WiFi / update / files
connect
Both standard norns and shield are capable of connecting to existing WiFi networks, or hosting their own as a hotspot.
shield has its own WiFi antenna built in (3B: 2.4Ghz, 3B+/4: 2.4Ghz and 5Ghz), thanks to its Raspberry Pi. Standard norns doesn’t have WiFi built in, so it comes with a 2.4GHz USB WiFi adapter – if you need replacements please see replacement parts.
connecting norns to a WiFi network
The first few minutes of this video walks through how to host a hotspot from norns and how to connect norns to a known WiFi network:
figure 1: WiFi + maiden access video
To connect norns to your local network router:
- navigate to SYSTEM > WIFI
- if hotspot is already enabled, select
OFFand press K3 to disable it
- if hotspot is already enabled, select
- select ADD and press K3
- choose your network from the list displayed
- enter the password
- E3 toggles between the character selector and the controls at the bottom of the screen
- when in the character selector, E2 scrolls character and K3 selects it
- both lowercase and uppercase letters are available, as network passwords are case-sensitive
- if you’ve made a mistake in entry, turn E3 to highlight the controls row, then turn E2 to highlight DEL and press K3 to delete the last character
- when your password is completely entered, turn E3 to highlight the controls row, then turn E2 to highlight OK, and press K3 to submit the password
- you should be assigned an IP address shortly after
After a network is added, norns remembers the credentials. Known networks are stored under CONNECT. You can remove known networks under DEL.
Having trouble with connectivity? Please see the WiFi section of our extended help docs.
hosting a hotspot from norns
If you do not have access to a router, you can also turn the norns into a WiFi hotspot. This will create a new network which you can then connect to with your computer.
Note: since a hotspot isn’t connected to the internet, you will not be able to download scripts via maiden
Navigate to SYSTEM > WIFI and select HOTSPOT. After a few seconds, norns will begin broadcasting a network. To connect to it from another device:
network name / SSID: norns
default password: nnnnnnnn
See change default password + address to change these two credentials for increased security.
update
Once norns is connected to a network, you can access system updates which fix bugs, add new features, and improve the overall experience.
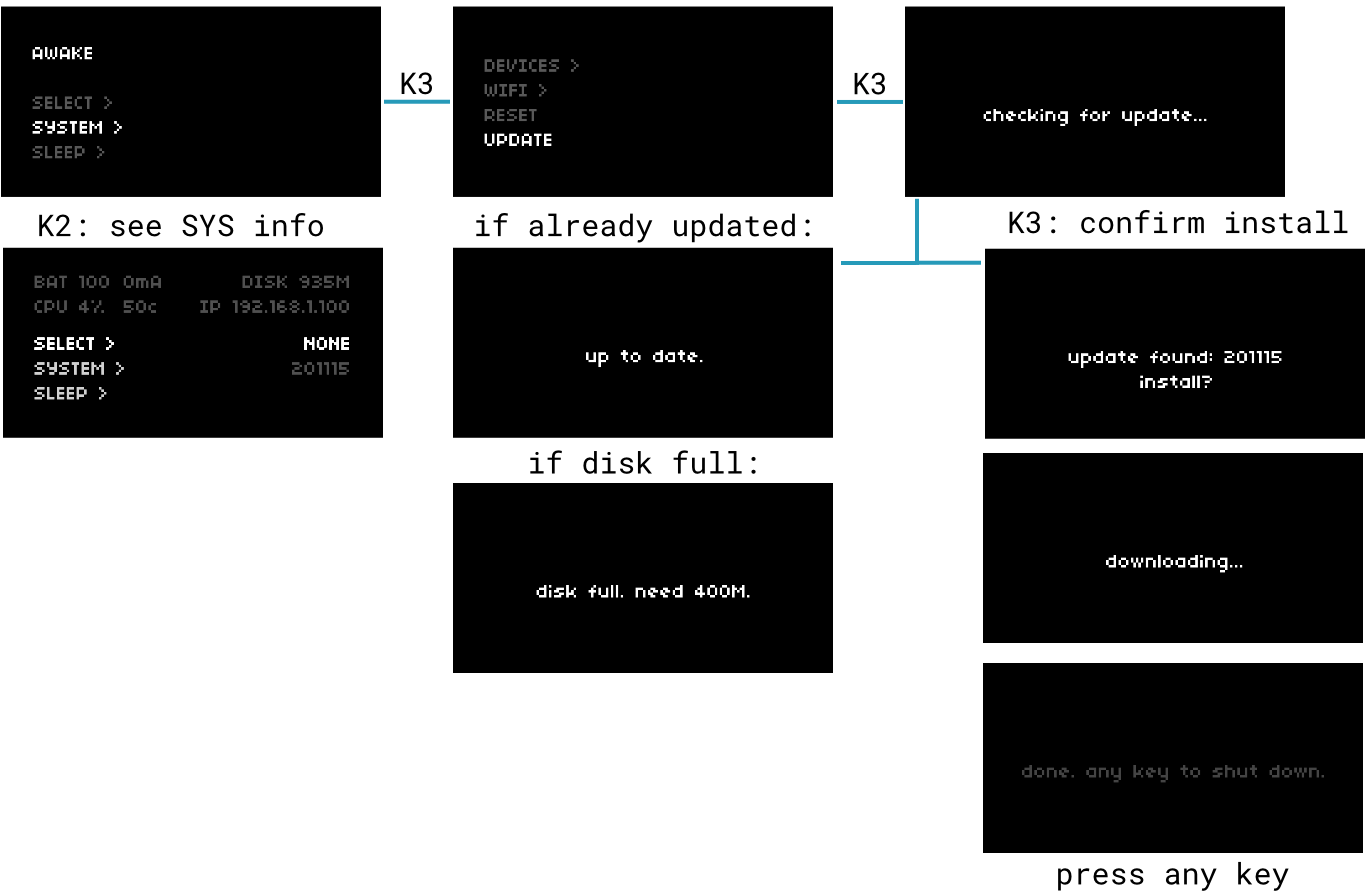
To check for and install updates:
- connect to a WiFi network (updates cannot be performed via norns-powered hotspot)
- navigate to SYSTEM > UPDATE and press K3
- norns will check for available updates
- nb. if this takes a while, confirm norns is connected to WiFi and/or perform a SYSTEM > RESTART
- if norns finds an update, press K3 to confirm installation
- after installation, press any key to safely shut norns down
To re-run an update, navigate to SYSTEM > UPDATE, then hold K1 and press K3.
running 220129 or earlier?
If your norns is running software version 220129 (January 29 2022) or earlier, you must reflash your norns to the latest disk image in order to use the SYSTEM > UPDATE menu action. While a bit of a hassle, this gives a consistent base operating system across all norns devices, and makes future updates and support much easier.
To see which version of the norns software you’re running, navigate to the SELECT / SYSTEM / SLEEP menu and hit K2 to toggle the informational display. Software version is listed on mid-right of your screen, under the currently-running script’s name.
If you are running anything earlier than 220306 (March 06 2022), be sure to perform a backup and follow the fresh install instructions instructions to get the necessary norns software installed on your device.
“disk full. need 400M.”
If you encounter this message while attempting to update, it means the amount of storage allocated to norns by the filesystem has less than 400 megabytes currently available.
If you’re using a high-capacity card/chip (eg. 32gb), this is likely the result of the filesystem not being expanded after a fresh install (eg. re-flashing the norns to overcome technical issues) or after the initial norns shield assembly (eg. the final expand steps). Either way, this is normal – norns can’t anticipate how much space it’s allowed to allocate for itself, so it retains a minimal installation size until directed otherwise. To expand the filesystem of a standard norns, follow step 7 of the ‘fresh install’ docs. To expand the filesystem of a shield, follow steps 1-8 here.
If filesystem expansion doesn’t resolve the issue (or if you know you have a lot of stored audio files), you’ll want to transfer files from norns to another computer. See the next section of these docs to learn how to mount norns as a networked drive.
transfer
In play, we loaded loops and recorded our own audio using the TAPE. All of the files that you interact with (audio, scripts, PSETs, etc), live inside a special folder in norns called dust.
Here’s the dust file tree:
dust/
  audio/          -- audio files
    tape/             -- tape recordings
    ...
  code/           -- contains scripts and engines
    awake/
    mlr/
    ...
    we/
  data/           -- contains user data created by scripts
    awake/            -- for example, pset data
dust management is best achieved via Samba, a protocol that allows you to directly connect your computer’s file browser to norns. If you haven’t already, please connect your norns and your computer to the same WiFi network.
connecting to norns via macOS
Open Finder and hit CMD/Apple-K or navigate to Go > Connect to Server.
In the top IP address bar, enter: smb://norns.local and click Connect:
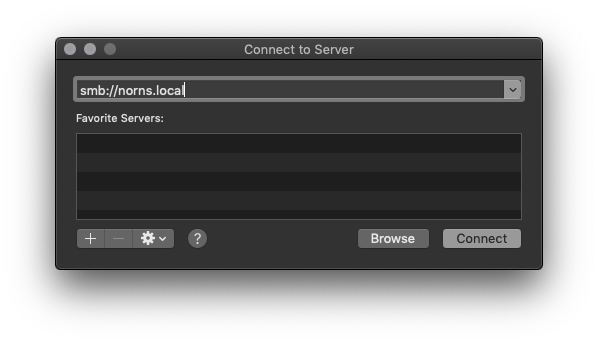 figure 3: Samba connect address
You may see an “Unsecured Connection” warning, but you can safely ignore it and click Connect.
Login as a Registered User with the following credentials:
- Name:
we - Password:
sleep
…and click Connect one last time!
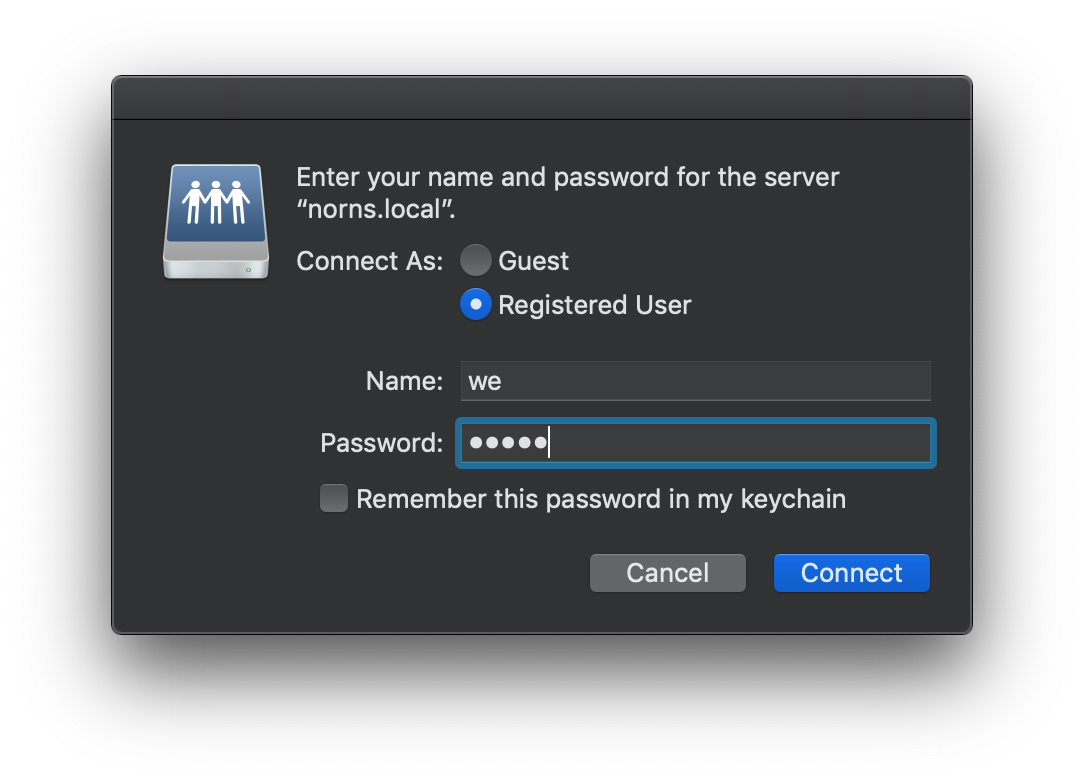 figure 4: Samba connect dialogue
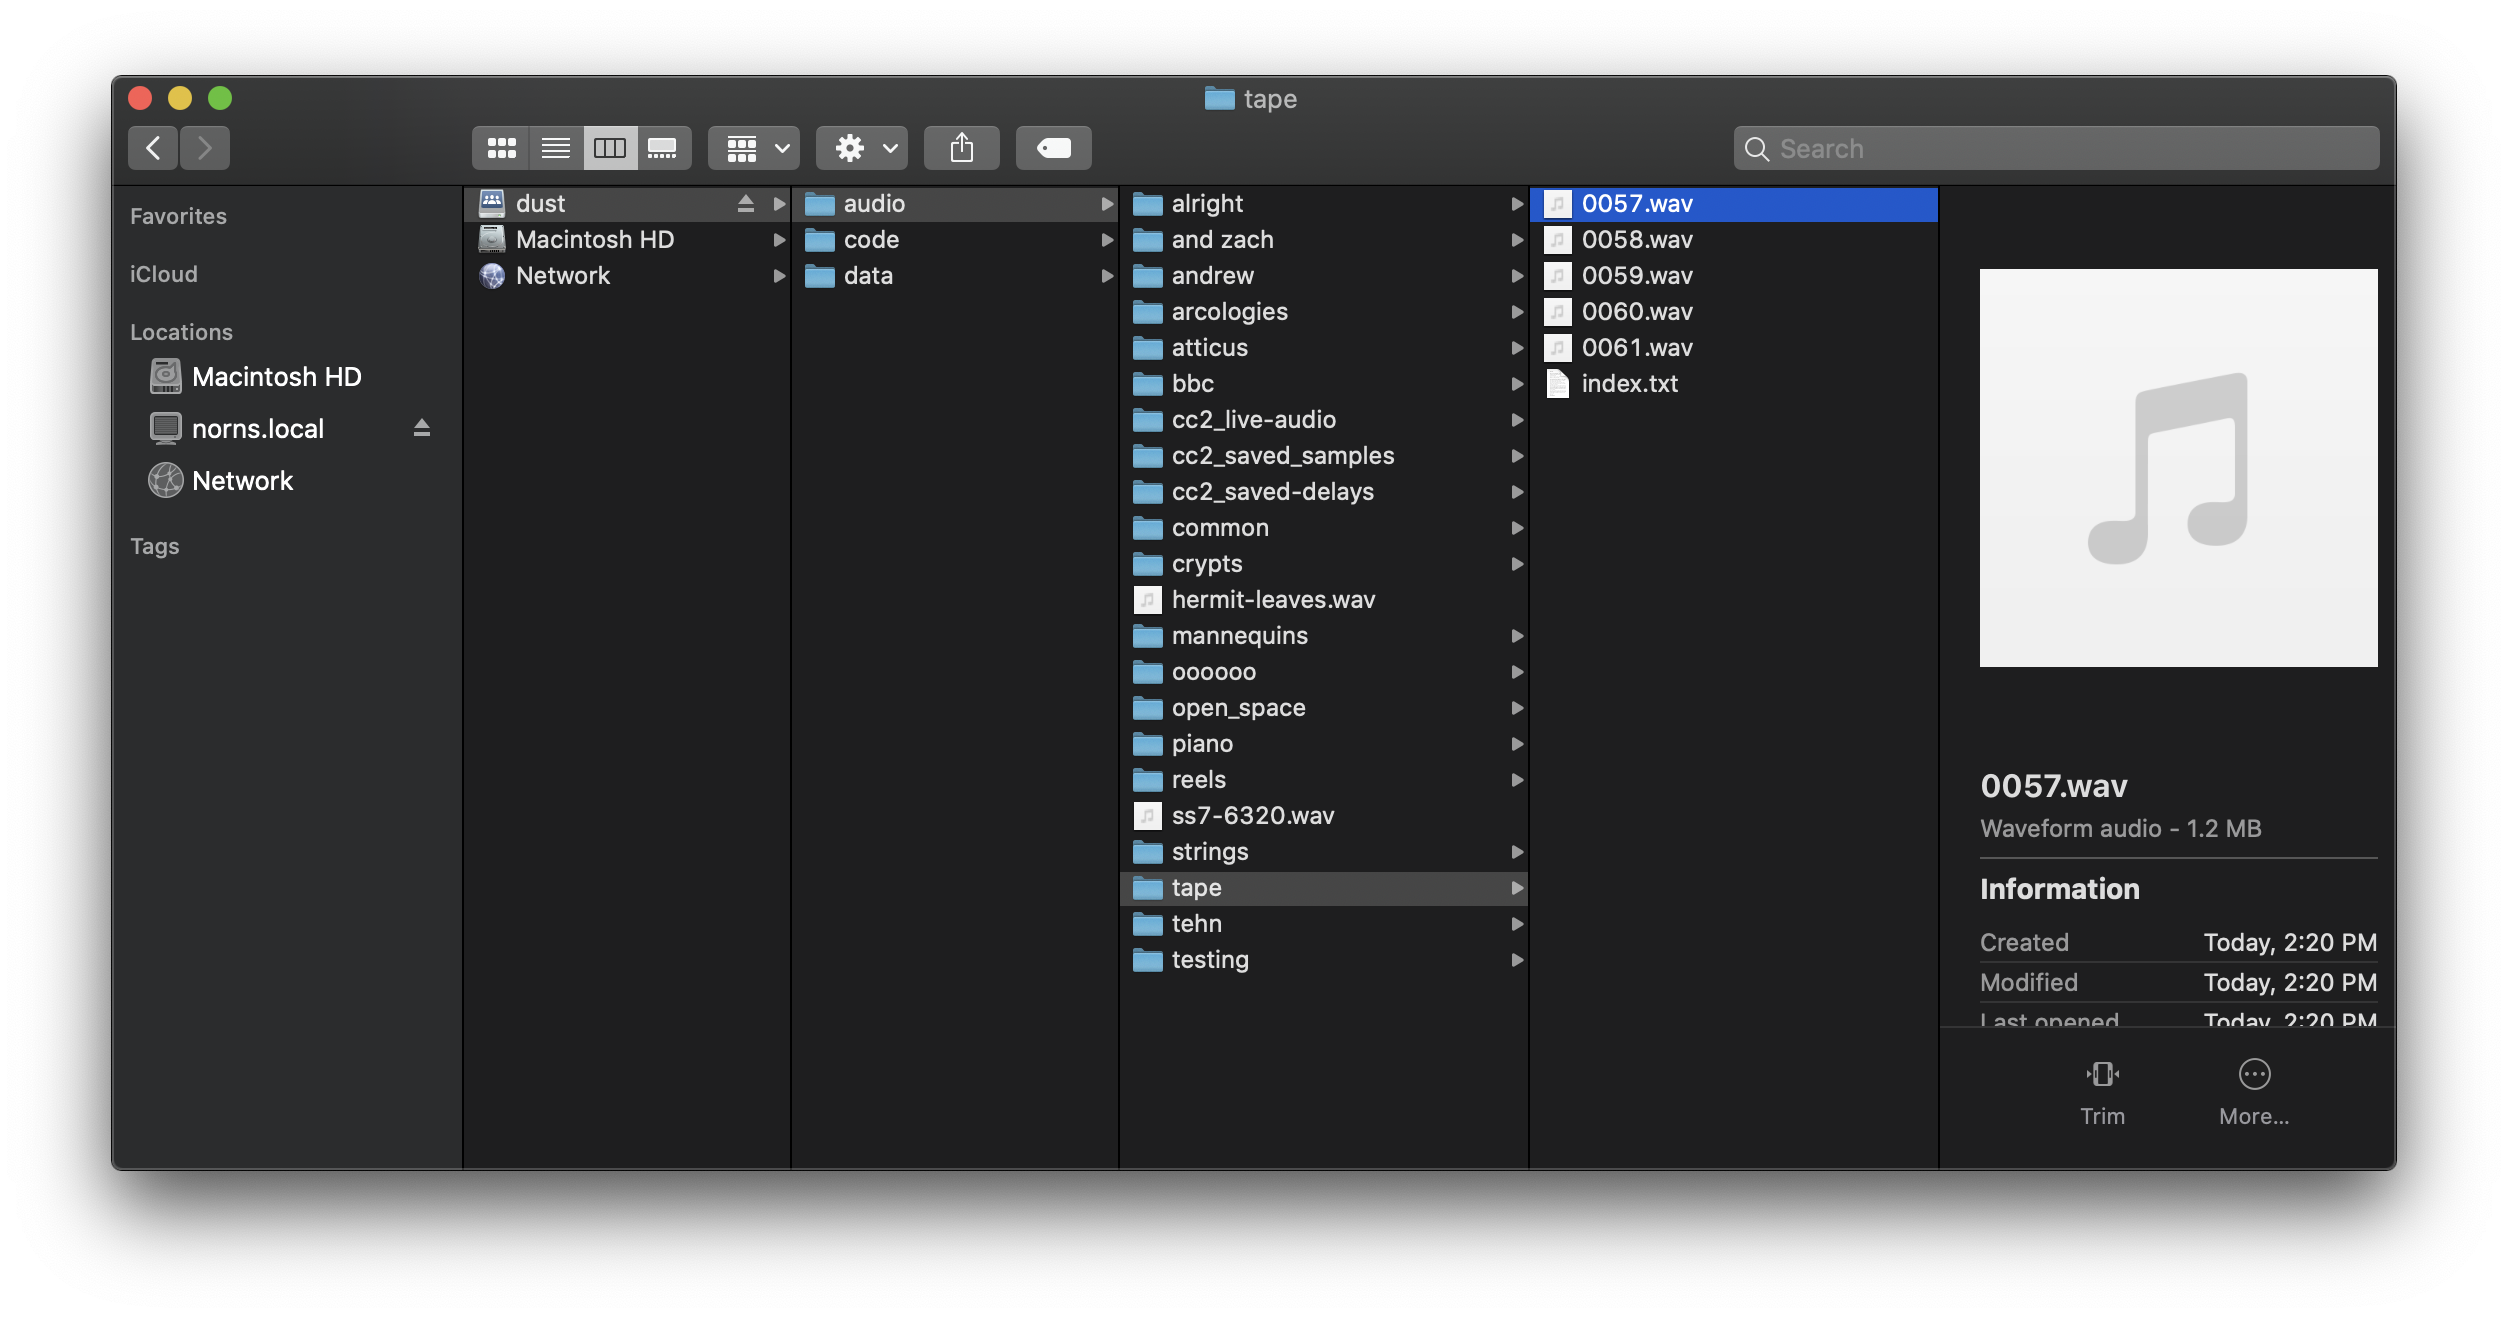
Once connected, you can freely navigate through files on norns:
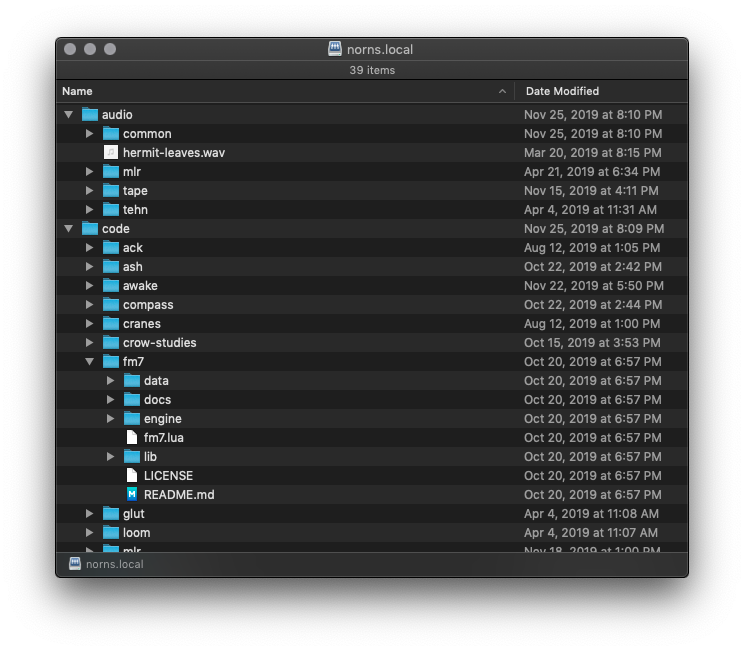 figure 5: norns as connected network drive
connecting to norns via Windows
To use Samba (also known as “SMB”) network sharing on Windows 10, navigate to Control Panel > Programs > Programs and Features > Turn Windows features on or off, and turn on the SMB features.
Then, reboot.
Using File Explorer, the norns.local file tree should be available at \\norns.local. If \\norns.local does not resolve, please try navigating to \\IP-ADDRESS-OF-YOUR-NORNS, eg. \\192.168.1.100.
Login as a Registered User with the following credentials:
- Name:
we - Password:
sleep
Samba alternatives
We prefer Samba because it mounts norns as a virtual flash drive, which makes file management feel familiar and approachable. However, if you have any trouble connecting to norns via Samba using the methods described above, you may be interested in accessing norns via SSH File Transfer Protocol (also known as “SFTP”).
For more info on establishing an STFP connection, visit the STFP section of the docs.
transferring audio to/from norns
You can use Samba to share audio files between norns and your computer. On norns, these files are stored under dust/audio – depending on which scripts you have installed, you may see many folders under audio or just a few.
Recordings made on norns will be stored under dust/audio/tape.
You’ll also find an index.txt file which logs the TAPE index – if you wish to reset the auto-generated counter, edit this file to start back at 0.
Feel free to make folders inside audio to store various samples, field recordings, single cycle waveforms, etc. Each of those folders can also store subfolders, but please note that you cannot nest more than ten folder layers.
norns records 48khz stereo WAV files – please only import uncompressed 48kHz files (bit-depth irrelevant).
backup
Backup is best done by hosting a hotspot from norns and connecting your destination computer to its network – this will greatly improve transfer speeds.
If you have edited any scripts to your own needs, or written any scripts of your own, please make sure you’ve copied those files to another computer or web repository.
If you have only downloaded scripts from others (or have already backed up your own scripts/modifications) and wish to retain audio files, script PSETs, midi mappings (PMAPs), etc, simply copy your entire audio and data folders, which live inside of dust, via Samba (as described above) or SFTP.
Restoring from this backup is as simple as copying the contents of the folders from your non-norns computer back to the /home/we/dust/audio and /home/we/dust/data directories on norns.
After you restore these files, we encourage downloading fresh copies of the community scripts you want to use.
note for norns shield users: on Windows + MacOS, the norns partition on your SD card is unfortunately not accessible by simply inserting it into an SD card reader. For the adventurous, here are steps to surface the ext4 filesystem: Windows and MacOS.
change default password + address
Since all norns units come configured with the same username + password, we encourage you to personalize + protect your setup by changing the default hostname and password for the we user.
via SETTINGS menu
In the norns SETTINGS menu, there’s a PASSWORD entry which will open up a text selector for you to enter a new password. This will be the password you use to connect to your norns via SSH, as well as your SMB (samba) + hotspot passwords. nb. this password must be between 8 to 63 characters in length – otherwise hotspot (which is WPA-PSK) will not work.
While you can simply reset this password again via this menu option, we encourage you to set it to something memorable so you don’t worry about troubleshooting connectivity in a critical moment.
hostname
To change the hostname for maiden access, log in to the norns via ssh and execute:
sudo raspi-config
This will lead you to the Raspberry Pi Software Configuration Tool, where you can follow these steps:
- press ENTER on
1 System Options - press ENTER on
S4 Hostname - press ENTER on
<ok>and type in a new hostname for your norns device (no need to type.local - navigate down to
Finishand press ENTER – if asked to reboot, please do - the unit will restart after a few seconds
Now, you’ll be able to use your new hostname for maiden access (what once was norns.local will now be your_unique_name.local!) and your new password for ssh access!
where to next?
Now that you know how to get connected to WiFi, your norns is up to date, and you’ve got some fresh new audio to mangle, let’s find some new community scripts through maiden!