play
sections
start
To begin, let’s get acquainted with the layouts of both iterations of norns – standard and shield:
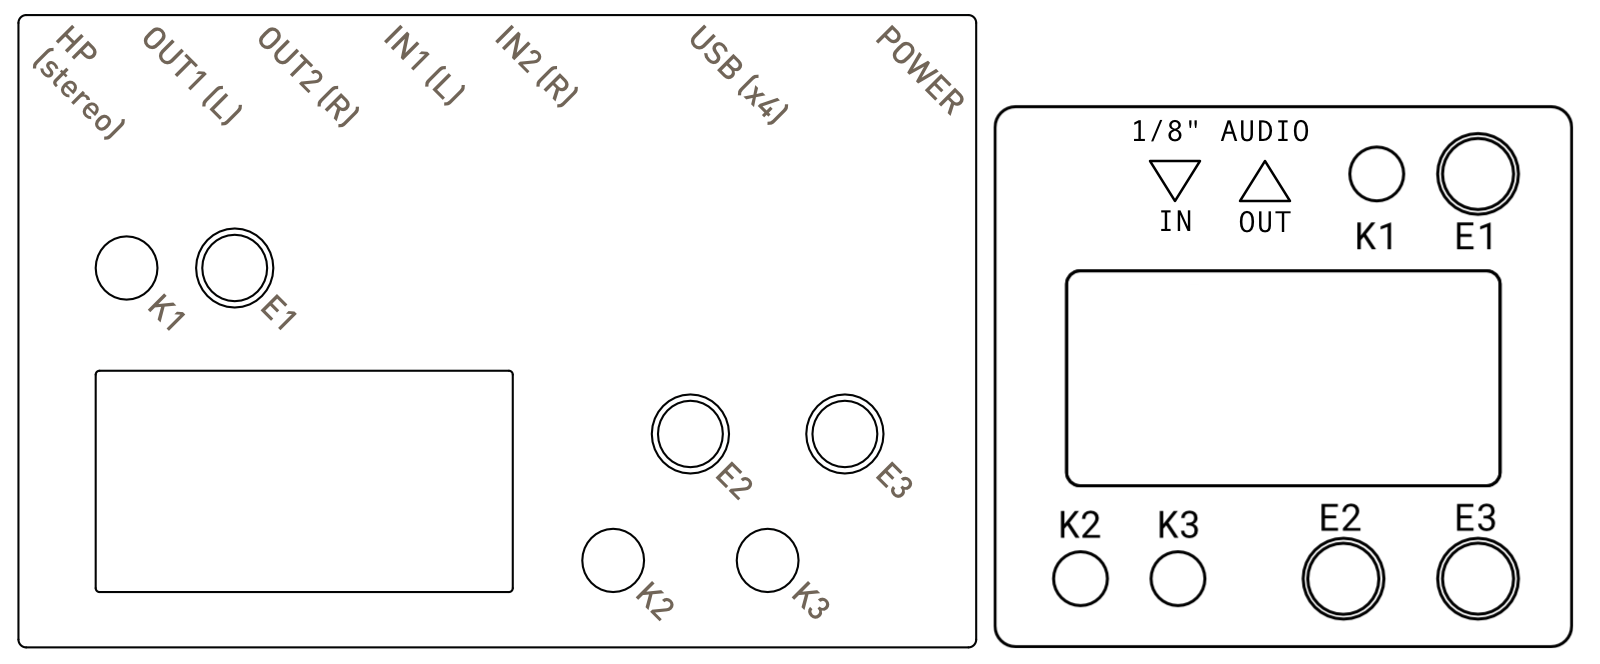
figure 1: standard norns and shield legend
Note for shield: the headphone jack on the Raspberry Pi itself is unused, as is the Pi’s HDMI port.
power on
standard
Note that the charger which comes with standard norns is rated for 2A / 5.25V. This brick is of very high quality and can use 110 or 240 VAC input, so it can be used outside of the US with a simple plug format adapter.
- Hold K1 for four seconds.
- Until you’ve performed this process a few times, it might help to look at the light next to the POWER jack. You’ll see it transition from white, to peach, to amber – you can let go of K1 at amber.
- In a few seconds, you’ll see a sparkle animation on the screen and you’ll hear a sinelike startup tone. norns is on.
shield
- Confirm that you’ve followed all of the steps in the norns shield assembly guide.
- Attach a high quality Raspberry Pi power supply that provides at least 2A at 5V to the power input on the Pi (Pi 3: micro-USB / Pi 4L USB-C)
- If using a power supply which has a detachable USB cable, make sure the cable is 24AWG or less. Lower AWG = lower noise & more stable voltage delivery for better performance.
- The red light on the Pi will be steady, while the not-red light will flash.
- In a few seconds, you’ll see a sparkle animation on the screen and you’ll hear a sinelike startup tone. norns is on.
After norns powers up, it will launch the last script that was loaded. On a fresh norns, this will be awake, a set of looping sequencers with delay.
power off
standard
- Press K1 and navigate to HOME.
- Use E2 to select SLEEP.
- Press K3. You’ll be asked to confirm.
- Press K3 again to go to SLEEP.
- After a few seconds, norns is off.
shield
- Press K1 and navigate to HOME.
- Use E2 to select SLEEP.
- Press K3. You’ll be asked to confirm.
- Press K3 again to go to SLEEP.
- Wait until you see the not-red light on the side of the Pi stop blinking and go out completely.
Only after the not-red light on the side of the Pi is no longer on can you safely remove the power connector from the Pi. If the not-red light is steady or blinking, do not disconnect power.
audio I/O
Referencing the layout image at the start of this section, our audio I/O options include:
norns standard
from left to right, looking at the top of the unit:
- 1/4” stereo (TRS) headphone output; copy of the main outs, with independent gain
- 2x 1/4” mono (TS) outputs; line level, left and right
- 2x 1/4” mono (TS) inputs; line level, left and right
norns shield
- 1/8” stereo (TRS) output
- 1/8” stereo (TRS) input
Note that neither norns standard or norns shield supports USB audio via their power ports. Also note that neither version has USB audio interface support baked-in, though advanced Linux users can feasibly re-route and adjust JACK via command-line interface.
core terminology
As you navigate these documents, you’ll encounter a few key phrases which have specific meaning in the norns ecosystem. To help ease the cognitive load, here’s some of the core terminology:
| term | definition |
|---|---|
| script | Analogous to a Game Boy cartridge, a script re-defines what norns is right now. When loaded, it takes over the main interface and translates button presses, encoder turns, grid button holds, incoming MIDI, etc into musical activity as defined by the script’s summary (eg. live sampling manipulator, no-input drone box, polyphasic sequencer, etc). Only one script can run at a time, though individual scripts can do many things at once. A script typically has two main components: a SuperCollider engine and Lua code. |
| SuperCollider | An open-source synthesis platform which creates sound in the norns system. |
| engine | SuperCollider code which defines the types of sounds that a currently running script will make. Some scripts bundle their own engines, while others might rely on engines from other scripts. Some scripts don’t use any SuperCollider engine at all – these most often use the built-in sampling layer (see softcut) or create streams of data (eg. MIDI) to be interpreted by other outboard gear. |
| softcut | A six-voice sampler bundled with the norns software, which can be addressed through live-code or scripting. Each of the six voices can programmatically record into and play back from either of two ~5 minute mono audio buffers. For examples of scripts which creatively explore softcut’s power, see: mlr, cheat codes, oooooo, and wrms. |
| Lua | A powerful, lightweight, and approachable language which is used to create the playable structure of every norns script. Lua glues together SuperCollider engines, incoming audio, grids, arcs, crows, MIDI, OSC, etc into an easy-to-use interface for performing artists. |
awake
Before we dive into exploring the system menus, lets play with the script that loaded when you turned on your norns and has been happily generating music as you read.
Here’s a quick guide to each of the modes in awake, which E1 switches between:
STEP
- E2 navigates position, E3 changes position
- K2 toggles the sequence to edit. K1+K2 clears all steps
- K3 morphs the current sequence. K1+K3 randomizes
LOOP
- E2 / E3 sets loop length
- K2 resets to play to zero
- K3 jumps to random position
SOUND
awake uses the PolyPerc SuperCollider engine to generate the synth tones. awake also uses softcut configured as a monophonic half-second delay. Both PolyPerc and softcut have a number of useful parameters to change the sound of what’s playing.
-
K2 / K3 changes parameters
-
E2 / E3 adjusts selected parameter
parameters:
cut: filter cutoff frequency. higher hertz/hz values reveal more of the engine’s timbral character.gain: filter gain. higher gain creates tonal focus at the cutoff frequency, further shaping the engine’s output. careful: high values can create unwanted self-oscillation.pw: pulse width. adds string-like timbres as the distance between waveform cycles widens or closes.rel: release. extend or shorten the length of a played tone.fb: feedback (for delay). control how much past material should remain in the delay buffer.rate: rate (for delay). with delays, duration and pitch are linked. if there is past material in the delay buffer, changing rate will change the pitch of the playback while adjusting the time it takes for the delay to loop.pan: panning (for engine). change the placement of the engine in the stereo field.delay_pan: panning (for delay). change the placement of the delay in the stereo field. it can be very fun to offset the delay panning from the engine panning.
OPTION
- E2 adjusts BPM
- K1+E2 change division
- E3 changes root note
- K1+E3 selects scale
Try plugging in a grid and you’ll gain a playable physical interface to manage the sequencer’s steps.
Most norns scripts rely on these types of interactions — re-definable encoders, two-button presses in the form of hold-one-press-the-other, turning an encoder while a modifier button is held, etc.
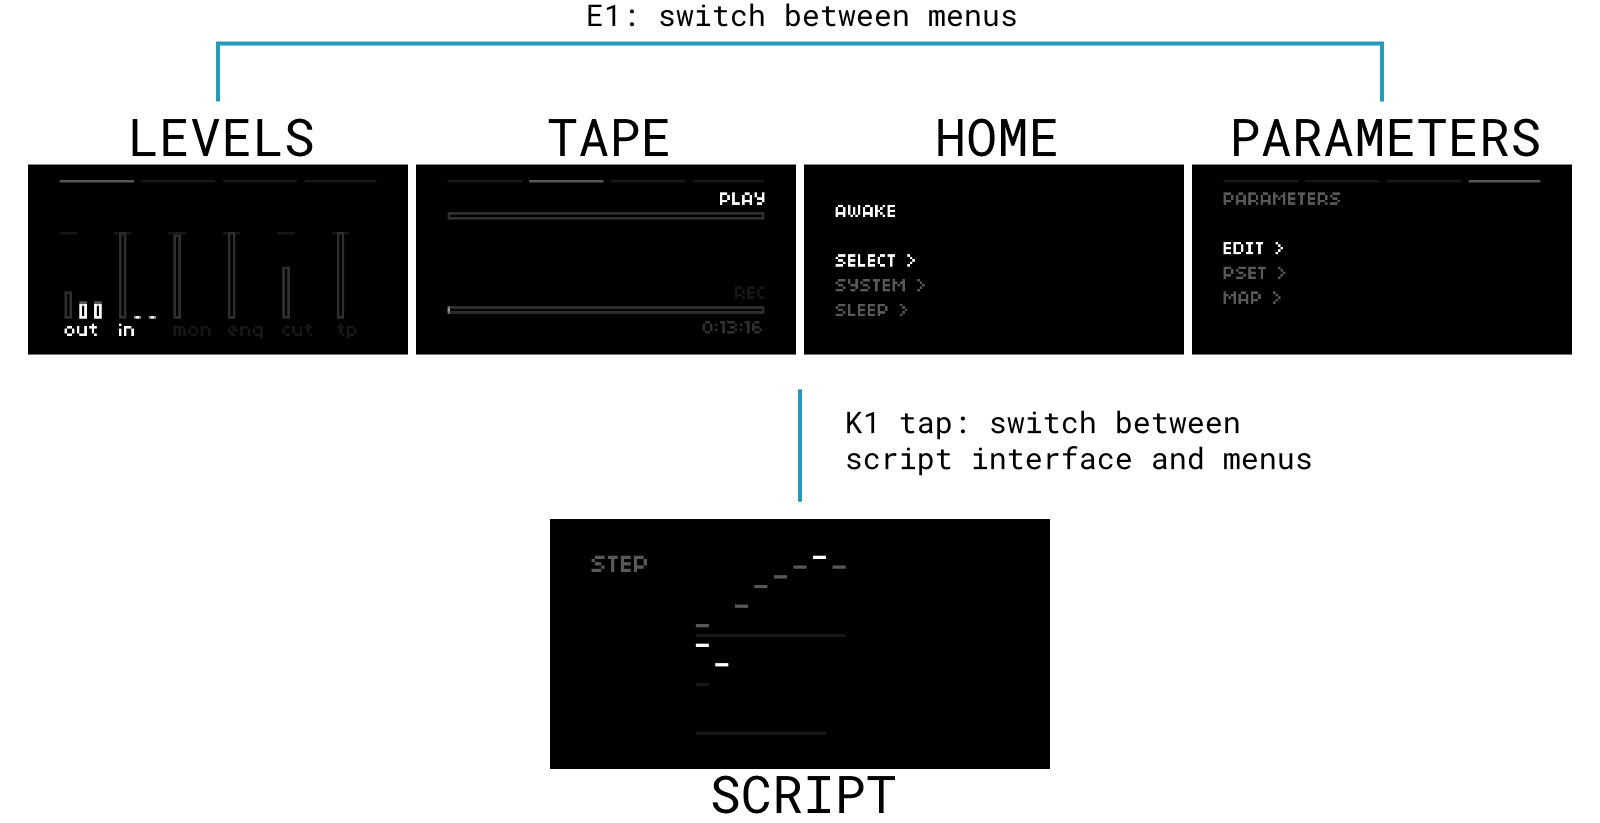
interface layers
There are two layers to the norns UI – a multi-page menu interface and a script’s playable interface. A quick tap of K1 is how you swap focus between these layers. In the diagram below, a quick K1 tap toggles between the multi-page menu layer (top row) and the current script’s playable interface (bottom image).
While you are inside of the playable interface, the encoders and keys perform script-specific actions.
Once you are in the menu interface, use E1 to switch between the different menus (LEVELS, TAPE, HOME, PARAMETERS). We’ll explore each of these menus in the rest of the docs!
LEVELS
DO NOT plug modular-level signals into norns (neither standard or shield) – norns is designed for line levels only.
To begin our menu dive, let’s adjust the audio levels.
Tap K1 to come up from the script layer to the menus layer and turn E1 counter-clockwise until you see pairs of vertical sliders.
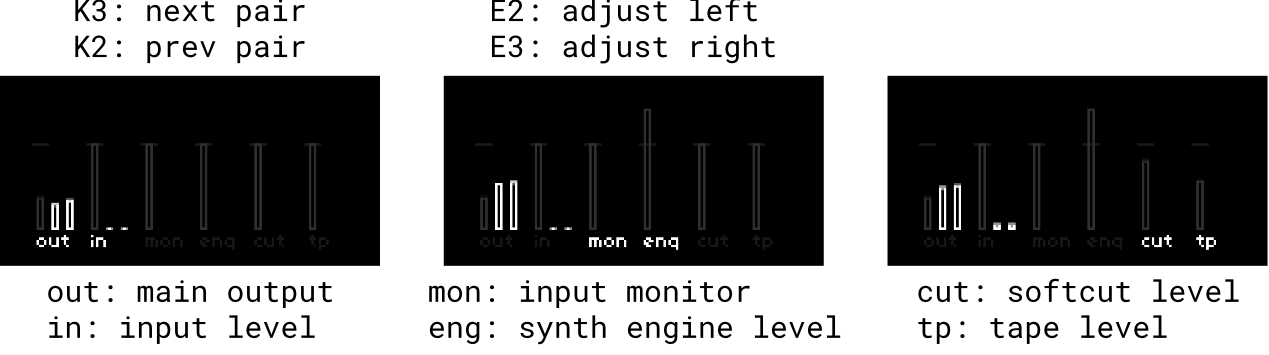
- K2 / K3: select previous pair / select next pair
- E2 / E3: adjust left level / adjust right level
The horizontal notch represents unity. All levels can go to +6dB.
- out
- controls the final output of the global mix
- in
- determines how much of an external input is fed into the script
- mon
- allows the input to be monitored as part of the global mix
- eng
- controls the output level of the script's synth engine
- cut
- determines the mix presence of softcut, a flexible sampling layer
- tp
- adjusts the level of a playing tape, which is fed into the global mix as well as softcut
For audio input/output hardware specs, see the extended help docs.
PARAMETERS
The PARAMETERS menu is where you’ll find helpful system controls as well as performance-centric settings for each script.
changing the sounds
Use E1 to navigate to PARAMETERS, and enter the EDIT menu with K3.
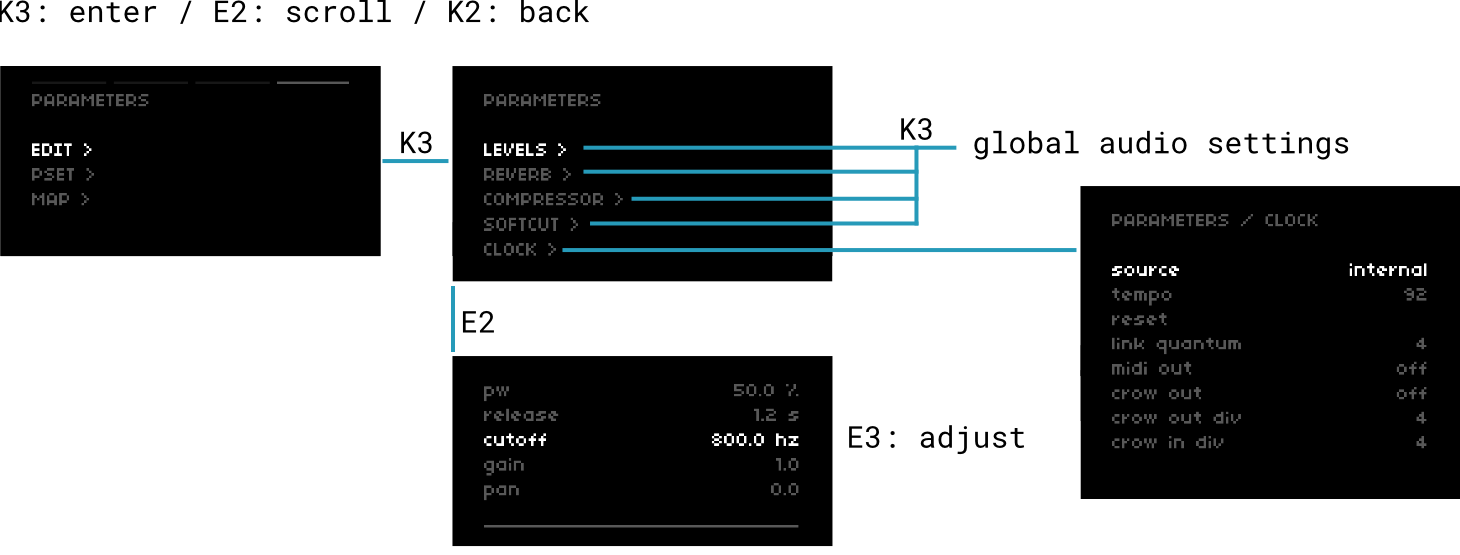
At the top of this menu are controls for each component of the global audio chain.
- LEVELS
- controls output, input, monitoring, engine, softcut and tape levels
- REVERB
- adjusts the system reverb and send levels for the currently loaded engine, softcut, monitor, and tape
- COMPRESSOR
- adjusts the system compressor, which is the final stage of the audio processing
- SOFTCUT
- adjusts the output and send levels for the six-voice system sampler
- CLOCK
- reveals controls for the norns global clock. The clock can be synced to a number of sources, including MIDI, Ableton Link, and crow. We'll dig into specifics about clock later, but it's good to know about!
Scrolling down further, we find some of the script’s parameters. These are chosen by the script’s author and can be adjusted by using E3.
To fine-adjust a parameter, hold K3 as you turn E3. If the parameter is linearly or exponentially scaled (eg. LEVELS > OUTPUT), this will adjust the value by 1/20th of its usual delta step.
saving parameter sets
To recall and build on the changes you’ve made in a future session, we can save a script’s parameter state as a PSET (ParameterSET).
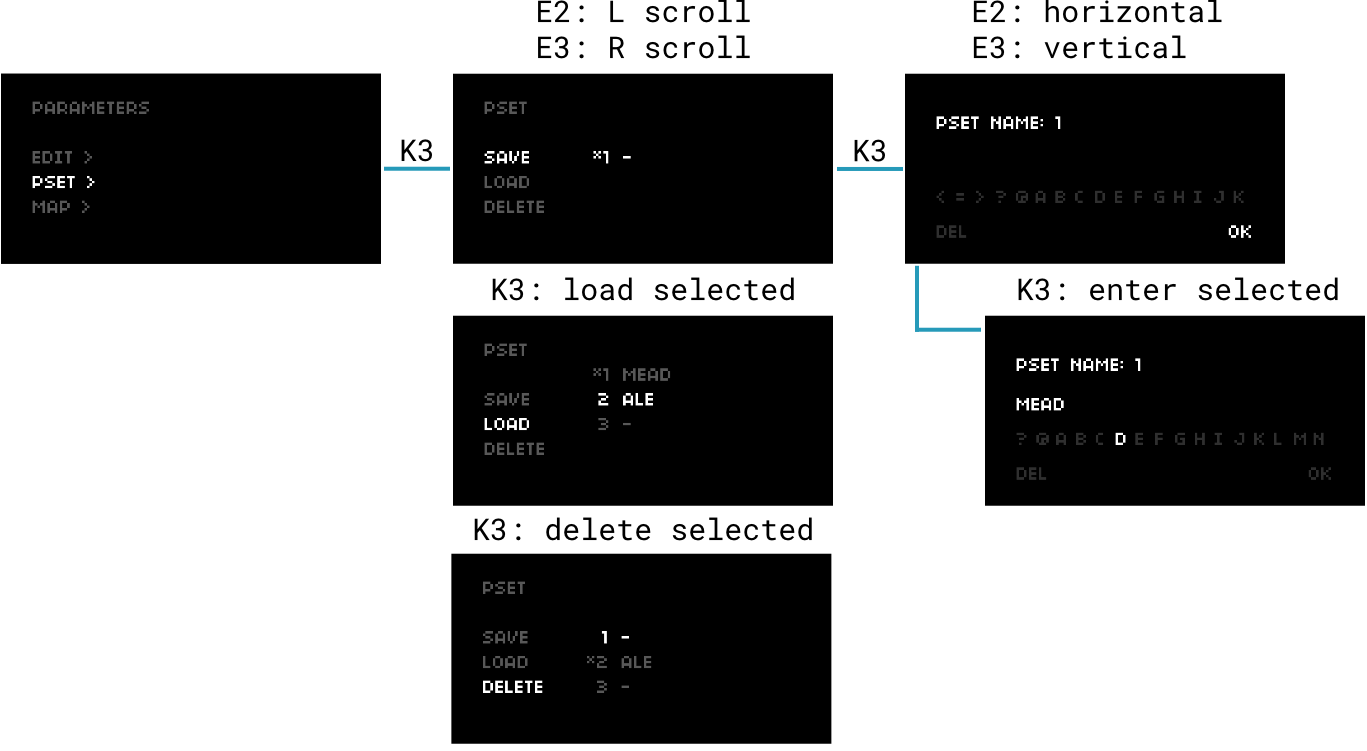
figure 5: saving parameter sets / PSET
Use E2 to navigate down the left column of the PSET screen.
Use E3 to navigate down the right.
The currently loaded PSET will have an asterisk * next to it.
save PSET
- select
SAVEand press K3 to open the naming dialogue - use E3 to switch to the alphabet and E2 to choose letters
- K3 enters the selected letter
- use E3 to navigate back to the controls (use E2 and K3 on
DELto delete a letter) - press K3 on
OKto save
load PSET
- select
LOADand use E3 to choose a saved PSET - press K3 to load the selected PSET
delete PSET
- select
DELETEand use E3 to choose a saved PSET - press K3 to delete the selected PSET
TAPE
norns has a built-in mechanism to play audio files underneath a script as well as record system audio, so you don’t need connect a separate recording device to capture your creations.
play
These changing melodies are lovely, but they’re a bit removed from the natural world. Let’s load a field recording of hermits to loop underneath.
Jump to the menus interface and use E1 to navigate to the tape screen.

select loop
- with the PLAY lane selected, press K3 to open the
audiofolder - the
audiofolder contains both folders and single clips- folders end with
/, without a duration - clips end with their filetype (eg.
.wav) and a duration - want to import more clips into your norns? see wifi + files.
- folders end with
- turn E3 clockwise to preview a highlighted file. turn E3 counter-clockwise to stop the preview.
- press K3 to load the clip
nb. PLAY expects 48khz files (both stereo and mono supported). WAV, AIFF, FLAC and other uncompressed header / sample formats supported by libsndfile will all work (including RAW).
loop enable / disable
- turn E3 clockwise to enable looping
- turn E3 counter-clockwise to disable looping
transport controls
- when a clip is loaded, its name will appear in the PLAY lane
- press K3 to START playback
- during playback, press K3 to PAUSE and RESUME playback
- press K2 and select
unloadto stop playback or presscancelto return
rec
This all sounds pretty nice – perhaps you’d like to record it?
On the tape screen, press K2 to switch between the PLAY and REC lanes.

record
- with the REC lane selected, press K3 to open the naming dialogue
- name your tape, or feel free to use the pre-populated counter
- see figure 5 for tips on navigating the naming dialogue
- when you arrive back at the tape menu, press K3 to record
- during recording, press K3 to PAUSE and RESUME the recording
REC creates 48khz stereo WAV files and stores them under we/dust/audio/tape
stop recording
- with the REC lane selected, press K2 to open the stop dialog
- choose
unloadto stop the recording and save the file - choose
cancelto return to the tape screen without stopping
- choose
- the tape will be saved as a stereo 48khz .wav file with the name you gave it
deleting, exporting, and importing files
To manage TAPE and audio files on norns, see wifi + files.
what gets recorded exactly?
In the simplest terms, everything you hear from the main output is committed to a recording tape. This includes the system reverb, compressor, monitor audio, as well as any tape that might be playing. If you are recording for further processing in a DAW, you may want to turn off the system reverb and compressor for a more barebones sound.
HOME
The HOME menu holds waypoints for essential norns interactions, including selecting a new script, managing system settings, and safely shutting the device down.
system status
While on the HOME menu, press K2 to toggle helpful system status information:
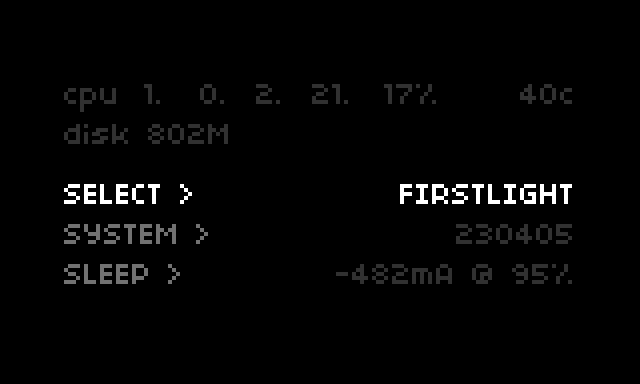 figure 8: toggling system status information
The first four cpu readings show the state of each of the processor’s four cores, followed by an average CPU load.
Occasionally, you may see !!! next to the CPU average. This indicates that the audio system has detected the occurrence of xruns. This indicator is normal during script switching, when SuperCollider engines are being swapped out. If the indicator is present during a script’s run, it likely corresponds to audio glitching due to CPU overload.
The disk reading shows the storage available, in megabytes.
Underneath the script’s name (or NONE if no script is running), you’ll see the software version currently running on your norns. In the screenshot above, we’re running 230405, formatted as YYMMDD. See the update docs for more information.
The current state of the battery is shown in the bottom right corner:
- if the
mAreading is negative, this means power is being drawn- if you ever see a consistently negative reading while plugged into wall power, then the draw on the built-in USB hub is likely too high and you should use an externallty-powered hub
- if the
mAreading is positive, this means power is being supplied and the battery is charging up - on wall power, as the battery gets closer and closer to 100%, you may see the positive
mAbegin to reduce – this is normal / expected, as norns is ‘trickling’ charge in - at 100% battery, you’ll likely see
0mA, since norns does not need to draw any more power to charge the battery – this is a safety against overcharging and degrading your battery, so that if you leave your norns plugged into wall power for months, you’ll still have a working battery when you detach
‘Normal’ battery draw is difficult to define, as it depends on the script being used and the hardware connected to norns. Generally, though, a draining battery will display ~-400mA without any additional hardware connected. A charging battery will display 400mA - 600mA.
SELECT
Navigate to the HOME menu, then press K3 on SELECT:
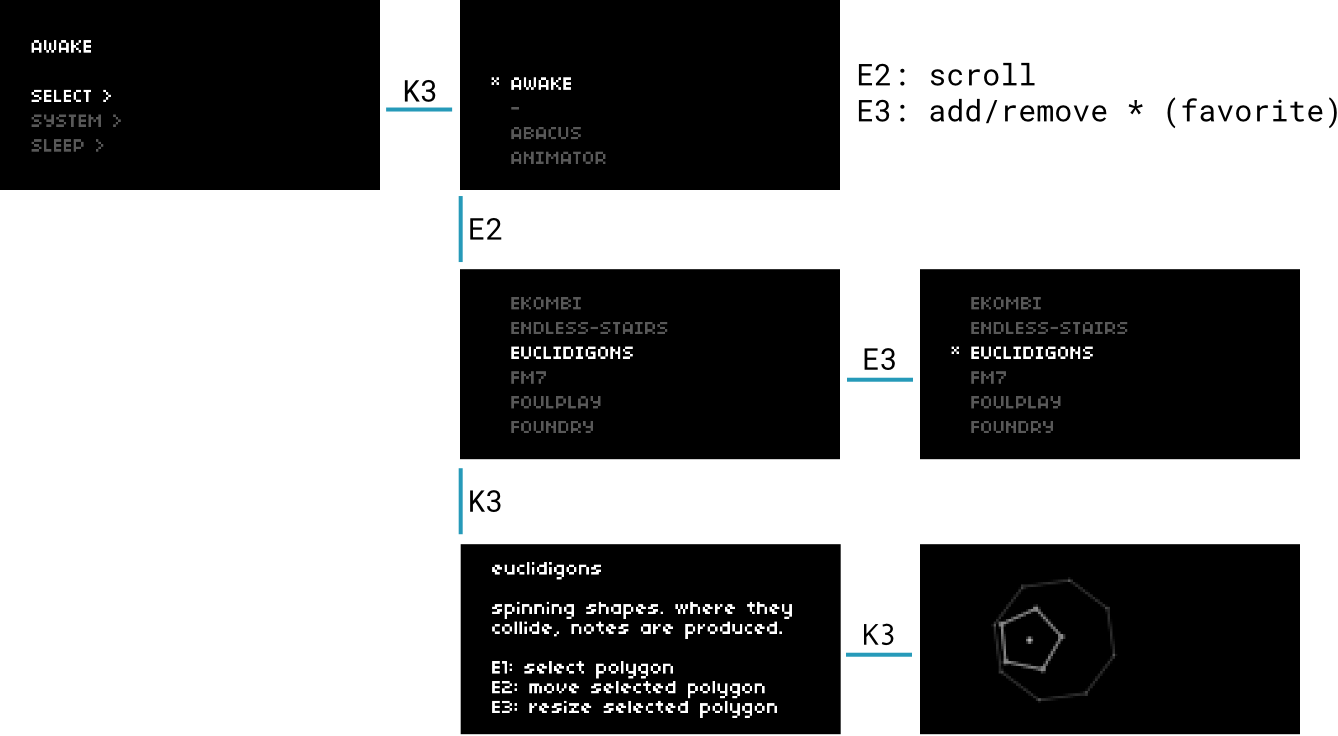
- use E2 to scroll through installed scripts
- press K3 to open a description of the selected script
- press K3 again to load the selected script
- press K2 to return to the SELECT menu
A fresh norns installation comes with two foundational scripts: awake, which we’ve covered earlier in these docs, and first light, a fantastic starting point for those curious about how norns scripts work from a code perspective. If you’d like to jump into any of the community scripts available for norns, be sure to connect to wifi and access maiden (the norns project manager)!
favorites
When you entered the SELECT menu, you might’ve noticed an asterisk next to awake – this signifies a favorite script, which places it at the top of the scroll. This makes it easy to quickly access your go-to’s!
To add a favorite, turn E3 clockwise on any script in the SELECT menu.
To remove a favorite, turn E3 counter-clockwise on any already-favorited script.
clear script
To clear the script running on norns:
- navigate to the HOME menu
- if SELECT is not highlighted, use E2 to highlight it
- hold K1 on SELECT and you’ll see
CLEAR - while holding K1, press K3 to clear the currently-running script
- release K1 and you’ll see
NONEwhere the previously-running script’s name used to be
SYSTEM
Navigate to the HOME menu, then press K3 on SYSTEM:
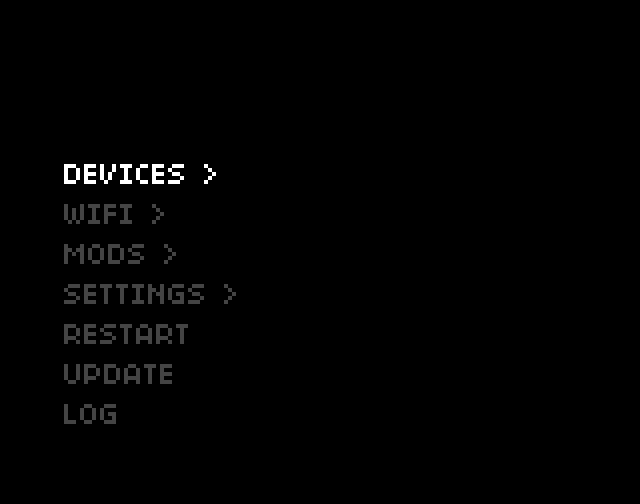
figure 9: the norns SYSTEM menu
The SYSTEM menu contains a number of helpful entries:
DEVICESallows you to manage all your connected devices (MIDI, grid, arc, and HID). See control + clock for more info.WIFImanages network connectivity, including hotspot mode, wireless access, and ethernet. See WiFi / update / files for more info.MODSare small chunks of code to create custom modifications to the core workings of the norns system software. See mods for more info.SETTINGSallows you to:RESETyour norns back to its default settings, erasing your favorites, disabling all mods, and restoring global audio levels to their defaults.- change your
PASSWORDfor SSH, SMB, and hotspot - tune the
DISPLAYbrightness, contrast, and gamma - toggle the on-screen
BATTERY WARNINGon and off
RESTARTwill restart the unit without erasing any settingsUPDATEwill perform a system update, if you’re connected to WiFi.LOGwill export any messages and errors initiated by matron (the Lua layer), SuperCollider, and the general Linux system. If something isn’t performing as expected, this mechanism is the most helpful tool for diagnosing trouble. See the logs section of the maiden docs for more info.
DISPLAY
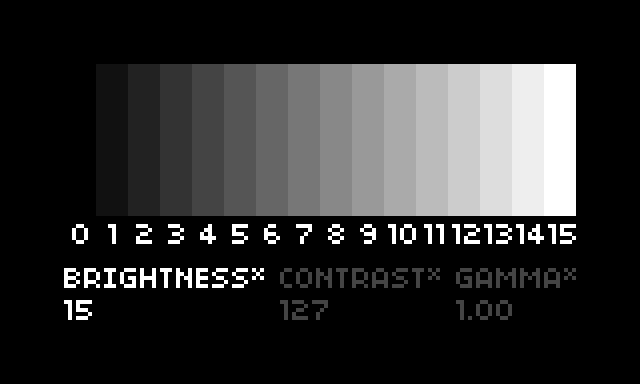
figure 10: the norns DISPLAY menu
This menu allows you to fine-tune the norns display, offering adjustments for:
- BRIGHTNESS: 0 to 15, default 15
- CONTRAST: 0 to 255, default 127
- GAMMA: 1.00 to 30.00, default 1.0
Any adjustment will create and update a system.display file under dust/data. This file can be safely deleted to quickly restore defaults upon RESTART.
SLEEP
To safely shut down norns, navigate to the HOME menu and press K3 on SLEEP. You’ll be asked to confirm the selection by pressing K3 again. See power off for more details.
where to next?
Now that you know the basics of navigating the system, adjusting a script’s parameters, and recording the results, you might want to explore the community scripts available for norns.
But first, we’ll need to connect to WiFi in order to get norns up to date, transfer TAPE files, and download new community scripts. Please read on to WiFi / update / files!