Kria (Ansible + Grid)
Kria is an app for the Ansible Eurorack module that uses the Grid to program a four-track step sequencer. This is an updated version of Kria which began as a White Whale alt-firmware. While some functionality has changed, a general overview could be understood by viewing the alt-WW Kria tutorial video. There is also a MIDI Kria implementation for Norns. The mode LED will show orange whilst Kria is running.
sections
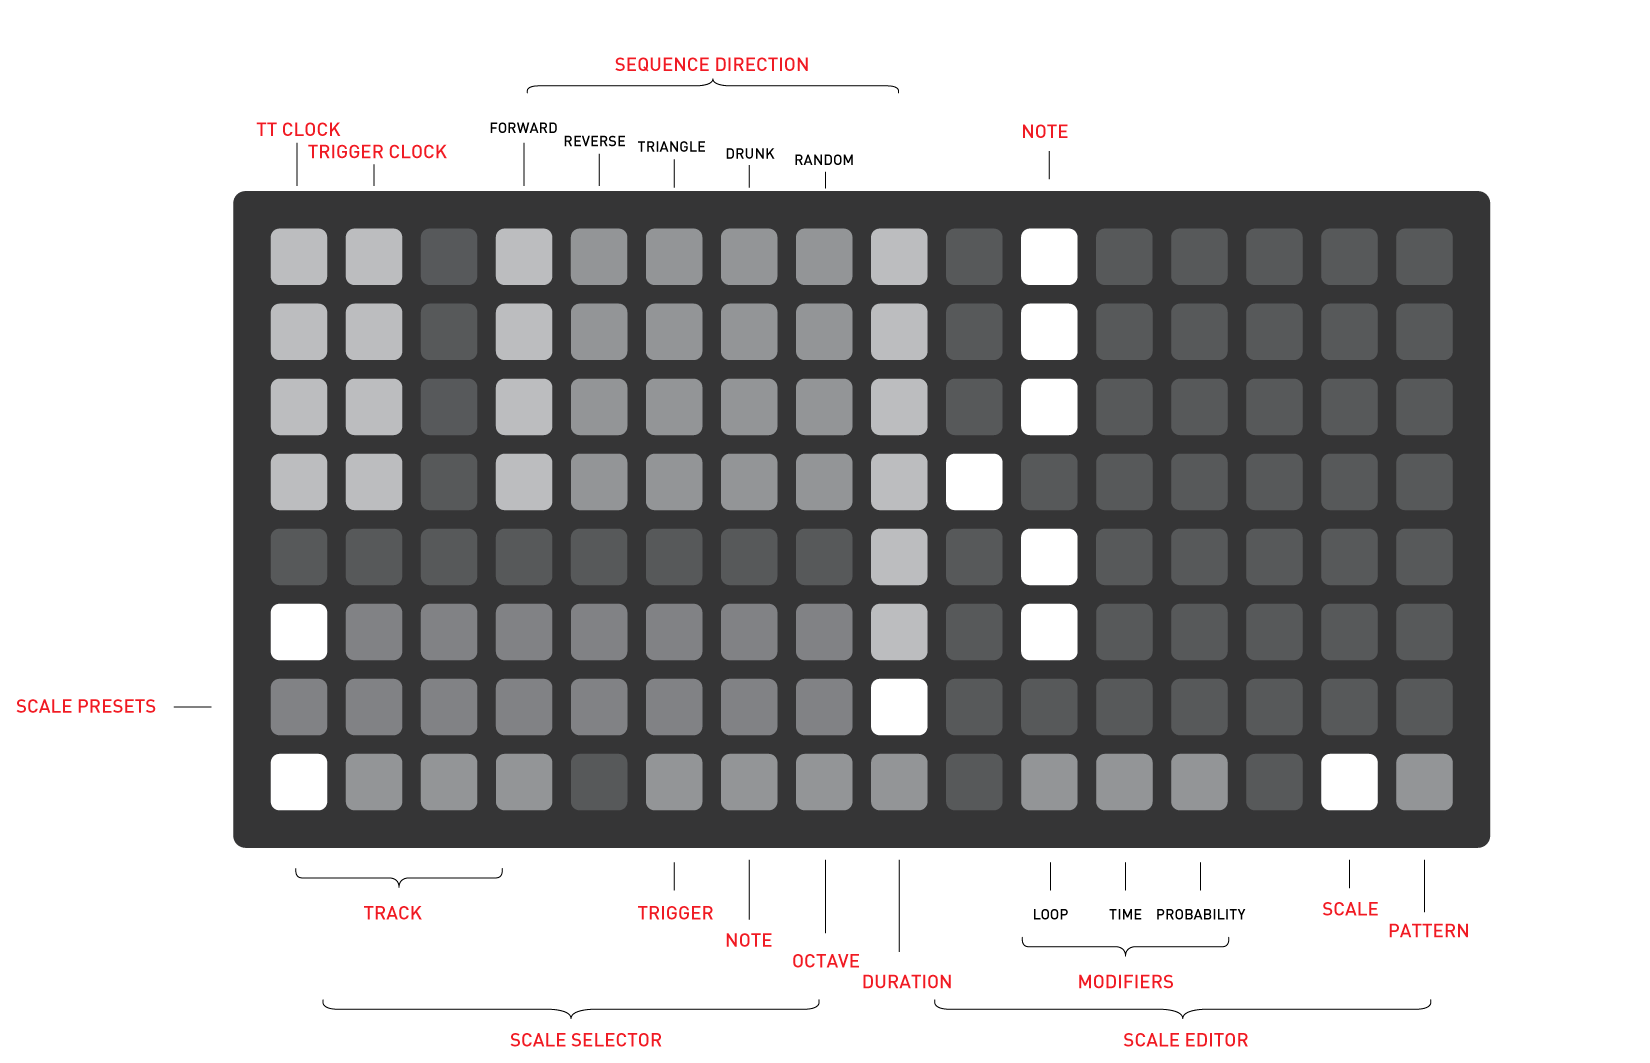
Interface
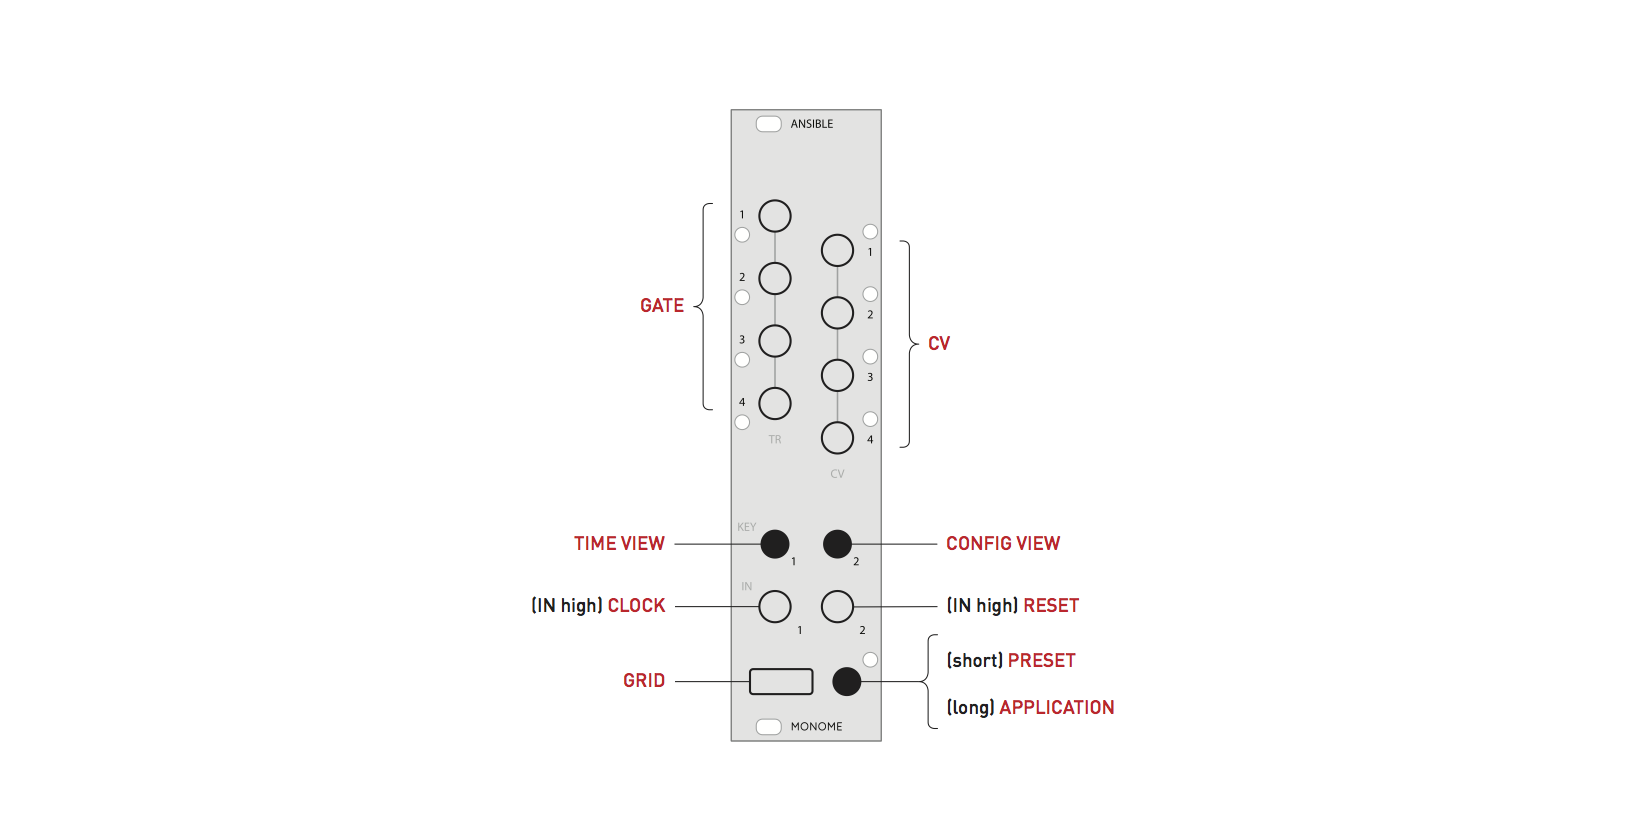
Key 1: Time View-
Key 2: Config View In 1: Clock (rising edge)In 2: Reset (rising edge)
Basic
Four tracks of sequencers. Each track outputs to its respective CV/TR pair as pitch and gate.
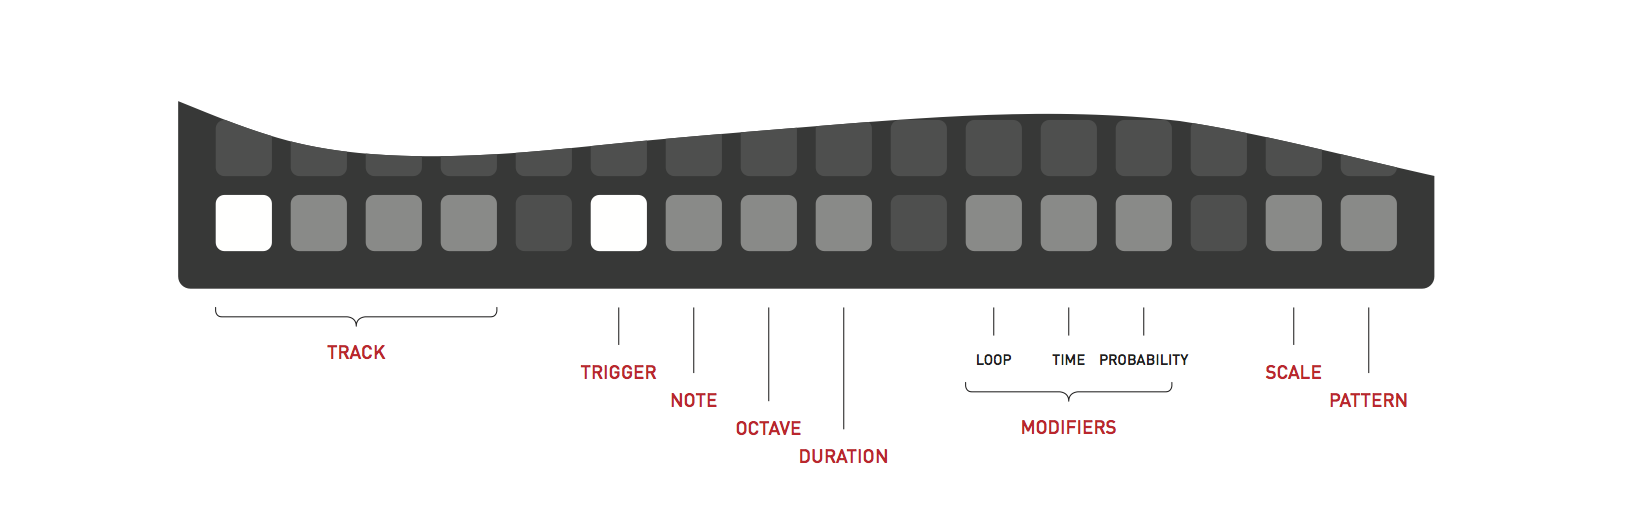
The main grid view uses the bottom row for navigation, which are dimly lit into blocks and highlight the current setting:
- 1-4: Track
- 6-9: Trigger, Note, Octave, Duration
- 11-13: MODIFIERS: Loop, Time, Probability
- 15: Scale
- 16: Pattern
Parameters
Each track has four parameters Trigger, Note, Octave, and Duration. These parameters work together to form the sequence loop.
Select a parameter to adjust by pressing its key in the bottom row of the grid (keys 6-9).
A note will occur only when a trigger is set. This note will be the pitch specified by note in octave of a specified duration. The first 6 keys on the top row of the octave page allow setting the base frequency of a track between +0 and +5 octaves.
The trigger view shows all four tracks at once, whereas all other parameter views display the track selected.
The duration view has downward sliders (lower is longer) and a master duration multiplier at the top. Duration is relative to the clock: when duration is set to max, the pulsewidth of the gate is entirely based on the current clock. This lets you create tied notes.
Extended parameters
Many of the parameter views have “sub-pages” that extend or augment their functionality. To enter into each sub-page, switch to the parameter using keys 6-9, then tap the parameter key again. When you are in the sub-page for a parameter, its parameter key will be blinking. Press the parameter again to return to the main parameter view.
| Parameter | Extended Parameter |
|---|---|
| Trigger | Trigger Ratcheting |
| Note | “Alternate Note” |
| Octave | Glide |
| Duration | none |
Just like the primary parameter pages, each of the extended parameter subpages have their own probability, clock division and loop controls. This allows for some very complex phrasing to be built.
Modifiers
The sequencing of each parameter can also be altered using one or more modifiers. The modifiers correspond to keys 11-13 on the bottom row and are, in order, LOOP MOD, TIME MOD, and PROBABILITY MOD. You adjust a modifier for a particular parameter by holding the mod key, which causes a different UI view to appear.
The LOOP modifier lets you adjust the endpoints of the sequence loop for a given parameter. With the loop mod key held, the current loop selection is highlighted. You can move the start point of the loop by tapping any column (outside the bottom row). To change both endpoints of the loop, hold the loop mod key, hold the new start point, then hold the new end point. The loop may wrap around the edges of the grid if you tap an end point further to the left than the start point. By default, all parameters and all tracks share the same loop endpoints and are updated whenever you change the loop for any parameter. You can allow tracks or parameters to have independent loops by configuring the sync settings on the config page.
The TIME modifier lets each parameter update on a different clock divider. With the time mod key held, the top row is highlighted to let you select a clock division between 1 at the left and 16 at the right. You may wish to have parameters within a track share clock dividers, or quantize changes to the clock division to occur only at the end of the current loop - these settings can be configured on the time page.
The PROBABILITY modifier lets you program the probability of taking no action for a sequence step of a particular parameter. With the probability mod key held, the 4 center rows of each column of the grid act as a fader controlling the probability that the parameter will change to its next programmed value when the step is reached. The default is that reaching the step will update the parameter 100% of the time, you can set individual steps to occur with 50% probability, 25% probability, or 0% probability.
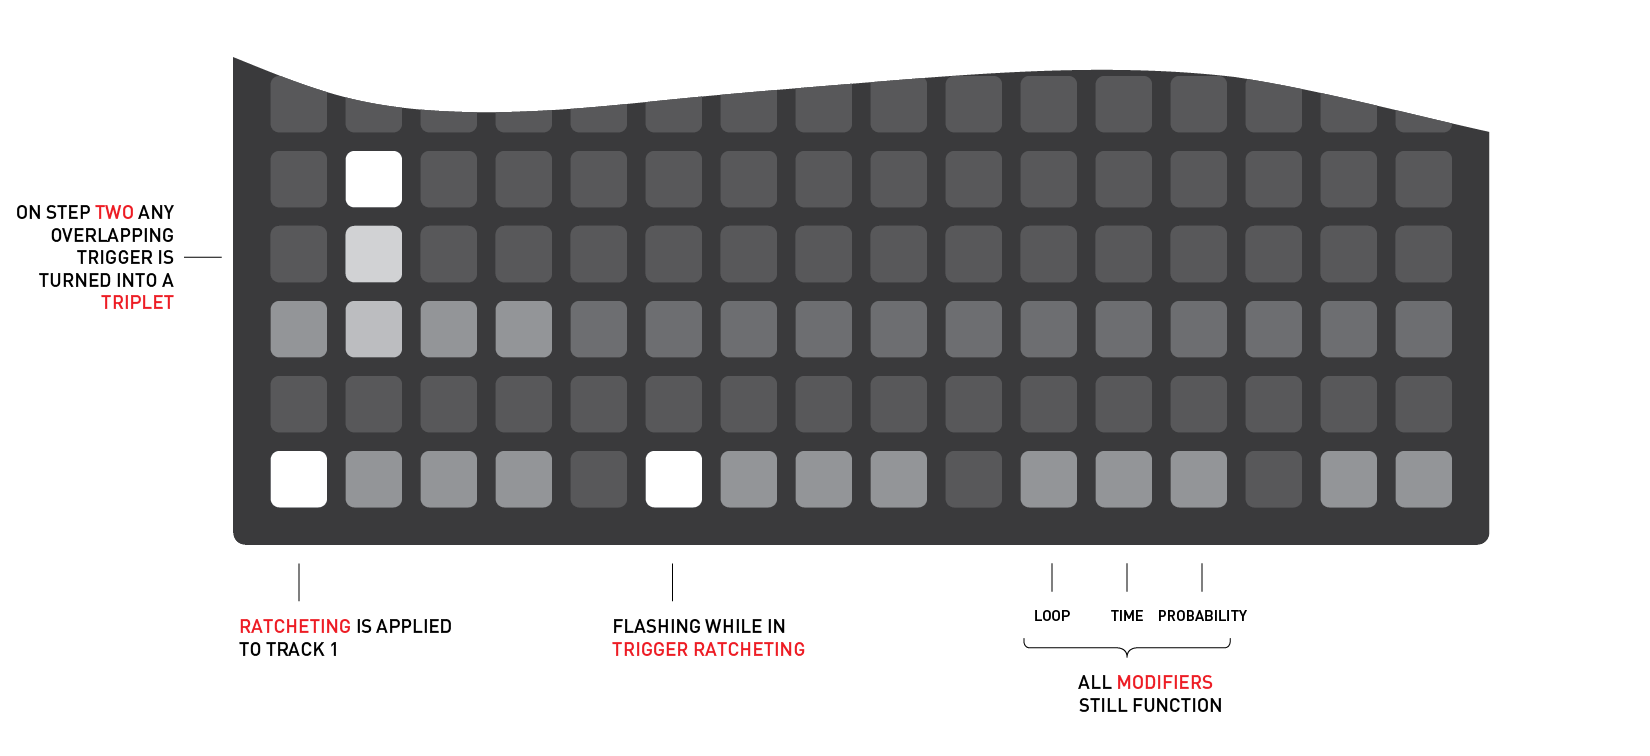
Trigger Ratcheting
Trigger ratcheting allows multiple, regularly-spaced gates to be emitted for a single trigger in the grid.
To enter the ratcheting page, press the trigger parameter key a second time when you are in the trigger view. The trigger parameter key will blink.
Ratcheting uses rows 2-6 to determine the number of sub-triggers that will fire for each trigger column. Pressing a key in these rows will enable an additional trigger on that step. You can toggle rows back off to turn them into rests, which are highlighted more dimly. Rows 1 and 7 are up/down switches to dial in the number of subdivisions, so you can include rests at the end of the step as well as in the middle or beginning. This allows programming a variety of syncopated patterns by subdividing each note and selecting only the triggers you want active. If you long-press a key in row 7 (at the bottom, just above the track/parameter selection row), the corresponding step will be cleared, going back to the default behavior of a single active trigger for the step with no subdivisions. If you long-press the top row, the selected range of subdivisions will be “filled” with triggers.
Alternate Note
Alternate note effectively allows a second note sequence to be specified for a track.
To enter the alternate note page, press the note parameter key a second time when you are in the note view. The note parameter key will blink.
The alternate note parameter screen is functionally identical to the main note screen, with its own probability, clock, division, and loop.
Both note pages - main and alternate - are additive. When a note from each screen is played simultaneously, the indices of the keys within the scale are added together, and then mapped to the current scale.
For example: if a note from each page is triggered and both are in the bottom row of the scale - “note 0” - then the CV output is for 0 + 0 = 0, ie, note zero, the root of the scale. If the current main note is the 4th key up (index 3 of the scale) and the alt-note is the 3rd key up (index 2). This step in the sequence will output 3+2 = 5 index 5 of the scale, ie, the 6th note.
Note that if the combined index is above 6, the final index will be index modulo 6. Or, in less mathematical terms, it will ‘wrap around’ to the bottom of the scale again: if the main note is the note 5 (index 4) and the alternate note is note 6 (index 5), the final index would not be 4+5 = 9 but (4+5) % 6 = 3 - index 3, or the fourth note of the scale.
The possibilities for alternate note become particularly interesting if you alter its probability or clock division, or if its loop points take it out of phase with the main note.
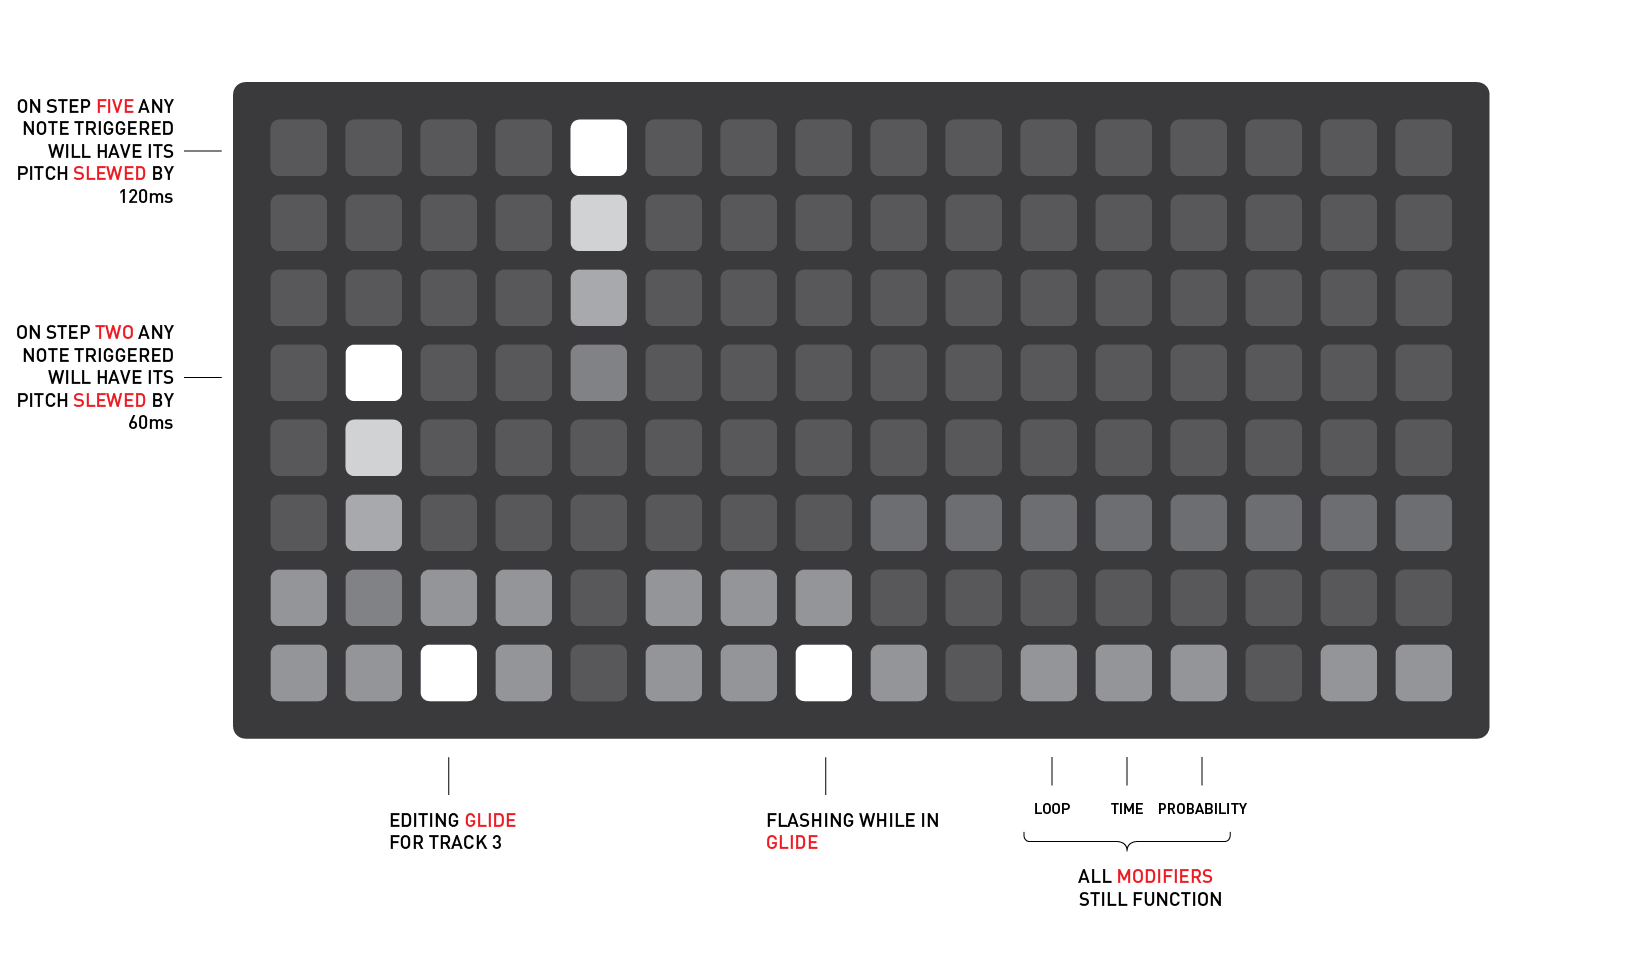
Glide
Glide allows up to 120ms of glide time to be added between triggered notes.
To enter the glide page, press the octave parameter key a second time when you are in the octave view. The octave parameter key will blink.
The glide view screen allows the user to slew the currently playing note into the next triggered note. This is controlled by setting a slider on each step column. Row 7 has a slew of 0ms, effectively a pass through. from here up each row increases the slew time to the note in the current column. Row 6 is 20ms, row 5 is 40ms, all the way to 120ms in row 1.
Quick track muting
Holding the loop modifier and pressing a track button will mute it; pressing again will unmute.
Scale
All tracks get their note values from this one scale.
The lower portion of the left side is the scale selector. 16 scales slots are available, with preset scale modes loaded by default. The scale editor occupies the right side.
Scales are constructed from the bottom row up. (In this case, the bottom row is the row above the navigation row). The bottom row is the root note. Add overall transposition by changing this bottom row to the right, where each point corresponds to a semitone.
Moving upwards through the rows, each row specifies a number of semitones to be added to the previous scale note, building an ascending scale.
For example, a whole tone scale (2 semitones per note) would be constructed by setting all rows to the second position. (The zero position is indicated dimly. Scale notes set to zero will be identical to the previous scale step).
To adjust one note in a scale without affecting its interval relationship with the notes after it, hold the scale key while changing the scale note. The subsequent note is adjusted to compensate.
You can perform temporary “live” adjustments to scale steps with a two-key gesture: hold down the active scale step, then press another key on that row of the scale programming section. The second key is highlighted more dimly to indicate that this scale step is adjusted. This adjusts the pitch CV assigned to that scale step without affecting the rest of the scale, which can be a useful performance tool. Pressing the brighter, “primary” scale key, or pressing another key to change the interval, will clear the adjustment. Scale adjustments are not saved to flash. Changing the selected scale will clear all scale adjustments, but changing patterns will not, which can make this useful for introducing live variations in a longer sequence.
Scales are shared between Kria, Meadowphysics, and Earthsea, and are saved to flash whenever a preset of either is saved.
Track step modes
The top-left region of the scale page contains settings for changing how each track advances to the next step:
-
The top four keys on the leftmost column of the page are used to toggle Teletype clocking for a given channel; see below for more details.
-
The next column over has track toggles for enabling trigger clocking. When trigger clocking is enabled, parameters besides trigger and ratchet will advance when a trigger fires, instead of on each clock step. This includes individual triggers within a ratchet group, so you can have a triplet quickly change the active note several times within the space of a single trigger step.
-
The next column over is currently unused.
-
The next 4x5 group of keys to the right lets you select direction modes for each track. From left to right these are: forward, reverse, triangle (bounce off the ends instead of wrapping), drunk (randomly move forward or backward each step), and random (any step in the loop may be chosen with equal probability).
Patterns
Patterns are shown along the top row, with 16 available total. Push a pattern key momentarily to load that pattern. Hold a pattern key to store the current pattern into it; it will pulse when the pattern is stored. Remember that loading an ‘empty’ pattern will effectively clear the current pattern.
Pattern Cueing
Pattern cueing allows the user to select the next pattern to be played, based off of pattern clock timing. To cue a pattern hold the Pattern button while pushing the next pattern to play. The top row will indicate which pattern is cued to play next
The second row on the pattern pages represents the Cue clock. Pushing a key in this row to set the number of steps for the cue clock.
A cued pattern is activated when the cue clock returns to zero. This clock represents a global quantize for pattern cueing.
This clock setting can be modified by the Time modifier, allowing you to get extremely long pattern cue time quantization. 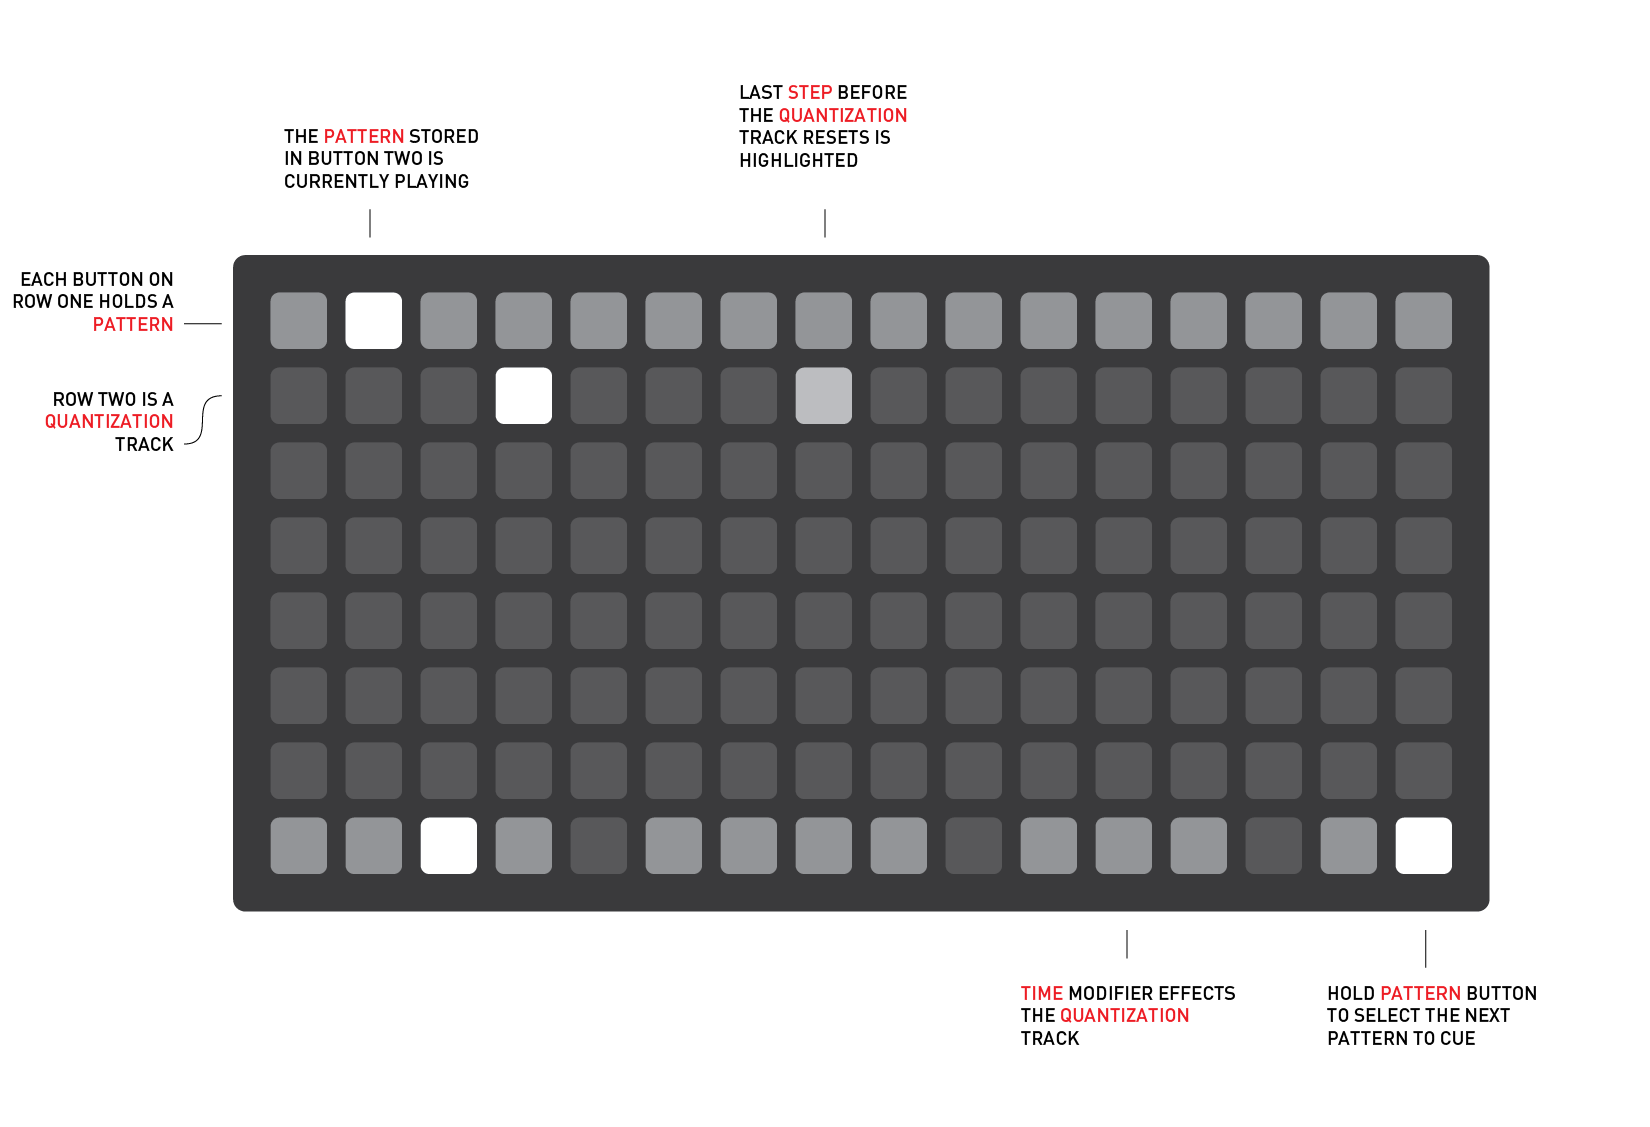
Meta Patterns
The Meta-Pattern mode allows you to create sequences of patterns, with control over the number of times a pattern loops before moving on to the next one.
To enter the Meta-Pattern mode, hold down the pattern button and select any button on row 7.
When Meta-Pattern is activated the rows on your grid are:
| Row | Function |
|---|---|
| 1 | This is your normal pattern row |
| 2 | Is a clock divider that determines the length between each step of the meta-sequencer. Think of it like a clock for row 7. This is a global setting |
| 3 | Pattern steps 1 - 16 |
| 4 | Pattern steps 17 - 32 |
| 5 | Pattern steps 33 - 48 |
| 6 | Pattern steps 49 - 64 |
| 7 | The meta-sequencer row. This hold the duration for your selected pattern |
| 8 | Normal navigation row |
Rows 3 through 6 are where you store your patterns in a Pattern Sequence. Each button in this row can have 2 pieces of data associated with it, a pattern and a duration.
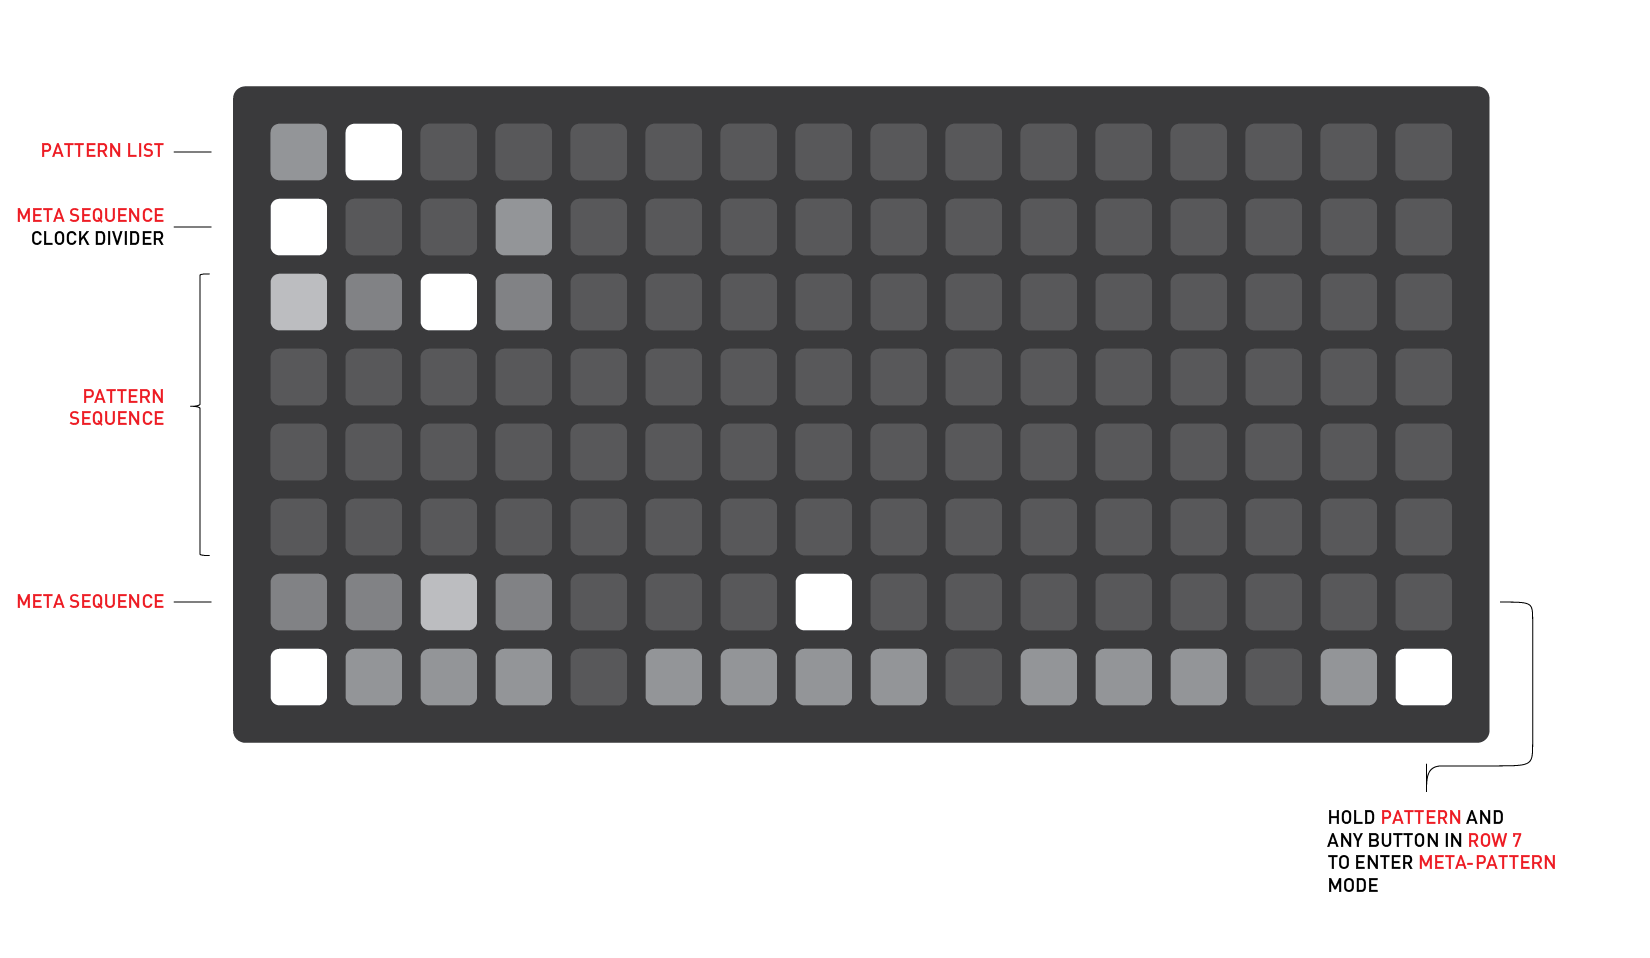
To edit the data just select the pattern sequence button you wish to change. It will glow at the maximum brightness. Selecting a pattern from row 1 will now change the pattern in the currently selected step.
You can also change the duration the pattern is played by selecting the end step of the meta-sequencer on row 7. Visually the meta-sequencer will show you the sequence length for the current step and the end point of the selected patterns duration at maximum brightness.
The meta-sequencer is clocked by the divider in row 2 and controls how long the current pattern will play before moving on to the next pattern. Row 2 itself is clocked by the current tempo (either internal or external), however if you hold the Time modifier you can subdivide the current tempo driving the row 2 clock divider, for extremely long step times.
The loop modifier can effect the length and start position of the pattern sequence in rows 3-6. The same multi touch gestures while holding the loop modifier work in these rows. This loop will wrap around the end. And like other views, you can push the same position twice to create a single-slot loop. Pushing a pattern sequence once while holding the loop modifier will cause the current loop to start at the new position.
If you hold the pattern button down and select a sequence step in row 3-6 the meta-pattern will jump to that position the next time the pattern advances.
Last, but not least you can edit your patterns live while the meta-pattern is running. This can be slightly off putting with quickly changing patterns, but is a great way to live edit your patterns within the context of a larger sequence.
n-So has created a very informative video that covers all of this in a mere 6 minutes.
Time
Hold Key 1 to change the timing.
With nothing present in In 1 the device is internally clocked. A pulse indicator is shown in the top row. Row 2 is rough and row 3 is fine, for jumping time intervals. The four keys in the middle are for incremental time movement, right and leftwards by fine and rough intervals.
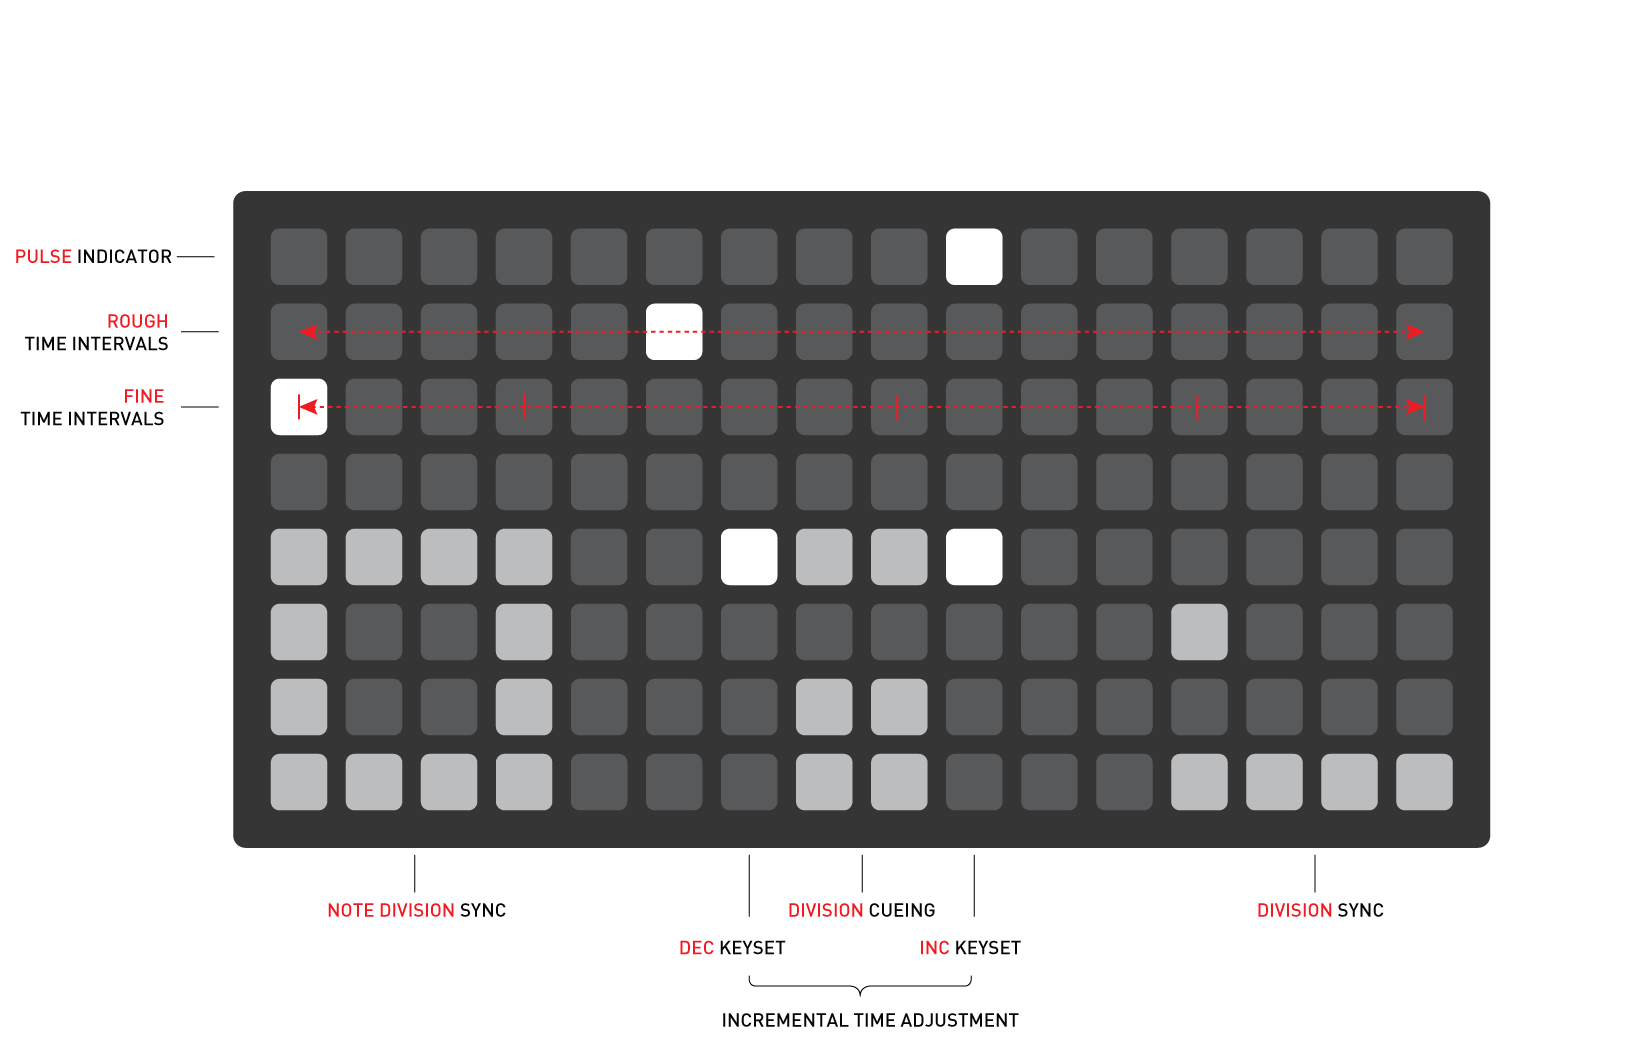
With a cable present in In 1 the device is externally clocked. The time view now shows a clock division multiplier in row 2.
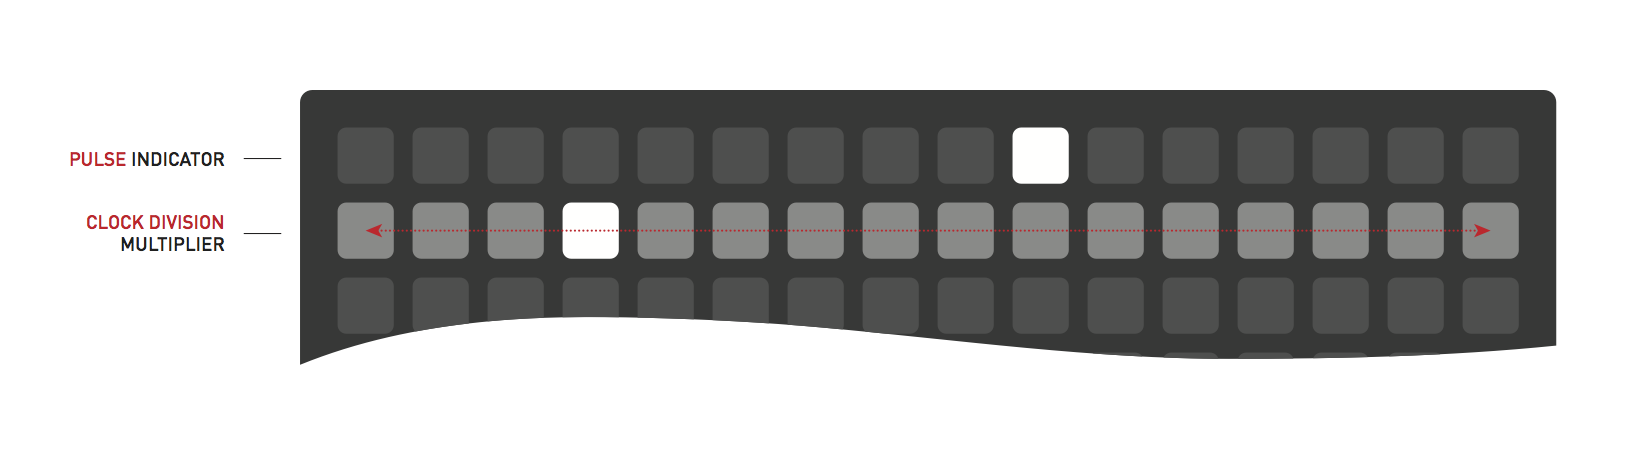
The bottom half of this clock configuration page is also home to three glyphs. These change how certain timing parameters work to allow you to keep different loop elements in sync. Note that the left and right glyphs look the same as glyphs for analogous functions on the Config page, but they are instead placed all the way at the edge of the grid. From left to right, the glyphs control the following options.
When Note Division Sync (hollow square on the left) is enabled, changing the clock division for the Trigger parameter will also update the clock division for the Note parameter and vice versa.
Division Cueing (small filled square bottom center) allows cueing of changes to the clock division for a parameter, so that the clock division does not change until the parameter restarts its loop. When a track’s direction mode is set to triangle, the clock division may change at either end of the loop. When a track’s direction mode is drunk or random, this setting has no effect.
Division Sync (1-key and 4-key rows on the right) determine which parameters should share the same clock division settings. There are three modes, as with Loop Sync: None (nothing lit), Track (top single block lit), and All (bottom row of 4 lit).
N.B. that when both Note Division Sync and Division Sync are engaged, the Trigger and Note parameters share one clock division (within a track or across all tracks depending on the Division Sync setting) and all other parameters share another independent clock division setting.
To summarize:
| note div sync (left glyph) | div sync (right glyph) | behavior |
|---|---|---|
| OFF | NONE | default behavior where all clock divisions are independent |
| ON | NONE | all tracks and parameters have independent divisions, but within a track, trigger & note divisions are always the same |
| OFF | TRACK | every parameter within a track is in sync, but tracks can have different divisions |
| ON | TRACK | within each track, trigger & note share one division, and the other parameters share a different division |
| OFF | ALL | every parameter on all tracks uses the same clock division |
| ON | ALL | all tracks share divisions, but trigger & note share a different division than the division shared by all other parameters |
By default Note Division Sync is off, Division Cueing is off, and Division Sync is set to None.
Config
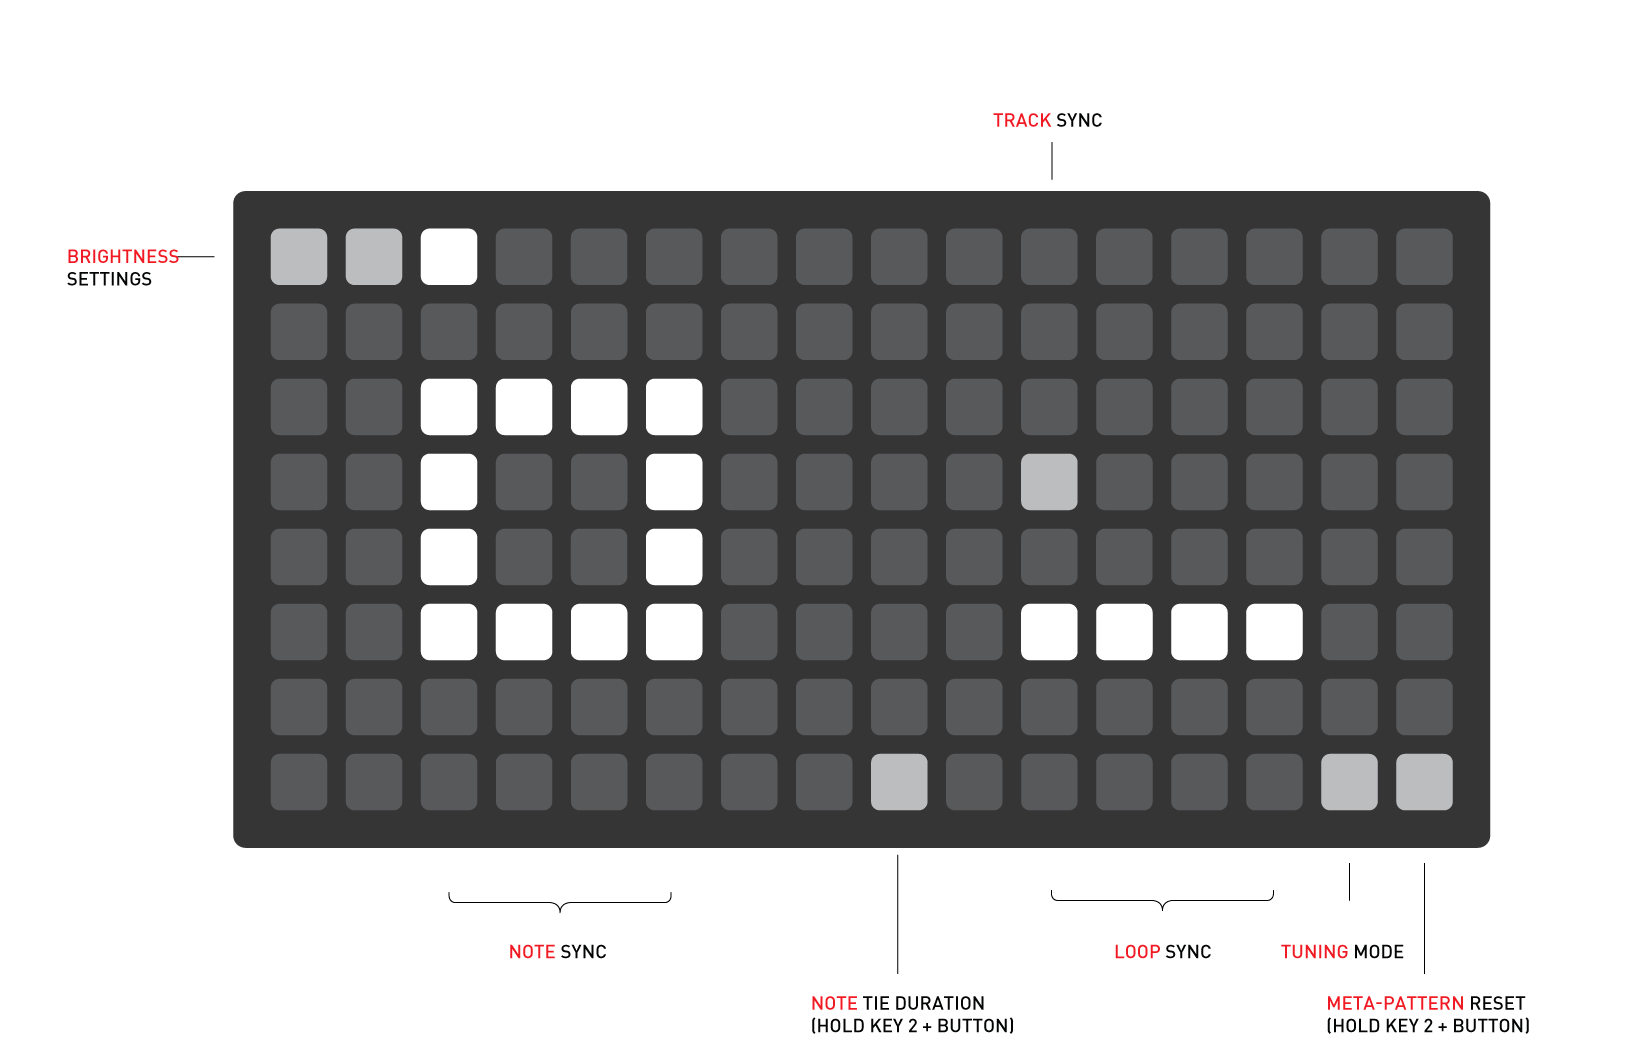
Kria has two parameters, represented on the left and right quadrants of the grid when Key 2 is held down, and a toggle for alternative sync behavior.
Note Sync can be toggled on or off on the left side by touching any key in the square – the square icon will be lit bright when Note Sync is on.
When Note Sync is on, Note and Trigger editing is linked. In Note view, you can now press on a step’s current note value to toggle off the Trigger at that step, and this is reflected in the interface. This way you can edit note sequences intuitively with rests without switching between two views.
When Note Sync is on but Loop Sync is off, placing notes will enable corresponding triggers, and updating loop endpoints on the trigger page will update the loop endpoints for the note page and vice-versa.
Loop Sync is shown on the right quadrant of the grid. There are three modes:
- None (nothing lit): all tracks and parameters can have independent loop points
- Track (top single block lit): all parameters within tracks have the same loop, but tracks can differ in their looping
- All (bottom row of 4 lit): all tracks and parameters have a synchronized loop
Note Tie Duration to enable note ties at lower duration multipliers e.g short triggers combined with held gates hold Key 2 (CONFIG) and pressing the bottom-middle (note tie duration), this causes notes to tie whenever the duration for an individual note is set to maximum by simply not turning the trigger off in the note-off timer callback when these options are set.
Meta-pattern Reset a trigger to the reset input In 2 currently resets the playhead within the current pattern, but does not reset the meta-pattern playhead to the first pattern in the meta-pattern sequence. Holding Key 2 (CONFIG) and pressing the bottom-right (pattern page select) key will reset the meta-sequence.
By default Note Sync is on, and Loop Sync is set to All.
Some space on this page is also used for some behavior that affects all apps:
-
The 3 keys in the top left allow adjusting brightness settings to improve visibility of some features on grids with different numbers of brightness levels. From left to right this selects a non-varibright, 4-step varibright, or 16-step varibright grid (the default).
-
The key in the bottom right, where Kria’s scale page key is, accesses tuning mode, described here.
Presets
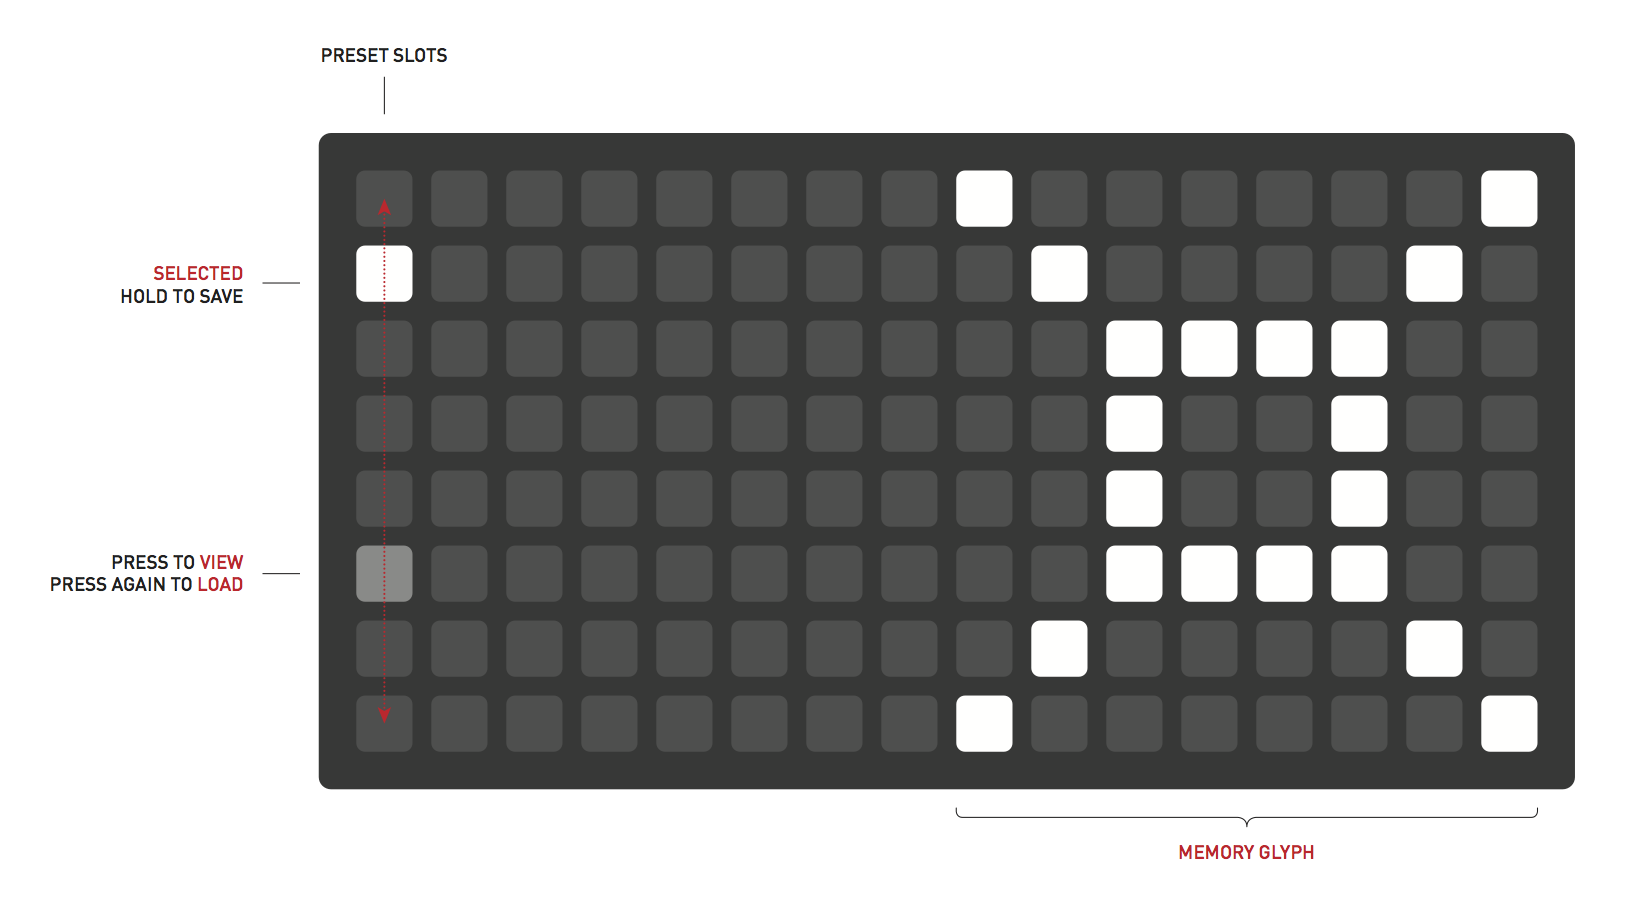
A short press of the preset key will enter preset mode.
There are 8 preset slots available, indicated in the first column of the grid. The current preset is lit.
To read a preset, press the position to select, and then press again to read.
To write a preset, press and hold the position to write to.
A “glyph” can be drawn in the right 8x8 quadrant as a visual cue as to what the preset is all about. This will be displayed when presets are selected for reading.
It is possible to backup all your presets as part of the module’s firmware; see modular firmware updates. Ansible can also save and load presets directly to a USB disk, see here.
Teletype Clocking
A channel of Kria can be set to be clocked from the Teletype command KR.CLK x (see the Ansible + Teletype manual here).
To do so, press the scale key to enter scale view. The four keys at the top of the left column will enable or disable Teletype clocking for the relevant channel. When a channel is clocked by Teletype, it no longer responds to the master clock (set either internally or by an external clock connected to the In 1).