Earthsea (Ansible + Grid)
Polyphonic pattern instrument
Earthsea is an app for the Ansible Eurorack module that uses the Grid as an isomorphic keyboard to perform, record, and play back patterns for up to four CV/gate voices. Earthsea is a new, polyphonic version of the the original Earthsea module. It now supports polyphony across up to four CV and gate outputs. However, it no longer supports the two- and three-finger shape memories of the original module. The mode LED will show whitish-orange whilst Earthsea is running.
sections
Interface

Key 1previous patternKey 2next patternIn 1Clock (rising edge)In 2Start/reset pattern (rising edge)
Clocking Earthsea
Earthsea does not require an external clock; it will play back recorded patterns in the manner you played them without one. However, it can be clocked external. If a clock source is connected to In 1, Earthsea will be synchronised to that clock. Note that if a jack is connected at In 1, Earthsea will not play without a clock source.
Basic
The far left column of the grid is reserved for special functions:
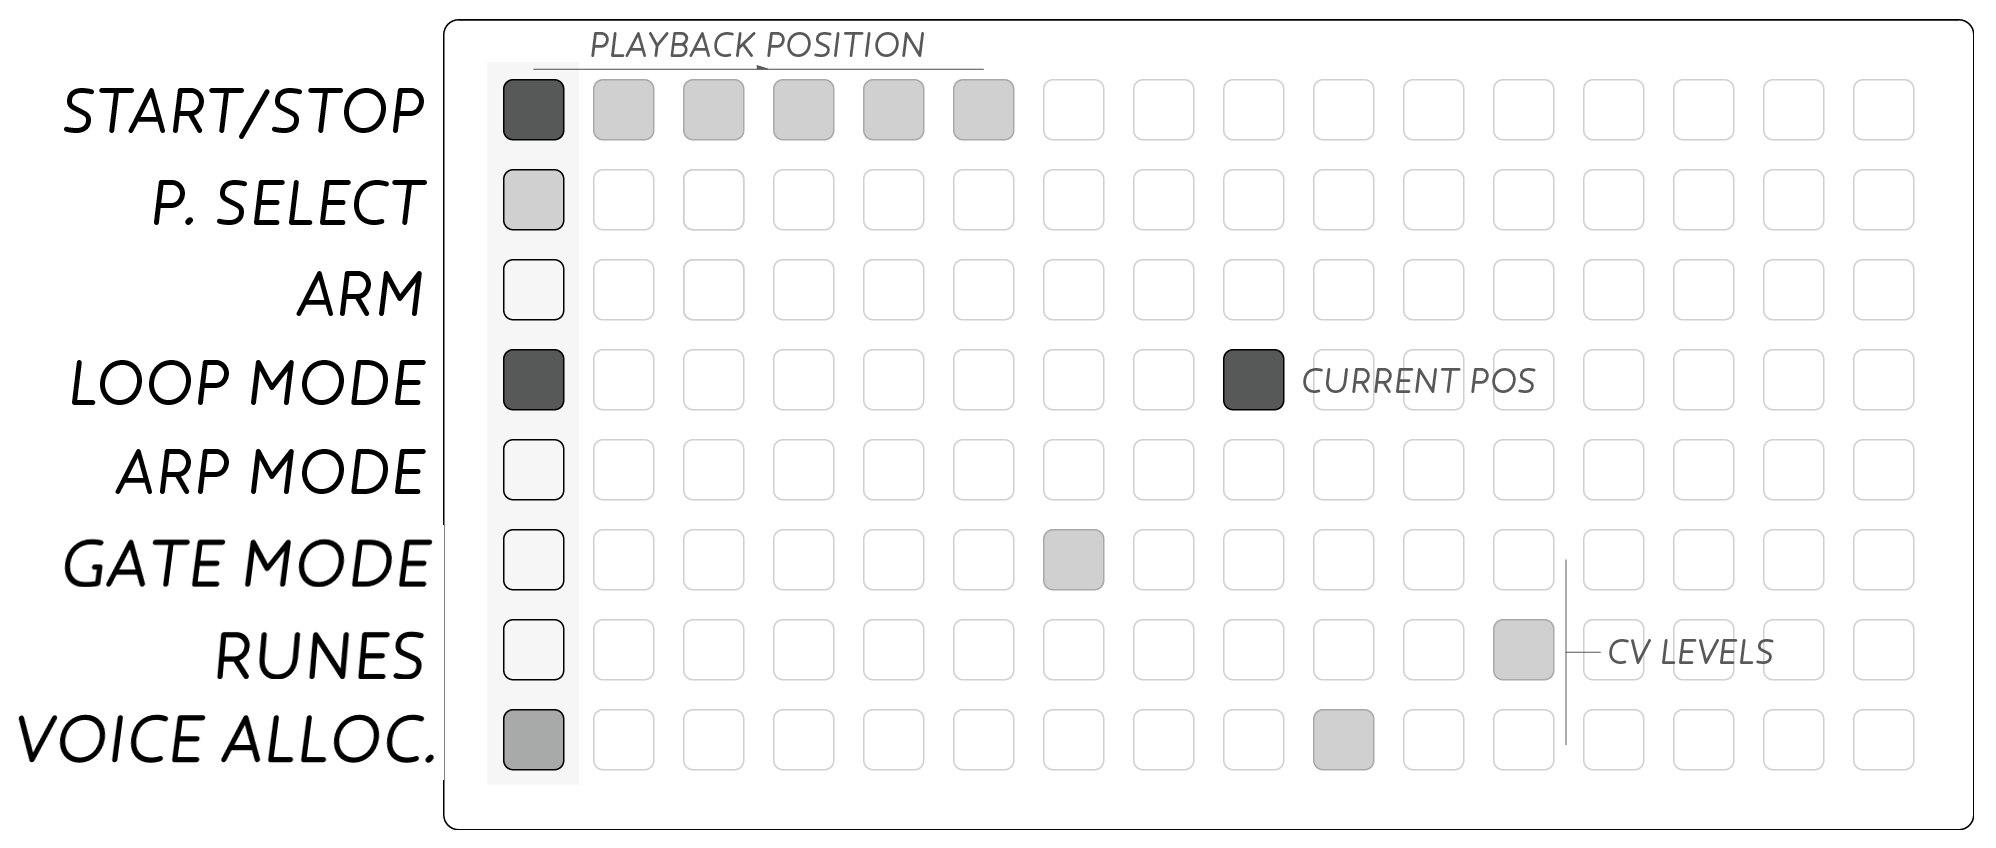
- START/STOP playback
- PATTERN select
- ARM record
- LOOP mode
- ARP mode
- GATE mode
- RUNES
- Voice allocation
The remainder of the grid is referred to in Earthsea as the keymap. Press keys to change the CV at the outputs of Ansible. Each press of a key on the keymap will output a voltage at a trigger output of ansible according to the settings of the Gate mode page. The specific CV and trigger outputs used will depend on voice allocation settings.
Keymap
The CV output of Earthsea is controlled by playing notes on the grid as a sort of extended keyboard. The CV output is calibrated, 1Volt per octave, and designed to be attached to an oscillator to play melodies.
The ‘pitch’ output by Pos is lowest at the lower-left of the grid, and higher at the upper-right corner. The current output value is displayed on the grid as a bright led.
- Horizontal: Semitone increase from left to right
- Vertical: Fourths (5 semitones) from bottom to top.
For those familiar with guitar or bass these intervals should feel familiar and common harmonic shapes will reveal themselves.
Voice allocation
Earthsea can be used polyphonically, for up to four simultaneous outputs. It offers fine control over voice allocation. Holding the bottom-left function key - voice allocation - offers configuration options.
The left column represents voices used by the recorded pattern. The right column represents voices used by playing the keymap live.
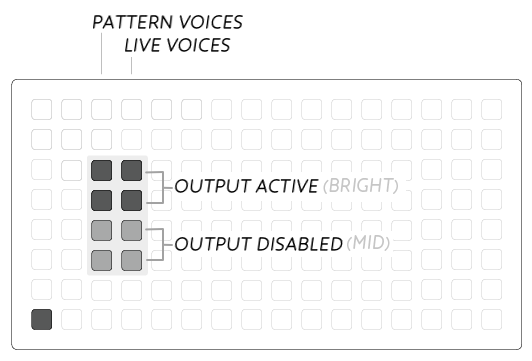
Focus on the right, ‘live’ column. When all four keys are lit, Earthsea is in four-voice polyphony mode. Each key pressed will output a control voltage from the first available CV output on Ansible. If you press buttons in a staccato manner - with a slight gap between them - corresponding voltages will all be output of CV output 1, with corresponding gate outputs output from Gate output 1.
However, if you hold more than one button at a time, voltage will be output from the next available CV output. For instance, if you play a succession of three-note chords, with gaps between each chord, they will always be output from CV outputs 1-3. If you release one note, CV output 3 would drop to 0V; re-holding that same note would emit voltage from CV output 3 again.
Voices are allocated via what is known as voice stealing: you can hold up to four keys at one time; if you try to hold a fifth, the earliest button you pushed will stop being lit, the new button you’ve pressed will light, and the CV of the new - fifth - button will come out of the CV output previously used for the first.
One obvious application of this feature is playing chords on multiple identically tuned VCOs.
Note that if you don’t have every CV output connected, playing legato notes on the keygrid may have the effect of “skipping” outputs. To avoid this, set “voice allocation” to match the number of CV outputs connected. For instance, to control a single voice and ensure there are no missed notes, connect a single CV and trigger out to the appropriate inputs in your synthesizer, and select only that CV and trigger out on the voice allocation page of Earthsea.
It is possible to use different outputs for playback of recorded patterns and ‘live’ keypresses of the keygrid. The first column of lights on the voice allocation page represents outputs for the recorded pattern; the second column represents outputs for live playing of the keygrid. If both are lit for a row, this means that notes from the playing pattern will be played out of that CV output, as will notes played into the keygrid - the most recent information taking priority.
This feature makes It is possible to configure Earthsea such that one or more CV/trigger output will play back previously recorded information, whilst further live playback will come out of a different CV and trigger output. This is useful to ‘reserve’ a channel for live playback - for instance, so that you can record a pattern of three-note chords, and play another melody over the top on the fourth output - or to output recorded notes to one module, but live playback to another.
Pattern recording
Performances across the keymap can be recorded live. There are 16 available pattern slots (per Preset, see below).
Once recorded, patterns can be manipulated: looped, transposed & time modulated. Each pattern can include up to 64 notes or shapes, with no limit on length in time.
Record
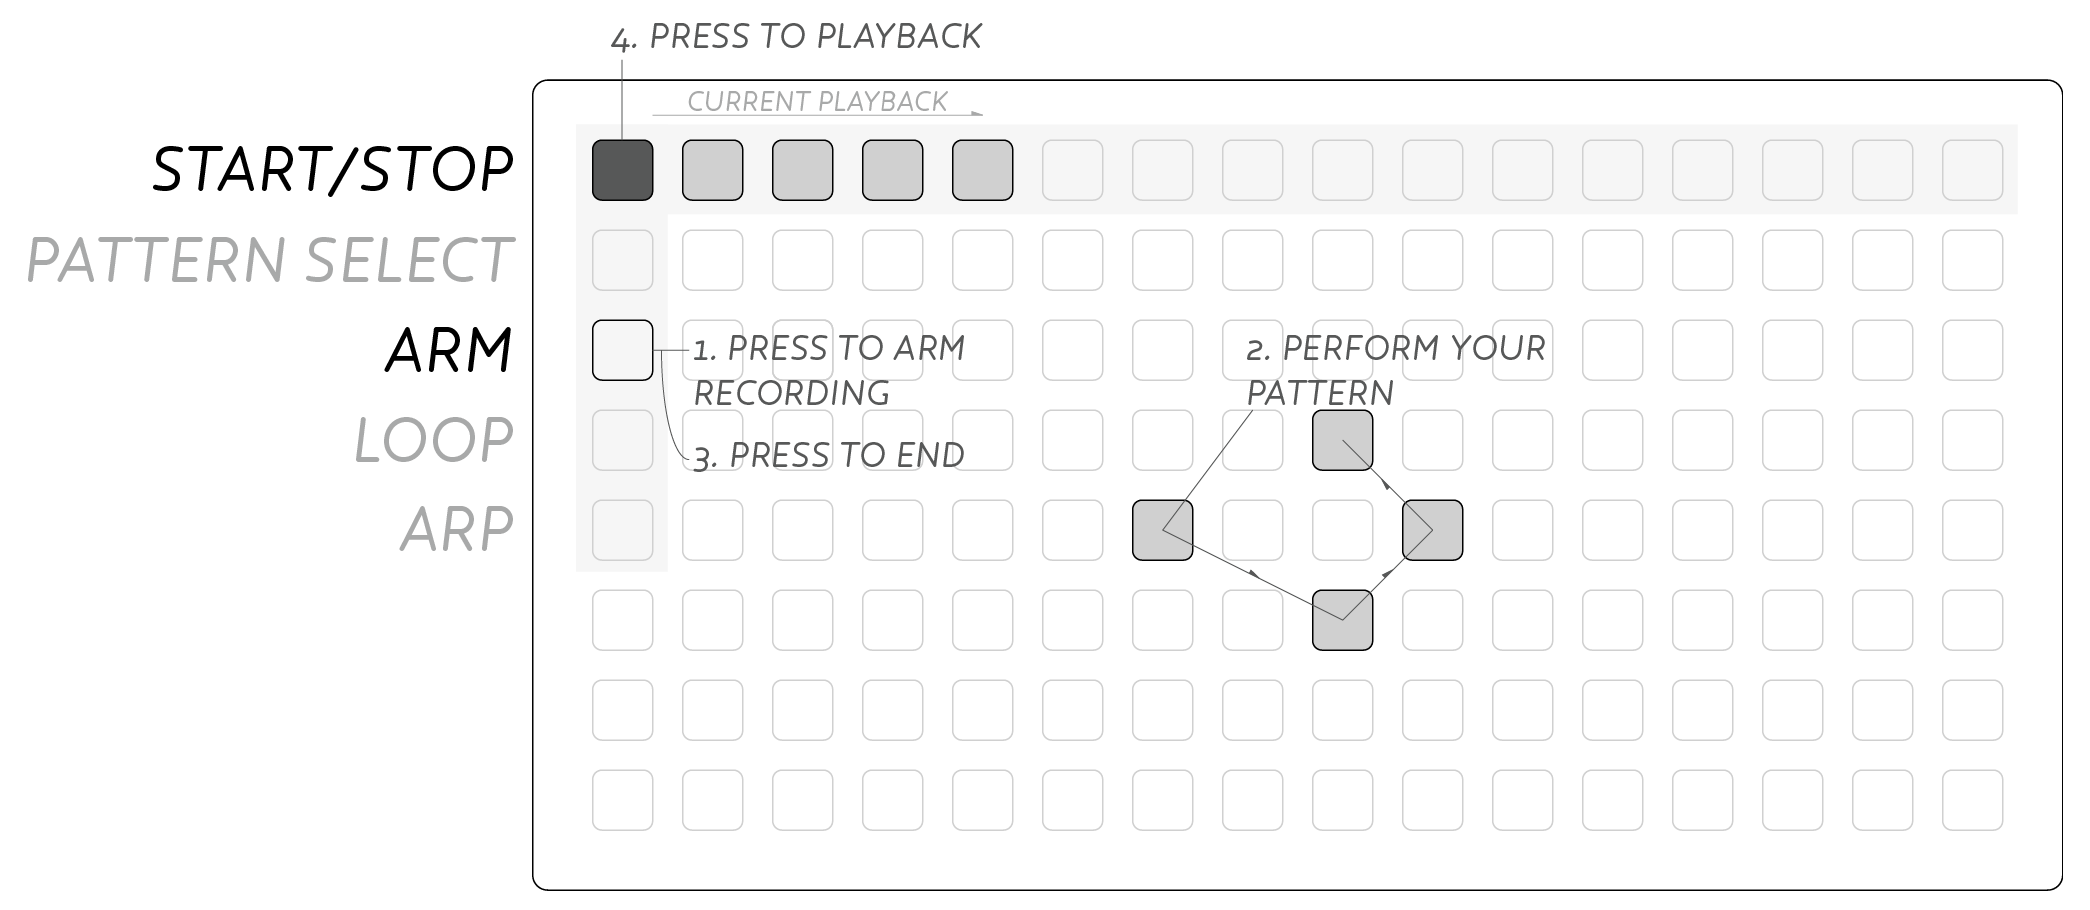
To make a pattern, press the ARM key (left column, third row down). The recording will begin at the first press of your performance. Play your pattern and press ARM again to end recording.
To enter a rest, press the top right key while recording. Rests will be respected in linearized mode or when using external clock.
The START/STOP key (top left) will be lit to show that a pattern is present. Press START/STOP to begin playback, and again to stop the pattern midway. The pattern will play through to the end and then stop.
Loop Mode
Each pattern can be set to loop by pressing the LOOP MODE key (left column, fourth row down) which will light. Now playback will start again when reaching the end of the recording.
Auto-Loop Record
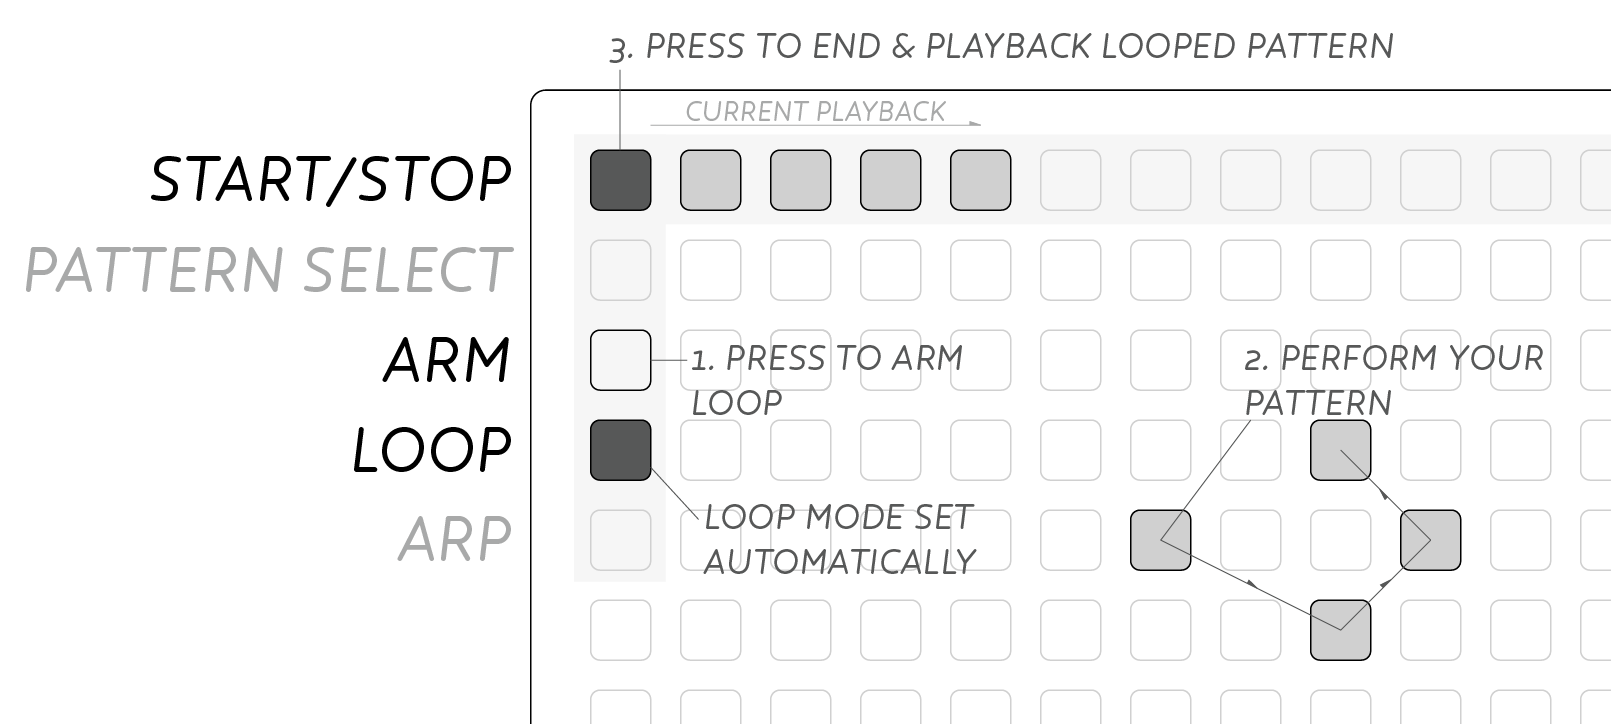
If you wish to loop a pattern directly, end your recording by pressing START/STOP rather than ARM. The pattern will instantly begin playback and the LOOP MODE toggle (left column, fourth row down) will be set.
Retrigger
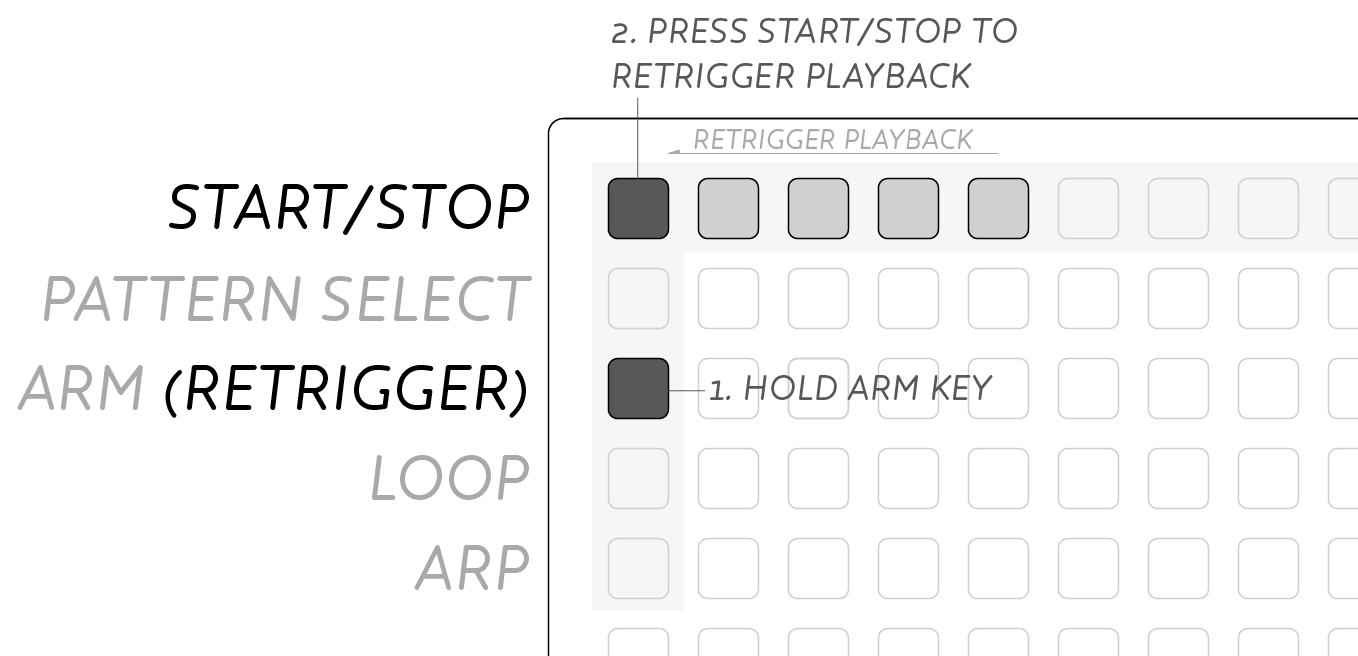
Patterns can be restarted while already playing, by holding ARM then pressing START/STOP.
You can jump to a specific point in the pattern by pressing that key in the ‘progress bar’ along the top row of your grid.
Pattern Select
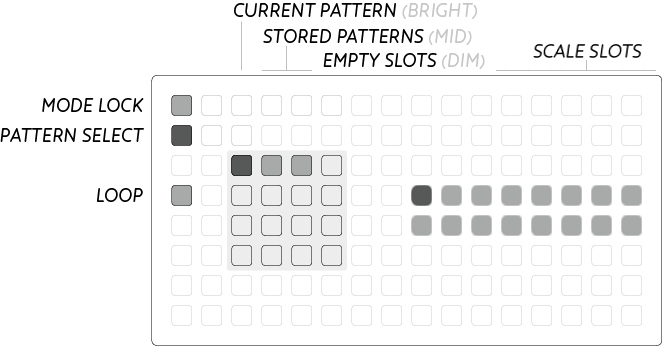
To access all 16 patterns, hold the PATTERN SELECT button and pick a pattern from the lit 4×4 grid. The current pattern is displayed at full-brightness, existing patterns are mid-brightness, and empty slots are low-brightness.
Pattern Bank Performance
The pattern bank itself can be performed directly, juggling between different patterns.
To enter, hold P.SELECT, then press START/STOP to lock onto the pattern bank. Now when you press a pattern slot it will playback instantly. Note that you can also set the LOOP mode for the selected pattern from within this mode.
Switch patterns from front panel
KEY 1 and KEY 2 on the front of Ansible can be used to move to the next or previous pattern in the group. They do not “loop” around - you cannot go to a previous pattern from pattern 1, or to a next pattern from pattern 16.
Highlighting scales on the key map
Holding PATTERN SELECT, a 2x8 block will illuminate on the right. These are scale slots - the exact same scales available to Kria and Meadowphysics. Pressing one of these will highlight keys in the keymap that are within that scale. To turn scale highlighting off, press the currently selected scale key again. (Note that this does not affect the pitches each key represents - it just acts as an ‘overlay’ to highlight notes within a scale).
You can also create your own key map. It will take the place of the ‘default’ keymap. To choose which keys to highlight in your scale, press and hold the top right key, and then press keys you want highlighted - two different brightness levels can be chosen from by pressing a key another time. Custom scale highlighting is confined to an individual preset, and will be saved along with that preset data.
Arp Mode
In addition to playback and looping, patterns can also be transposed on the grid using Arpeggio, or ARP, mode. This functionality is greatly inspired by Stretta’s polygomé max patch.
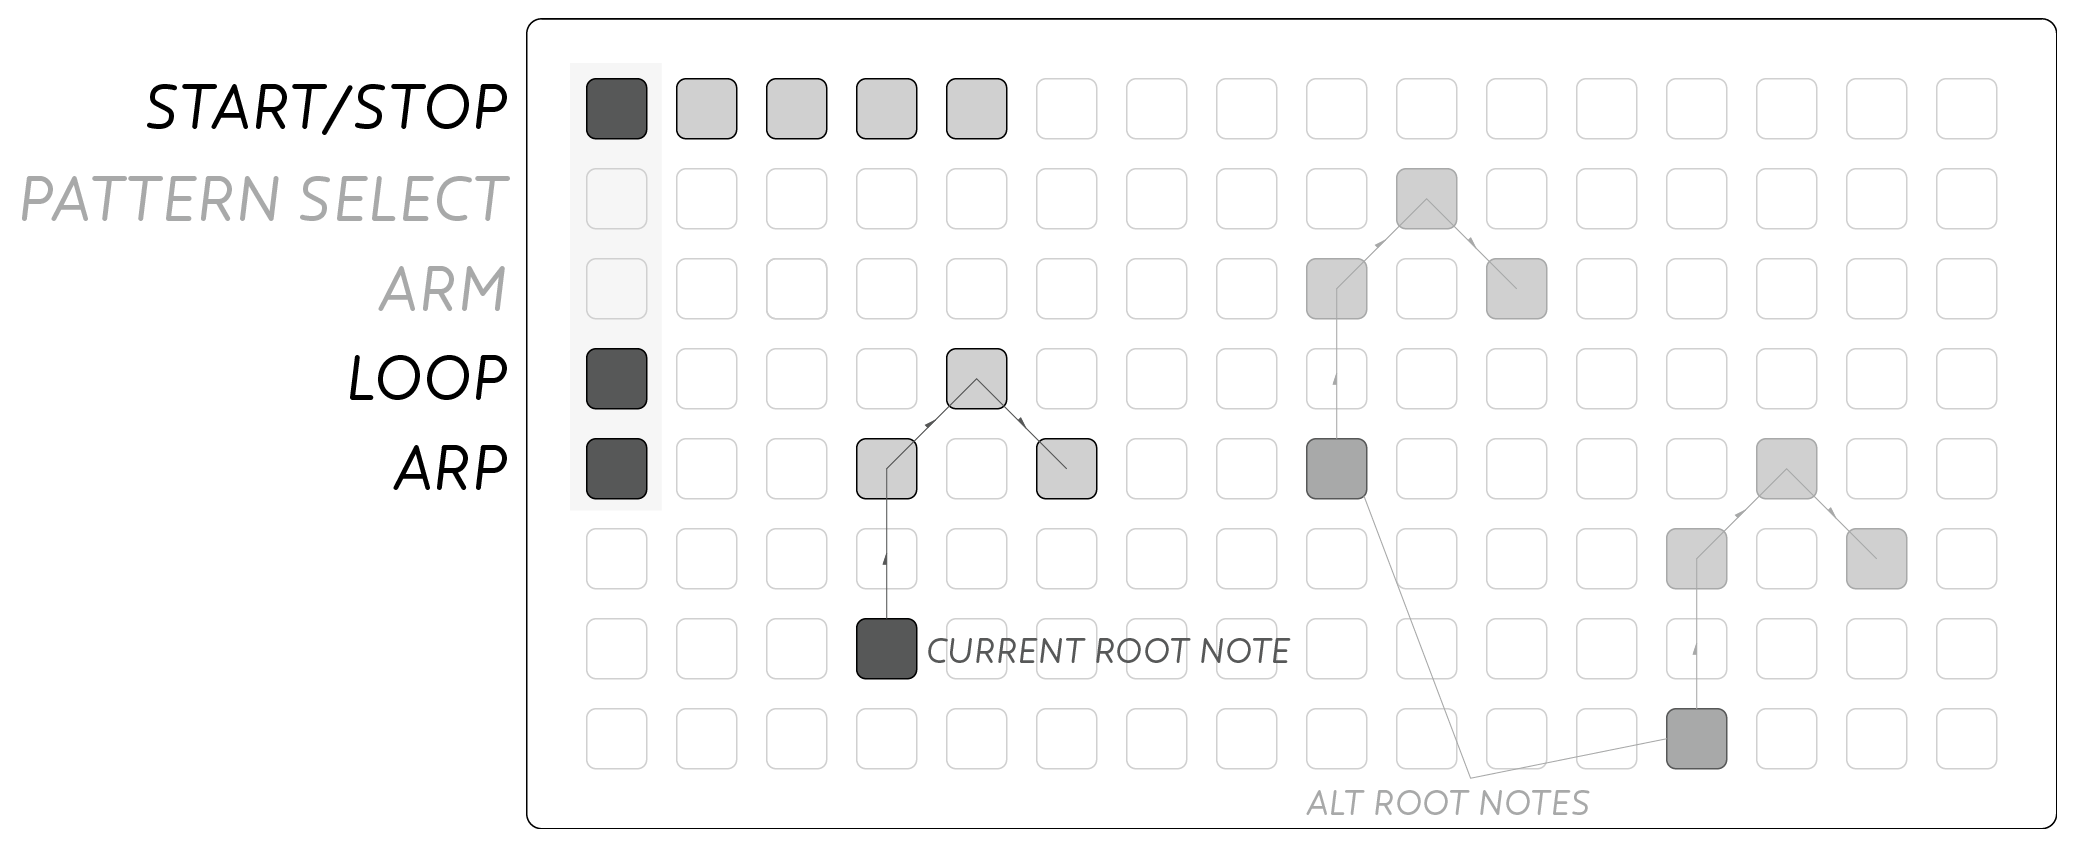
After recording a pattern, activate the ARP MODE button from the left column (left column, fifth key down). You will see a lit key showing the pattern’s ‘root’ position. Press this key to playback the pattern as normal (including looping if set).
Pressing elsewhere in the keymap will transpose and playback the pattern, restarting the playback on press. This transposition is ‘destructive’ so leaving ARP mode will retain the last selected transposition.
Note: It is recommended to record patterns in the middle of the grid so they can be transposed in all directions. When a pattern tries to go ‘outside’ of the playing grid, it is clamped to the maximum value for that row or column.
Gate mode
The default behaviour of the gate outputs is a traditional HOLD output. When holding a note down, gate is high and stays high throughout a legato phrase, until all keys are lifted.
Using the GATE MODE key (left column, 3rd from bottom) this behaviour can be changed to FIXED and DRONE modes. Hold GATE MODE and press within the 4×4 glyphs to select the different modes. The current selection will be brighter than the rest.
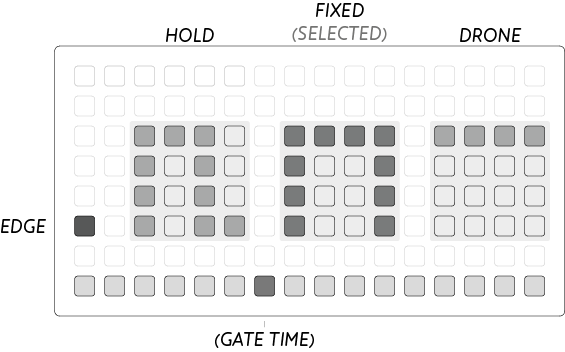
FIXED mode creates a fixed length gate at the appropriate Gate output. After selecting FIXED mode the bottom row will be activated displaying the gate time. Press a key in the bottom row to choose a gate time. When performing rapid presses in FIXED mode the timer is restarted at each new press, so legato phrases are still possible. Length can be very long for extended gates, particularly well matched to long-attack envelope generators.
DRONE mode allows easy latching of the appropriate Gate output. Pressing any key will cause the appropriate gate output to go high, and it will remain high until that same position is pressed again, toggling off the lit key. DRONE is an ‘infinite legato’ mode where phrases can be performed in a smooth gesture without worrying about press/release technique.
Runes
The RUNES page offers several large icons that can be selected by pushing anywhere within them. From left to right:
-
Linearize: This rune destructively edits the current pattern’s timing, particularly useful for making arpeggio patterns and riffs.
The time between each note and shape is set to the same time interval as the first two notes or shapes. A pattern of 7 notes will thus become a rigid 7-beat sequence.
-
Reverse playback, Regular playback These runes control the direction of playback: the right rune represents the order the pattern was recorded in; the left rune represents reverse playback.
-
Double speed, half speed These runes destructively edit the playback speed of a pattern, even while it is currently playing. Press double-speed a couple times to make rapid arpeggios, or even Game Boy-esque chords when taken to the limit. Half speed opens up the possibility for long evolving chord sequences, especially when applied to a linearized pattern.
Presets
Presets for Earthsea work like the other grid modes of Ansible.
A short press of the preset key will enter preset mode.
There are 8 preset slots available, indicated in the first column of the grid. The current preset is lit.
To read a preset, press the position to select, and then press again to read.
To write a preset, press and hold the position to write to.
A “glyph” can be drawn in the right 8x8 quadrant as a visual cue as to what the preset is all about. This will be displayed when presets are selected for reading.
It is possible to backup all your presets as part of the module’s firmware; see modular firmware updates. Ansible can also save and load presets directly to a USB disk, see here.