what is i2c / ii?
i2c, or ii, is a flexible communication protocol which allows modules to send commands to each other digitally, which opens up possibilities that patch cables can’t facilitate. This digital networking is described as a ‘bus’.
The i2c bus consists of 3 lines - ground (GND), data (SDA) and clock (SCL). The data and clock lines are “pulled high” via pull-up resistors to 5V and data is transferred when these lines are “low”, thus power is also needed for the bus to operate.
Both Monome’s Teletype and Crow provide power over the i2c bus – however, Ansible does not. If you are in need of additional power or are planning to add more than three or four i2c-capable modules to your bus, we suggest invest in a powered bus board like the Txb.
While ii setups are usually straightforward, requiring the connection of matching ii headers (GND <-> GND, SCL <-> SCL, SDA <-> SDA) via 2.54mm connectors, there are a few consideration to keep things working:
-
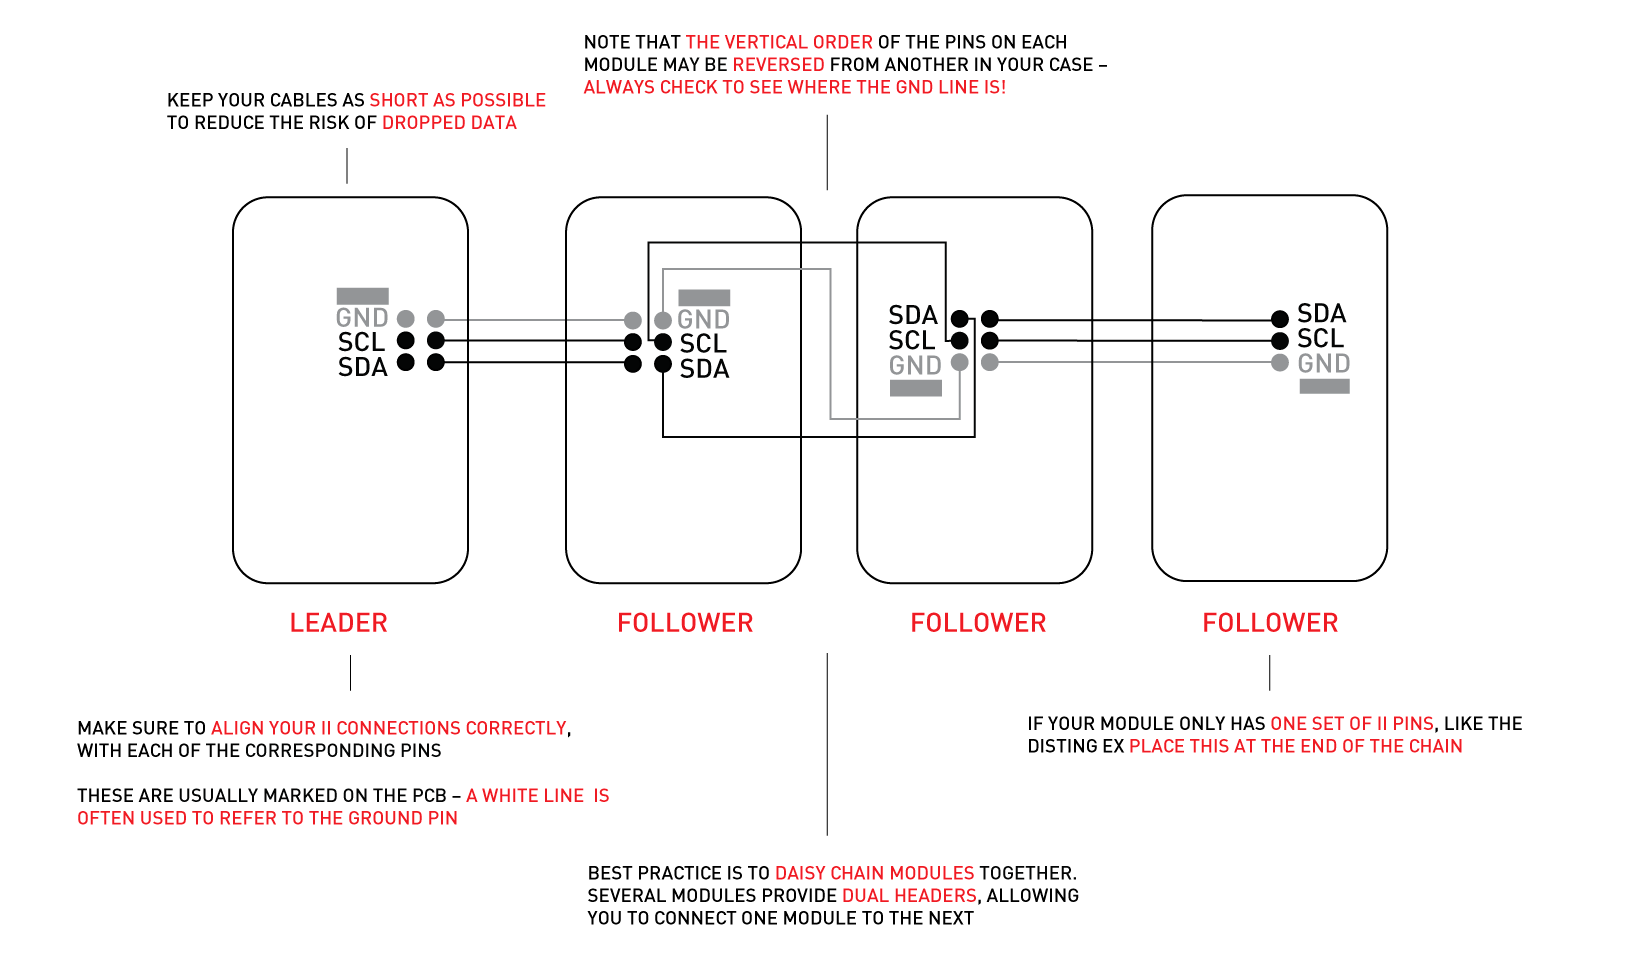
Best practice is to daisy chain modules together. Several modules provide dual headers, allowing you to connect one module to the next. If your module only has one set of ii pins, like the Disting Ex, place this at the end of the chain.
-
Make sure to align your ii connections correctly, with each of the corresponding pins. These are usually marked on the PCB – a white line is often used to refer to the ground pin. Note that the vertical order of the pins on each module may be reversed from another in your case – always check to see where the GND line is!
-
Keep your cables as short as possible to reduce the risk of dropped data.
For additional information, please check out the helpful i2c/ii guide available on lines.
ii leader/follower
A device that initiates communication with another is known as a leader. It’s important to note that while the i2c protocol makes provisions for multiple leaders, currently this is not officially supported in the Monome ecosystem as this may increase the risk of buggy behavior, including modules locking up and needing a power cycle.
Currently, the only interface for enabling Ansible’s leader mode requires a grid. In any grid application, go to the preset page by pressing the button next to the USB port.

Follower device toggles are arranged just left of center. From top to bottom, left to right:
-
Just Friends can be used as a synthesis voice or function generator.
-
TELEXo can be used as a set of 4 enveloped oscillators, or 4 CV/gate pairs.
-
ER-301 can be sent gates and CV.
-
Disting EX can be used as a set of 4 CV/gate pairs or 4 channels of CV - Midi conversion.
-
W/Syn can be used as a synthesis voice.
-
Crow can be used as a set of 2 ii CV/gate pairs.
Multiple followers may be active at once. Toggling any follower on enters leader mode, and deactivating all followers exits leader mode. Leader mode causes Ansible to send ii messages on any CV or gate change in any Ansible app, with Ansible’s four gate/CV tracks assignable to different follower behaviors.
To access more configuration, hold the lit key at the bottom of this column, then tap any follower toggle. This accesses detailed configuration for a particular follower, and pressing other follower toggles will change which follower you are configuring. To exit this mode and return to the main preset page, tap the key at the bottom of the column again.
On the follower configuration view, the bottom left keys (corresponding to Kria track select keys) toggle which tracks drive which follower, so you can send the first 2 tracks to one device and the last 2 tracks to another. By default all tracks are sent to all enabled followers.
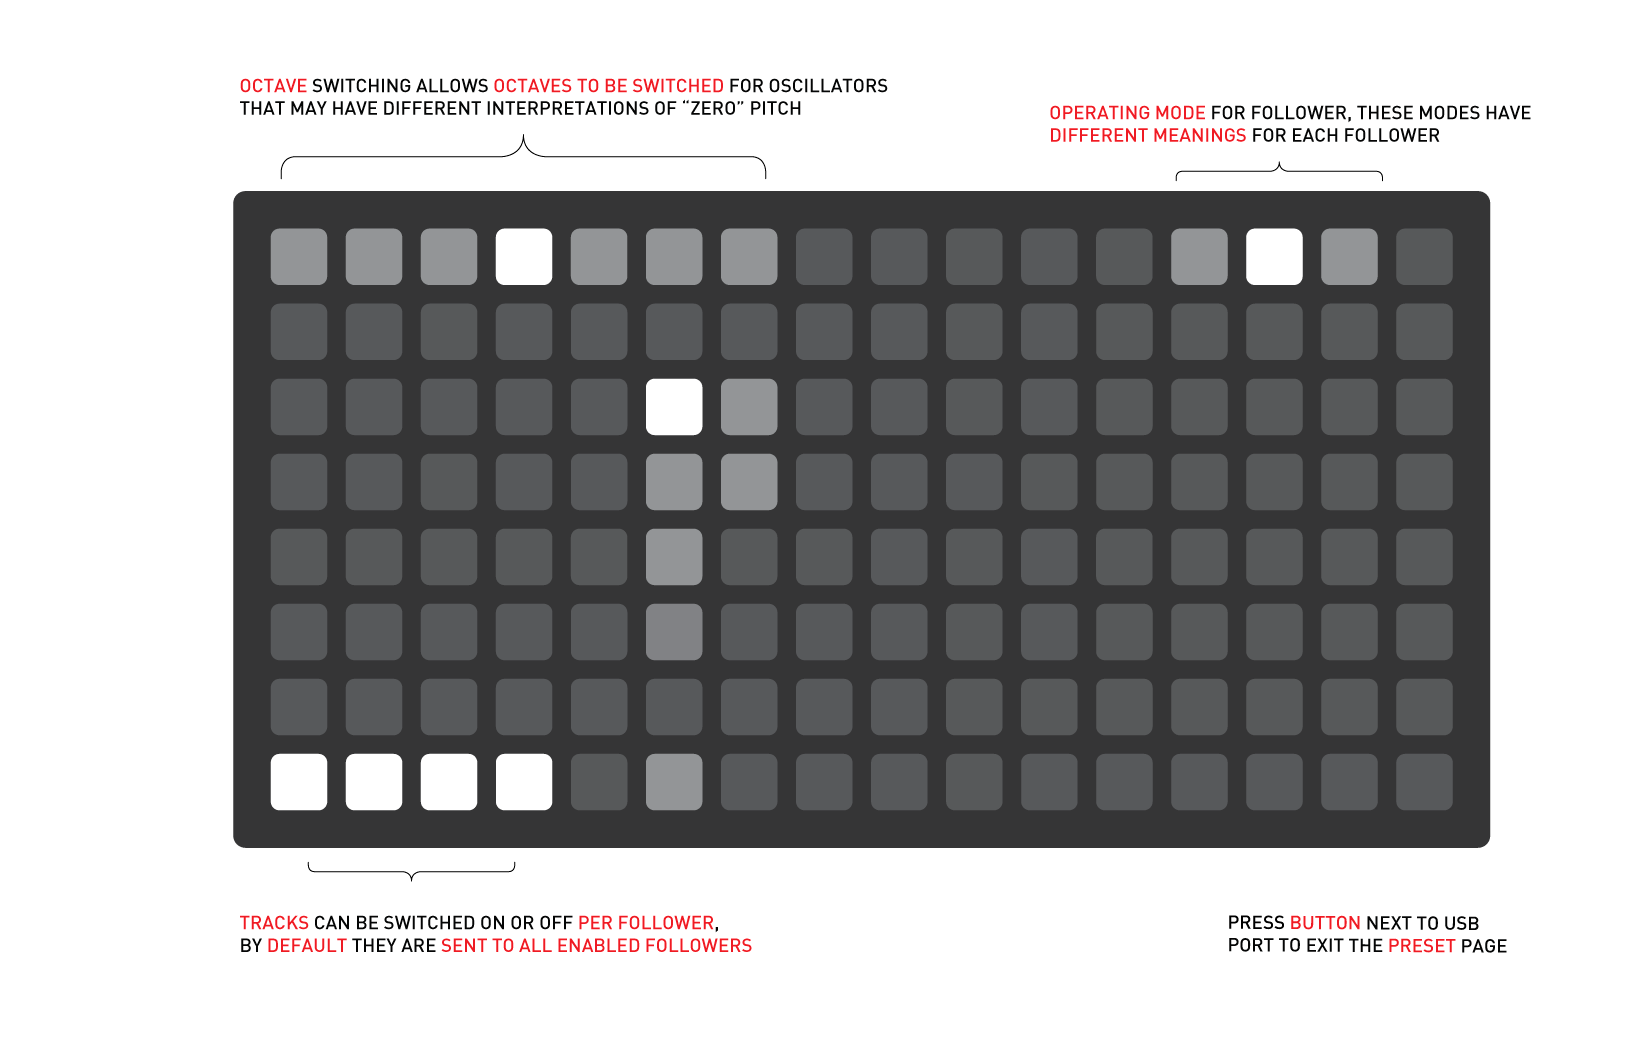
The top-left portion of the page is an octave shift for the follower. This will shift all pitches sent to the follower by the programmed number of octaves, with the initially selected center key generally corresponding to middle C. This can be useful for working with multiple followers that have different interpretations of “zero” pitch.
In the top right of the follower configuration page, you can select the operating mode for the follower. These modes have different meanings for different followers.
-
Just Friends, left to right: allocate notes polyphonically (
JF.MODE= 1 andJF.NOTEis sent for each gate), map each track to one output as a synth voice (JF.MODE= 1 andJF.VOXis sent), map each track to one output as a function generator (JF.MODE= 0 andJF.VTRis sent). In Kria, the velocity value is calculated based on the duration parameter. -
TELEXo, left to right: map each track to the corresponding enveloped oscillator (
TO.OSCis sent for pitch andTO.ENVis sent for gate on/off), map each track to the corresponding gate/CV pair (TO.TR/TO.CV). -
ER-301 can be sent gate and CV commands, with the 4 tracks corresponding to the first 4
SCchannels. -
Disting Ex, left to right: allocate notes/gates polyphonically, map each track to one output, convert CV to MIDI via the MIDI breakout on the Disting EX, all channels sent via channel 1, all channels send via channels 1-4. In MIDI modes data is passed through the Disting, it cannot be used in single algorithm mode, but will function in dual algorithm mode.
-
W/ Syn, left to right: allocate notes polyphonically, map each track to one output as a synth voice.
-
Crow, sends output number, pitch and duration.