Levels (Ansible + Arc)
Levels is an app for the Ansible Eurorack module that allows Arc encoders to assign voltages to CV outputs and create patterns which can be clocked.
The mode LED will show orange when running.
Basics
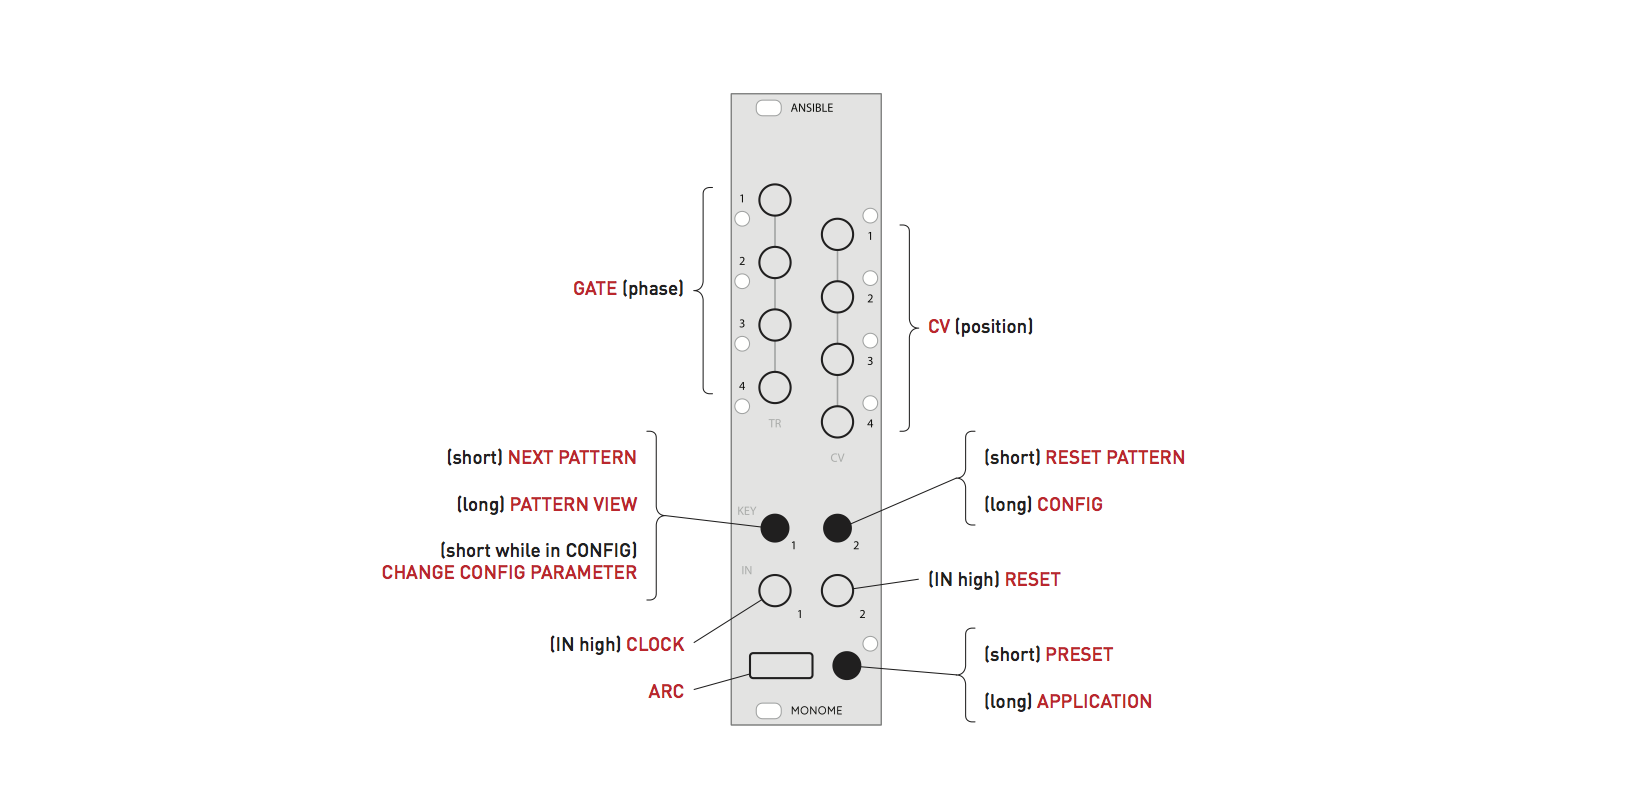
Each Arc ring is its own output unit and all encoders have the same capabilities. The leftmost ring (ring 1) uses CV/TR 1, ring 2 use CV/TR 2, and so on.
Turning the ring will change its value, and affect its output CV/TR. By default each ring is in VOLT mode, which is a continuous CV output from 0-10v. In VOLT mode the TR output is a pulse whose period relates to the ring position– leftwards is slower, rightwards is faster.
This can be changed to NOTE mode which maps the ring to a semitones, with octave markers. CV output is volt per octave, and TR is used for indicating PATTERN changes (more on this later).

Config
Enter the CONFIG “view” by pushing and holding KEY 2 on the panel. The Arc display will change– the first CONFIG view is mode, which allows toggling between VOLT and NOTE mode. Each setting is per-ring for every screen, so each ring can have a different configuration.
Pushing Key 1 while holding Key 2 will change the CONFIG parameter, as shown in the following diagram:
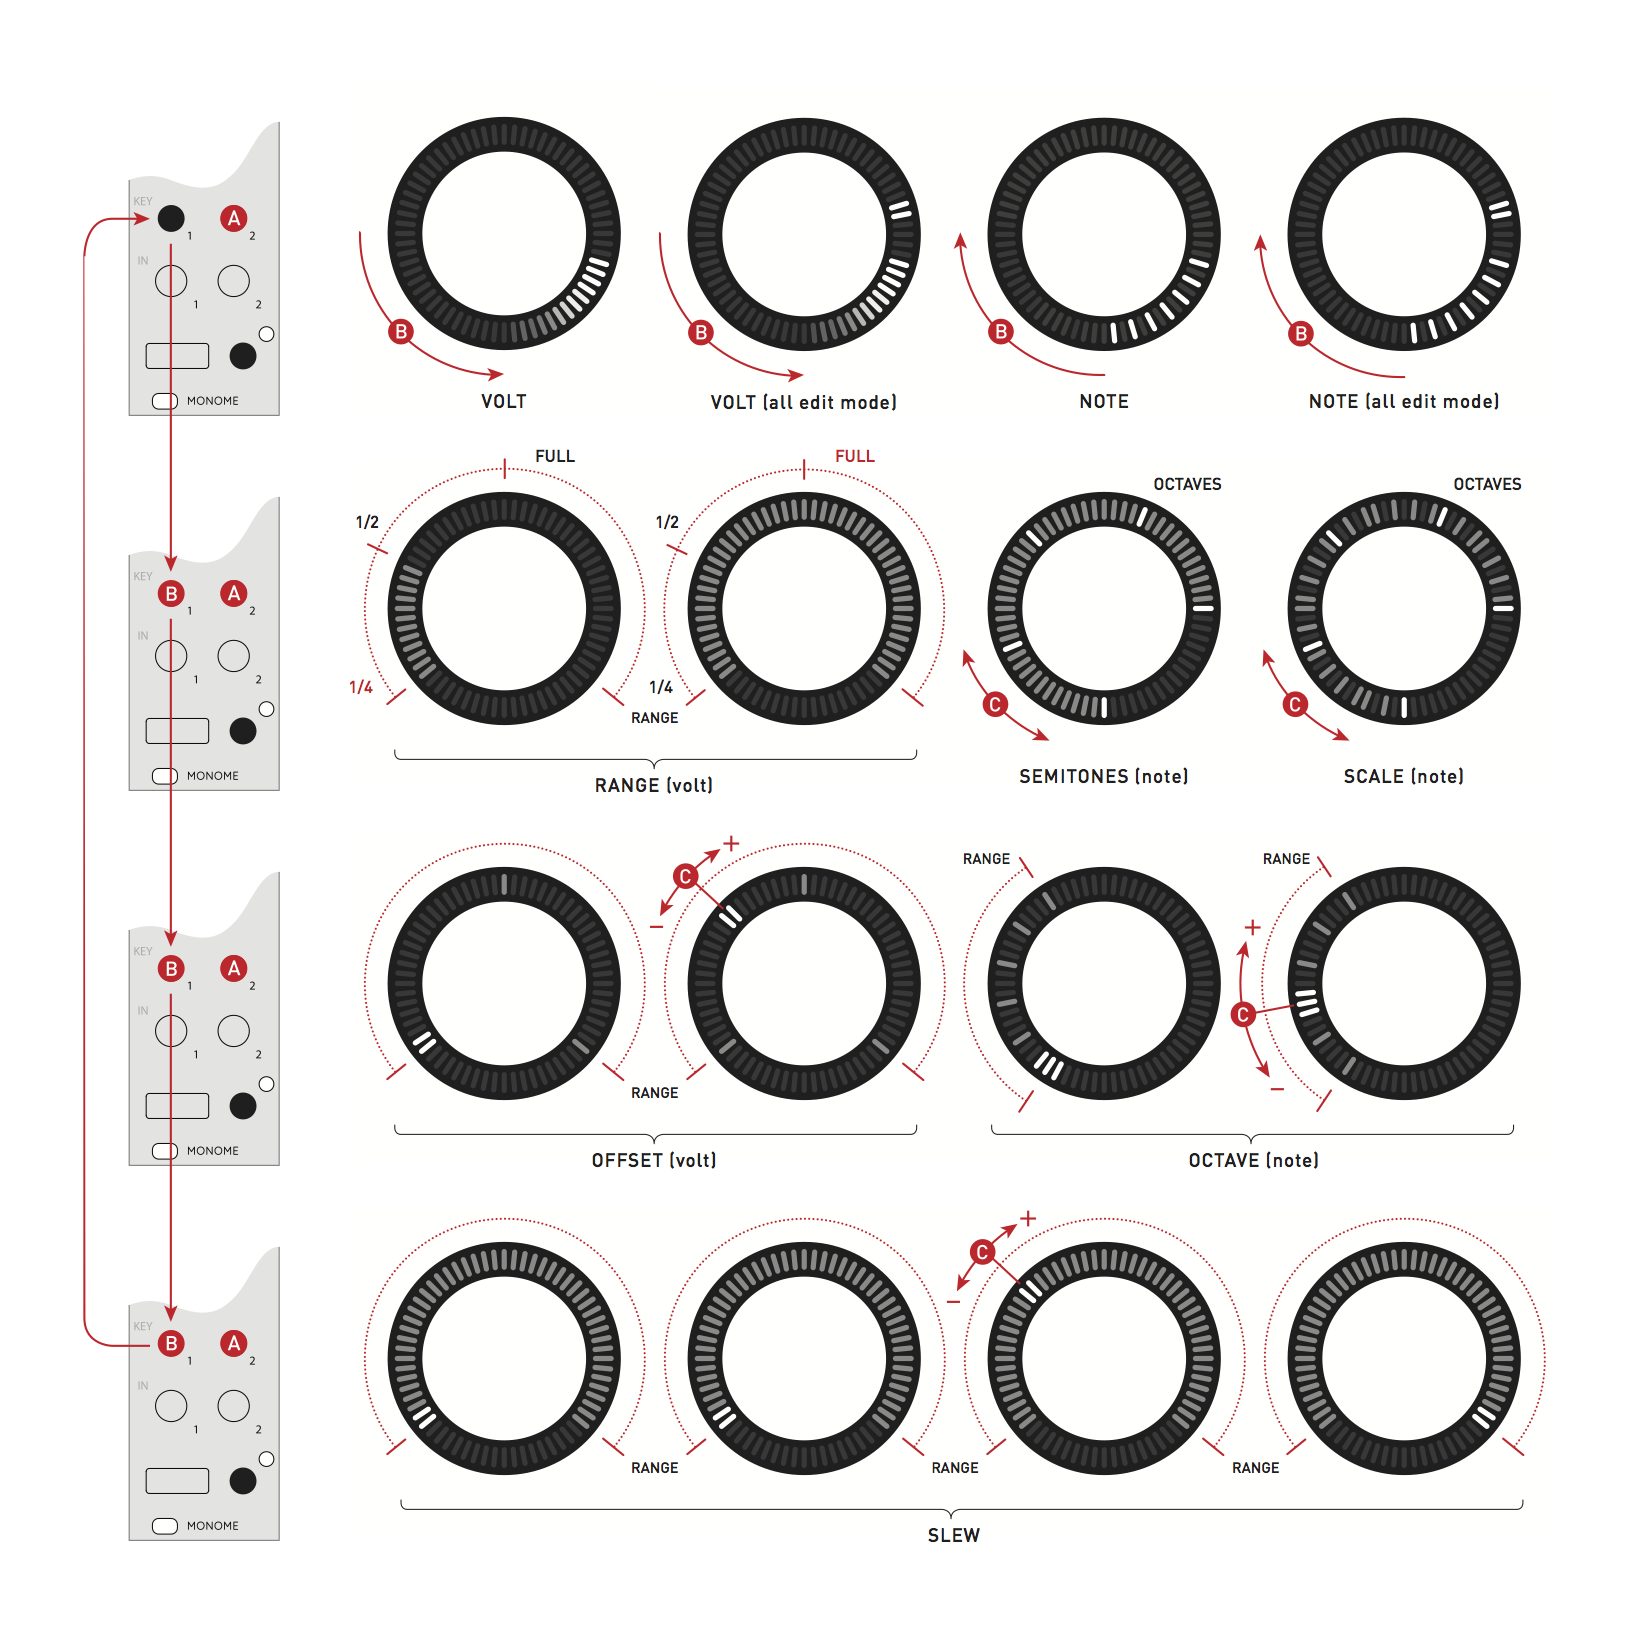
Mode - VOLT vs EDIT mode, also enable/disable ALL-EDIT mode.
Range/Scale - in VOLT mode we set Range, which specifies either full (0-10v), half (0-5v), or quarter (0-2.5v). In NOTE mode we set Scale, which lets you select various scale modes to confine values within.
Offset/Octave - in VOLT mode we set Offset, which adds a fixed voltage to ring values. 5v is marked at the north position. In NOTE mode we set Octave from 0-5 which similarly adds octaves to ring values.
Slew - for both modes, Slew is the transition time to new values on pattern change.
Patterns
Levels has 16 patterns to work with– pattern is the set of four values assigned to rings.
We can cycle to the next pattern with a short press of Key 1. On the next pattern we can set new values for the rings. Key 2 will reset us back to the start pattern.
We can set the pattern start and length by holding Key 1 to get into PATTERN mode.
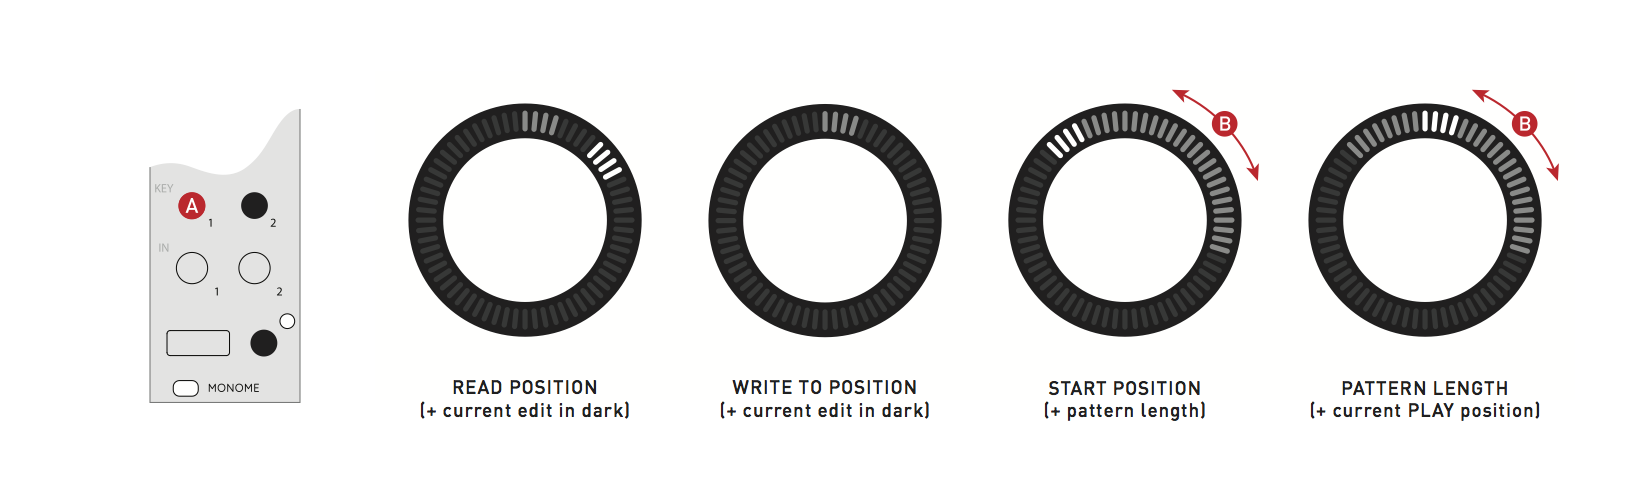
Ring 1 and 2 provide read/write functions. The current pattern is shown dimly. If we rotate ring 1 to a new position and release Key 1 we move to that position. Similarly for ring 2, we move to the given position but overwrite that pattern with whatever our current values are set at. It’s a way of copying values between patterns.
Ring 3 lets you move the pattern start position.
Ring 4 lets you change the pattern length. The length can be reverse, which will make patterns move in the other direction when clocked.
Parameters within CONFIG are fixed across patterns, but can differ between PRESETS.
Clocking
When a cable is present in In 1 we can clock Levels to change patterns with a low-to-high pulse. A pulse to In 2 will reset the pattern position to start.
When clocking externally editing is a little different. Key 1 and Key 2 still navigate edit position just the same, but the outputs of all CV/TR reflect the current play position dictated by the external clock. The play position is reflected in the PATTERN view.
You can dynamically change the PATTERN start and length while externally clocking pattern changes. I recommend trying this out.
Presets
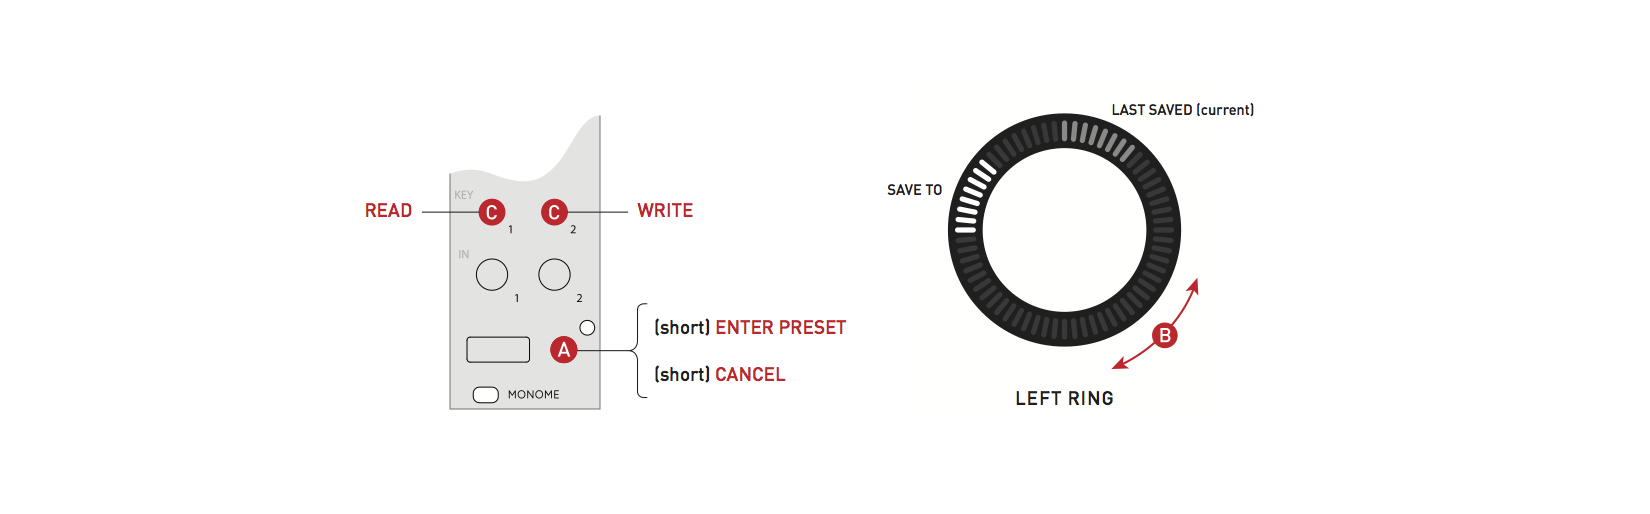
A short press to the preset key (next to the USB port) will enter PRESET mode.
The current preset will be shown dimly. Rotate to one of the other slots press either Key 1 or Key 2 to read and write respectively. Or press preset again to cancel.
Presets are written to flash, and the most recently used preset will be loaded upon power-up.
It is possible to backup all your presets as part of the module’s firmware; see modular firmware updates. Ansible can also save and load presets directly to a USB disk, see here.