sections
Hello, world?
Teletype starts up in LIVE mode. This is a basic interactive terminal where you can type in commands. Be sure the keyboard is plugged in. Try typing in:
HELLO
And then press ENTER. You’ll see UNKNOWN WORD: HELLO. Teletype doesn’t have great manners.
Backspace the greeting and instead type simply 7 and hit enter. Teletype will acknowledge you’ve typed in the number 7, and clear the prompt for a new command.
This is how LIVE mode works. You type commands and they are executed immediately. Live mode is indicated with the > character as the prompt.
Edges await your command
But really, now we will make something happen.
TR A 1
Executing this command will turn ON output A. The LED will light up, and voltage will be applied to this jack.
Here TR takes two parameters: the first (A) specifies the output number/letter (A-D) and the second (1) is the state: off (0) or on (1).
To turn off output A:
TR A 0
If we want to find out the current value of an output, simply leave off the last parameter:
TR A
In the terminal the value will be displayed.
There are a few other ways to use the TR outputs. If you want to switch the state of the output, use the following:
TR.TOG B
The TR output B will flip to on if previously off, or off if previously on.
THIS → Push the UP ARROW. Your last command will be recalled. Hit enter to execute it. Hit up several times to go through the command history. You can also push down (after going up) to navigate through previous commands.
Bip-bip-bip
TR.PULSE A
Make a pulse. Try it. If TR output A is on when the pulse is executed, you’ll get an inverted pulse.
How long is that pulse? Type:
TR.TIME A
Teletype will tell you. By default it is 100, which is in milliseconds. To change this to 200ms:
TR.TIME A 200
Now try TR.PULSE A for longer pulses (remember to use UP ARROW for command recall).
OK when do we make music?
What makes these little commands interesting is the ability to string a bunch of them together into a SCRIPT assigned to a trigger input– as if some other part of your modular types furiously each time a pulse came in.
We switch between LIVE and EDIT mode by hitting TAB.
Upon switching to EDIT mode however, you’ll likely notice a bunch of text suddenly on the screen– Teletype ships with the first SCENE loaded. Let’s take a quick detour to clear the scene.
Scene loading
Let’s get a blank scene as a starting point. Hit ESC to enter the SCENE page.
Scenes are listed along with their help texts. Use the brackets [ and ] to move through the available scenes. Hit ENTER to load the selected scene. In our case, let’s load scene 9, which should be blank.
Back to the script
Upon load you’ll be thrown into EDIT mode. You’ll see the prompt read 1 indicating that you’re editing script 1.
- Each trigger input (1-8) has its own script.
- A script is executed on the positive (low-to-high) edge of a trigger or gate.
- Scripts can have up to 6 commands (lines).
The EDIT interface simply lets you edit the commands of the script. Type in:
TR.TOG A
Patch some sort of timer into trigger input 1. Now on each incoming trigger signal the trigger output A is being flipped.
After entering a command the edit line is moved down, so you can add another line. Go ahead and do that:
TR.TOG B
Now your script has two lines, and one input is making two outputs flip around.
Say you want to edit the first line of the script– simply use the UP ARROW to navigate up there. The command will be copied to the edit prompt. You can use the DOWN ARROW similarly to navigate back to the bottom.
So far we’ve been modifying script 1. Use the brackets [ and ] to switch scripts. Hit ] to edit script 2:
TR.TOG B
TR.TOG C
Now trigger input 2 will flip outputs B and C.
If you continue hitting the brackets you’ll stumble upon the M and I scripts– we’ll be describing those in future chapters.
Scissors and glue
Navigate back to TR.TOG C and hit ALT-C. This will copy the whole command. Hit ] to go to script 3, and then ALT-V to paste the command. You can also use ALT-X to cut.
You can copy/paste between LIVE and EDIT modes, so if you try something out in LIVE mode you can quickly UP then ALT-C to copy it prior to pasting it into a script by hitting TAB.
Sometimes you may want to insert a command at the current position rather than overwrite the existing command. Use SHIFT-ENTER to insert rather than overwrite the current command.
Save it for later
Teletype saves scenes to internal flash memory. Presently it can store up to 32 scenes. The currently loaded scene will be automatically recalled on power-up, but you have to store it to memory first.
Hit ALT-ESC to get into SCENE (WRITE) mode. You should still be on blank scene 9– you can use the brackets [ and ] to switch where you’re writing to– careful not to overwrite existing scenes accidentally!
You can type a scene title into the top line, and “helper text” into the lines below. Typically it’s good to describe what the scene does, and we’ve found it best to give “function descriptions” for the trigger input scripts. For example:
JUMPY EDGES

THINGS GO UP AND DOWN

1: TOGGLE A B
2: TOGGLE B C
When you’re ready to save your scene, hit ALT-ENTER. It’s now in flash and will run immediately on your next power-up.
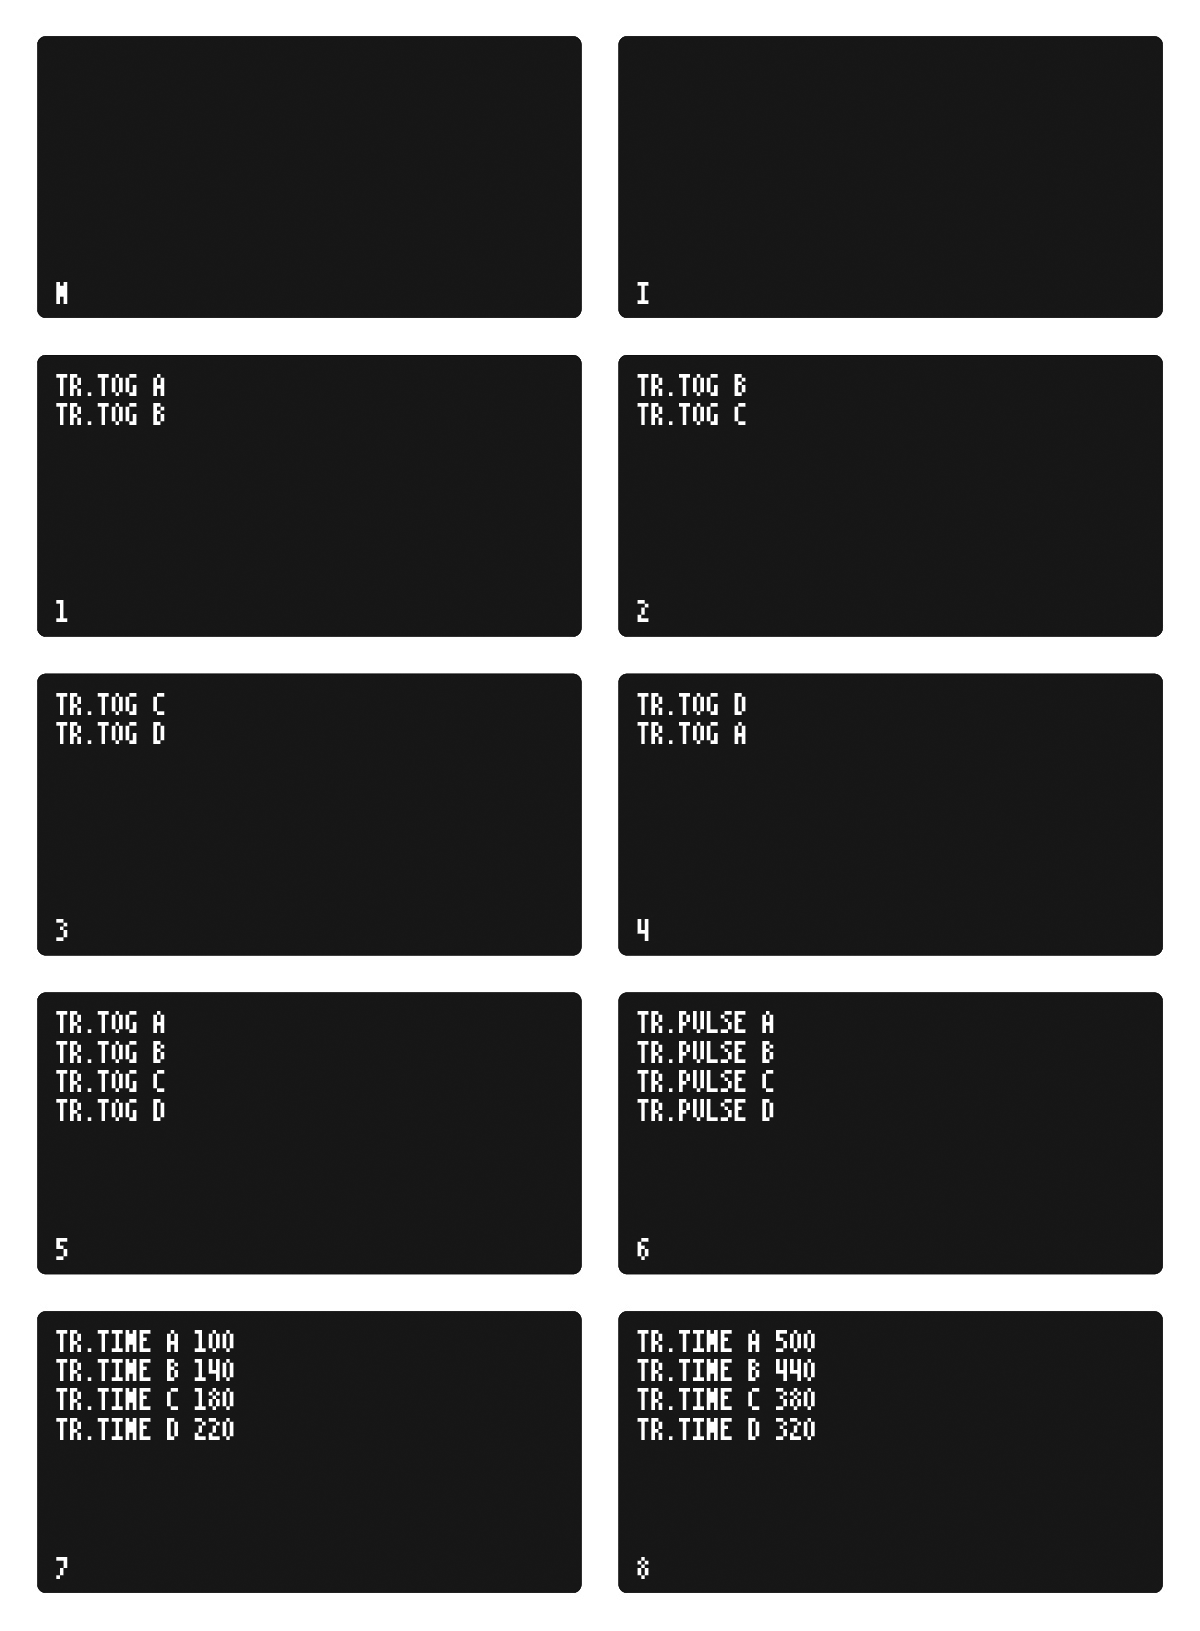
EXAMPLE: JUMPY EDGES
This scene is featured in the banner video above.
The following scene uses all 8 trigger inputs to act on outputs A-D. Try patching outputs A-D as gates to various sound-altering inputs.
Inputs 1-4 flip two sequential outputs, and Input 5 will flip all outputs. Try having input triggers 1-4 all patched, running at slightly different rates. You’ll notice patterns emerge.
Input 6 pulses all outputs. Inputs 7 and 8 change the pulse length. Given the pulse will invert the signal, try interjecting some pulses while scripts 1-5 are running for some variation.
Printable Blank Scene Template
Reference
Commands
TR x y          set trigger output x (A-D) to y (0-1)
TR.TOG x        flip trigger output x to the opposite state
TR.PULSE x      pulse trigger output x
TR.TIME x y     set pulse time of trigger x to y (ms)
You can also browse help within Teletype by using ALT-H to toggle help mode.
Teletype Studies Continued
Part 1: Navigating and making edges
Part 2: Curves and repetition →