control + clock
sections
norns plays well with others – black box drum machines, MIDI keyboards + faderbanks, modular synths, Max/MSP, Ableton Live, etc.
In this section, we’ll cover the basics of nestling norns among your other gear and establishing leader/follower networks for clocking in a variety of contexts.
sections: MIDI connect — managing MIDI devices — MIDI mapping — OSC — clocking
MIDI control
connect
When you connect a MIDI device to one of the four USB ports, norns automatically catalogues it under SYSTEM > DEVICES > MIDI:
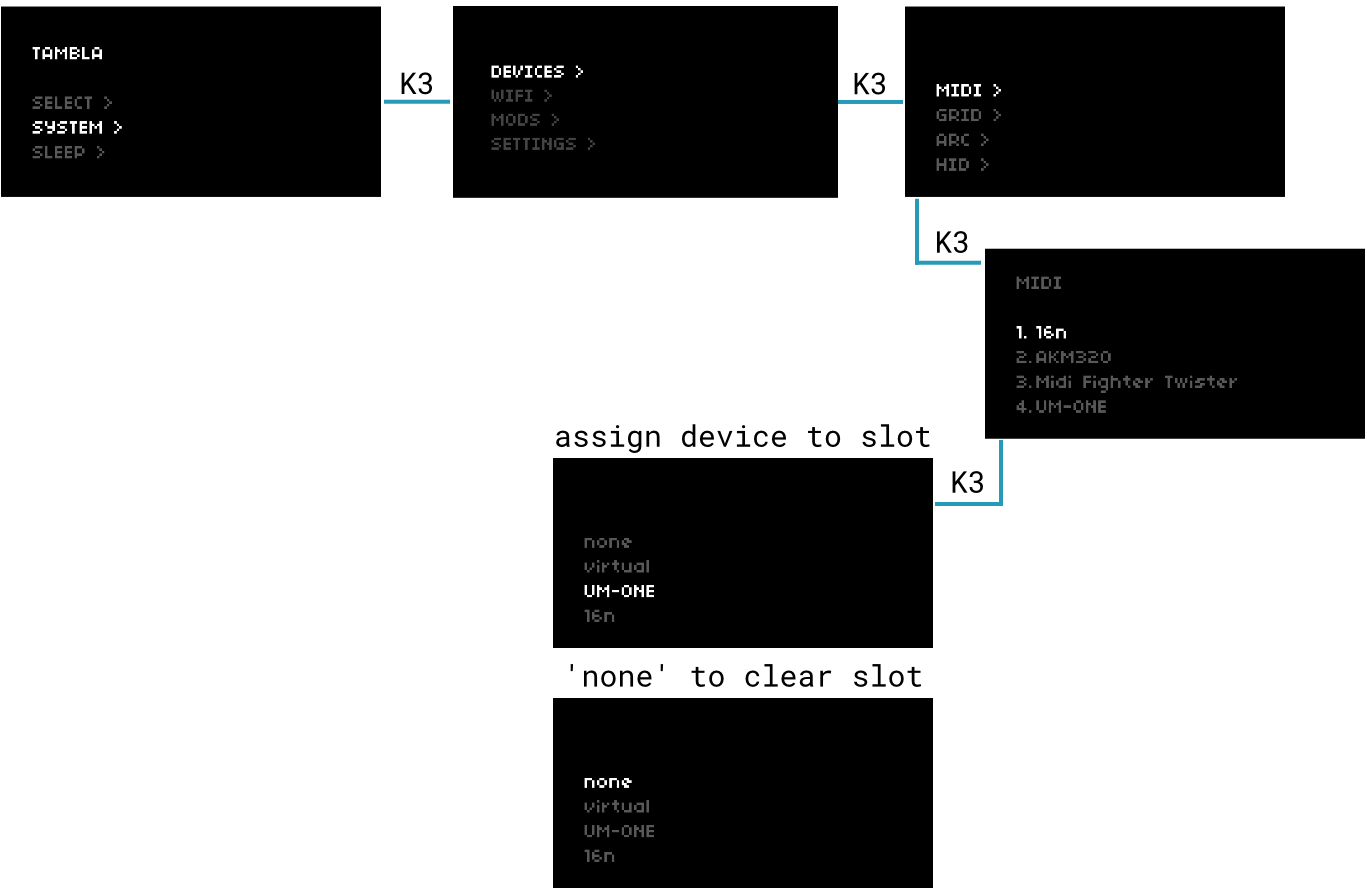
figure 1: managing MIDI devices through SYSTEM > DEVICES > MIDI
norns can remember up to 16 previously-connected MIDI devices
The order of devices actually matters – many scripts will have a parameter for device port or similar, where you’ll need to specify which slot holds the device you want to use (control in or out). If you’re ever unsure which slot has which device, just check the SYSTEM > DEVICES > MIDI page.
norns will remember these devices until they’re manually removed, even if they are no longer connected. If you have more than 16 unique USB-MIDI devices you’d like to use with different norns scripts, you’ll need to manage these ports over time.
manage
Let’s say we’re running a sequencer and we want to send MIDI out a connected USB-MIDI interface. The device list in figure 1 shows a 16n at port 1, but we want this to be the MFT (MIDI Fighter Twister).
If a script doesn’t allow you to specify a MIDI device port for incoming or outgoing MIDI, the script will default to the device at port 1.
To assign devices:
- select the port you wish to modify
- press K3 to open a menu of currently connected devices
- use E2 to select the device you wish to assign to this port
- press K3 to assign it
To clear ports:
- select the port you wish to modify
- press K3 to open a menu of currently connected devices
- press K3 while
noneis selected to clear the port’s assignment
map
As we saw in play, the controls in a script’s PARAMETERS can be fun to modify in realtime. To wrangle a bunch of parameters at once, let’s map some to one of our connected MIDI controllers.
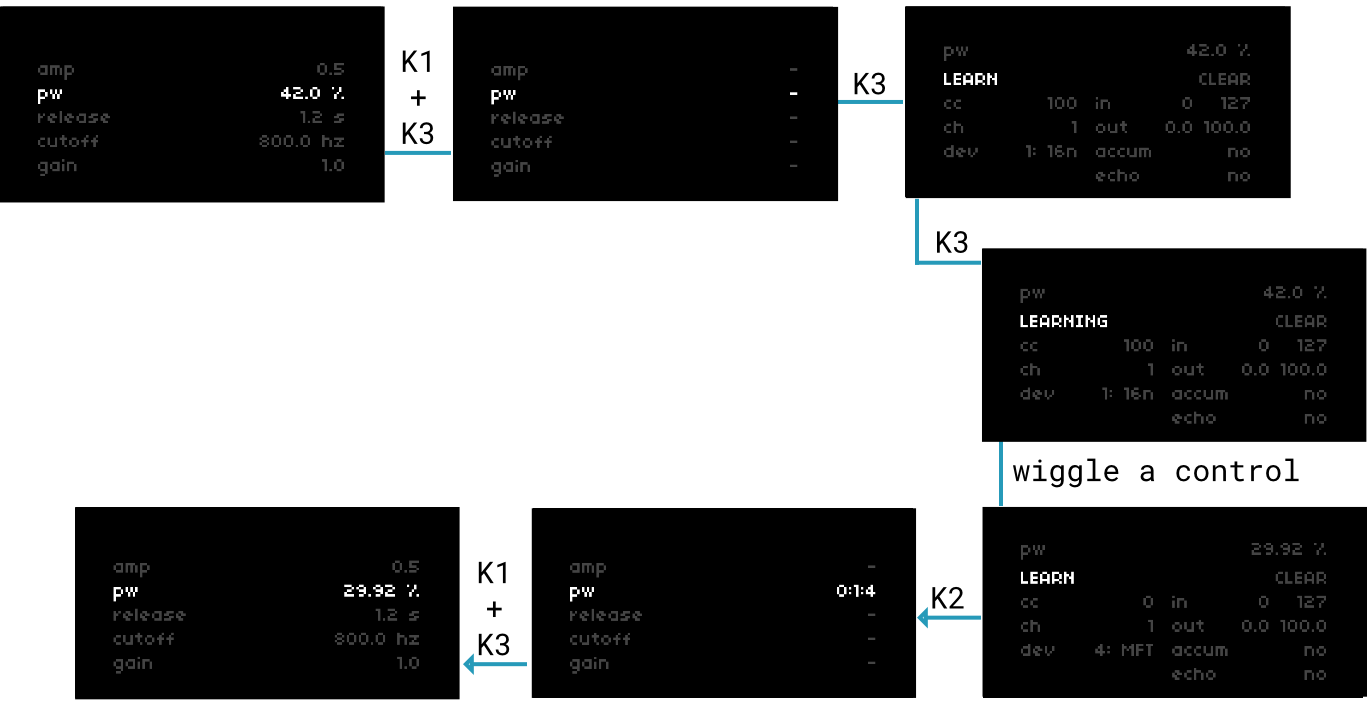
figure 2: mapping MIDI control
To MIDI-learn:
- hold K1 and press K3 to enable mapping mode
- use E2 to select the parameter you wish to map and press K3 to open its mapping menu
- with LEARN selected (default), press K3 and wiggle your MIDI control to map it to the parameter
manual map settings
-
CLEAR: clears the current map
-
cc: controller MIDI cc
-
ch: controller MIDI channel
-
dev: controller MIDI device
- slots 1-16 enumerated in
SYSTEM > DEVICES > MIDI - norns supports up to 16 devices
- devices can be queried in maiden:
tab.print(midi.devices) -- > 1 table: 0x448a70 -- > 5 table: 0x6abbb8 -- > 3 table: 0x617c30 tab.print(midi.devices[5]) -- > dev userdata: 0x6b70b4a8 -- > id 5 -- > name OP-Z - slots 1-16 enumerated in
-
in: range of incoming MIDI values
-
out: the min/max values that in spans
- eg. though a filter parameter might span 20 Hz to 20000 Hz, you can use out as a way to clamp a MIDI fader to a 800 Hz - 1600 Hz range
- hold K3 while adjusting to fine-tune with 1/20th quantum
-
accum: enable when using relative midi cc streams (for controllers that send deltas rather than 0-127 absolute streams)
-
echo: enable when using devices which can receive MIDI values to redraw LEDs or stateful text (eg. MIDI Fighter Twister or Faderfox EC4)
PMAPs
Every time a parameter is mapped, norns will save this configuration as a PMAP file. PMAPs are unique to the currently-loaded script and are stored under data/[scriptname]/[scriptname].pmap.
An example entry:
"bd_atk":"{dev=1, ch=1, accum=false, out_lo=0, value=0, in_hi=127, out_hi=1, in_lo=0, cc=100}"
You’ll notice that these entries are identical to the ones located on the mapping screen.
keyboard
An attached USB keyboard can be used to enter text anywhere across the norns system (eg. WiFi passwords, PSET filenames, TAPE names, etc). You can manage the keyboard layout via SYSTEM > DEVICES > KEYBOARD LAYOUT, where you’ll find 27 country codes.
A number of hotkeys are also available. To access the system menus:
F1: LEVELSF2: TAPEF3: HOMEF4: PARAMETERS
To toggle between script interface and system menus: F5
While in the system menus:
arrow up/arrow down: E2 with delta +/- 1 (while held)pageup/pagedown: E2 with delta +/- 6 (while held)+/-: adjusts selected parameter value up/down (while held)arrow left/arrow right: K2 / K3
Contributions to extend functionality are welcome.
OSC
Open Sound Control (OSC) is a network protocol for sending messages supported by numerous sound and media applications.
OSC allows you to control norns over WiFi using applications like Max/MSP, TouchOSC, Clean OSC, OSCulator, or Wekinator. You can create custom control surfaces to extend your gestural interactions with norns – eg. rather than using MIDI faderbank to change reverb damping, you could use a biometric sensor or Wiimote.
All of the audio parameters have OSC names. To see them, navigate to PARAMETERS > MAP:
| param | OSC name |
|---|---|
| LEVELS | — |
| output | output_level |
| input | input_level |
| monitor | monitor_level |
| engine | engine_level |
| softcut | softcut_level |
| tape | tape_level |
| monitor mode | monitor_mode |
| headphone | headphone_gain |
| REVERB | — |
| reverb | reverb |
| rev engine input | rev_eng_input |
| rev cut input | rev_cut_input |
| rev monitor input | rev_monitor_input |
| rev tape input | rev_tape_input |
| rev return level | rev_monitor_output |
| rev pre delay | rev_pre_delay |
| rev lf fc | rev_lf_fc |
| rev low time | rev_low_time |
| rev mid time | rev_mid_time |
| rev hf damping | rev_hf_damping |
| COMPRESSOR | — |
| compressor | compressor |
| comp mix | comp_mix |
| comp ratio | comp_ratio |
| comp threshold | comp_threshold |
| comp attack | comp_attack |
| comp release | comp_release |
| comp pre gain | comp_pre_gain |
| comp post gain | comp_post_gain |
| SOFTCUT | — |
| input adc | cut_input_adc |
| input engine | cut_input_eng |
| input tape | cut_input_tape |
Format your messages as /param/osc_name value, eg:
/param/comp_ratio 2.3
/param/rev_monitor_output 0
/param/output_level 0.5
norns receives OSC messages on port 10111
Want to see norns + OSC in action? Check out @felart’s TouchOSC template for the LEVELS, REVERB, and COMPRESSOR controls
For more detail on norns + OSC scripting, please see study 5.
clock
norns benefits from a global clock system. This helps makes it straightforward to pass a clock signal from an external source to a norns script, to pass the norns internal clock to a modular synth, or sync norns and Ableton Live over WiFi.
Please ensure that your MIDI devices are connected as needed by following the steps in connect
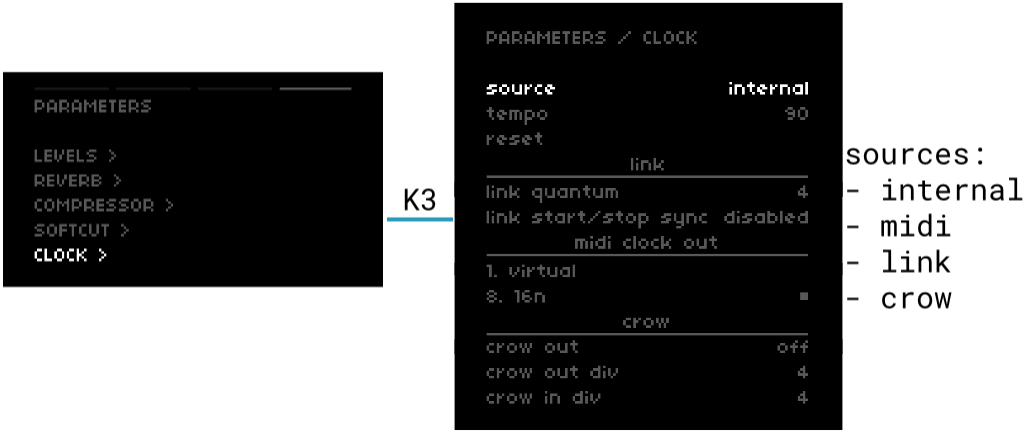
figure 3: global clock settings
settings
source
The global clock can be driven from four different sources.
- internal: advances independently
- midi: an incoming MIDI clock signal will advance
- link: if Ableton Live and norns are on the same WiFi network, enabling Link in Live will sync norns + Live in mutual following
- crow: pulses from a modular synth into a USB-connected crow will advance
tempo
If clock is set to internal or link, use E3 to adjust tempo (internal minimum: 1 bpm / Link minimum: 20 bpm ; maximum: 300 bpm)
If clock is set to midi or crow, an average tempo will be listed but cannot be changed.
reset
Press K3 to restart the clock if it’s stopped.
link quantum
From Ableton:
“In order to enable the desired bar and loop alignment, an application provides a quantum value to Link that specifies, in beats, the desired unit of phase synchronization. Link guarantees that session participants with the same quantum value will be phase aligned, meaning that if two participants have a 4 beat quantum, beat 3 on one participant’s timeline could correspond to beat 11 on another’s, but not beat 12. It also guarantees the expected relationship between sessions in which one participant has a multiple of another’s quantum. So if one app has an 8-beat loop with a quantum of 8 and another has a 4-beat loop with a quantum of 4, then the beginning of an 8-beat loop will always correspond to the beginning of a 4-beat loop, whereas a 4-beat loop may align with the beginning or the middle of an 8-beat loop.”
link start/stop sync
If you’d like to sync the transport of another Link-enabled device to norns, then toggle this setting to enabled. Please note that not all community scripts have transport-synced start + stop mechanisms – for code examples to add transport control to a norns script, see the clocks study.
If you run into any trouble with establishing a Link connection between norns and another device, be sure to check out this detailed troubleshooting document from Ableton.
midi clock out
norns can send a MIDI clock signal out to any port, regardless of the current clock source. This means norns can be a Link-to-MIDI-clock or CV-pulse-to-MIDI converter.
norns will automatically populate the currently-connected MIDI devices in this list. Use K3 to toggle clock out on/off for each entry.
crow out
norns can send a clock pulse through a USB-connected crow, to clock a modular system. Using the above settings, this means norns can also convert MIDI or Link clock to CV, as well as act as a clock divider/multiplier.
crow out div
Sets the pulse rate per quarter note, eg. 4 = 4 pulses per quarter note (16ths).
crow in div
Sets the how many incoming pulses equals a quarter note, eg. 4 = 4 pulses per quarter note (16ths).