norns: hardware help
Between this page and the search bar above, you should be able to solve most norns troubles that you’d run into.
If you need additional help, we’re here for you! Please send an email to help@monome.org using this format:
- What issue did you experience?
- What steps are necessary to reproduce the issue?
- What additional hardware was connected to norns at the time of the issue? This includes controllers, wifi dongles, external hubs, etc.
- Please attach any output printed in maiden when the issue occurs
If you’re unable to supply concrete steps to reliably reproduce the issue, this will reduce our efficacy. Please understand if we point you to existing resources and ask you to verify additional info.
For support with specific scripts and libraries, please visit lines and search for the script’s thread.
sections
- replacing parts - norns standard
- standard norns: CM3+
- WiFi troubleshooting
- boot-up troubleshooting
- grid connectivity troubleshooting
- audio input/output hardware specs
- can I plug modular signals into norns directly?
- how do I send MIDI to/from norns from/to another computer?
- norns shield: can I use the Pi’s HDMI output to mirror the shield’s screen?
- battery readings
replacing parts - norns standard
screen
The norns screen is a Newhaven Display 2.7” Graphic OLED Module with Molex Connector. Every standard norns comes built with the white model (NHD-2.7-12864WDW3-M), though it may be swapped out for yellow (NHD-2.7-12864WDY3-M). Either can be ordered online from many electronic component distributors.
When installing, be sure to handle from the sides – wiping away debris or oil from the viewing area can cause damage, even with a microfiber cloth. For the least amount of frustration, also be sure to have an air blower nearby – dust can quickly accumulate in this process, which is easiest to remove with a quick shot of concentrated air.
wifi nub
In order to use hotspot functionality, please be sure to purchase a replacement WiFi adapter with the Ralink RT5370 chipset.
charger
The charger that comes with norns is GEO151UB-6020 and its power specs are 2A / 5.25V. A direct replacement can be purchased from Adafruit. This brick is of very high quality and can use 110 or 240 VAC input, so it can be used outside of the US with a simple plug adapter.
battery
Standard norns has a PKCELL LP803860 3.7V / 2000mAh with a JST connector.
If performance does not improve, then a direct replacement can be purchased from Adafruit or DigiKey, or by emailing help@monome.org for a replacement (20 USD, shipping included, only US or can be bundled with an existing international purchase).
Before you purchase a new battery, please consider that your norns may not be reporting battery performance accurately. To test, fully drain the battery and then charge it fully.
encoders
If your encoders feel “jumpy”, you can verify that your encoders are in need of repair by performing this simple test:
- navigate to the LEVELS page
- turn a level all the way up and continue to turn the encoder
- if the level jumps and does not remain at maximum, then you might want to replace that encoder
For in-depth testing, see this thread on lines.
We do not recommend at-home repair, as the encoders are extremely sensitive to heat and require quick, confident soldering. To arrange repair / replacement, please email help@monome.org with the following info:
- your order number (if you purchased the unit from monome directly)
- if you did not purchase from monome, please provide any details you have about the unit’s prior life
- use a small screwdriver to remove the bottom plate and let us know if your board is either black or forest green
standard norns: CM3+
All standard norns units produced before 2021 have a Compute Module 3 (CM3), with 4gb of storage. A-stock units produced during and after 2021 (as well as a few 2021 b-stock units) have a Compute Module 3+ (CM3+), with 32gb of storage.
Every standard norns can run the CM3+ with 32gb of storage, by swapping the chip at home following the steps outlined below.
confirming Compute Module model
To confirm which chip your norns has installed, connect via SSH and execute pinout, which will return the name (and a cute illustration!) of your installed Compute Module:

If you do not have a CM3+ installed, the steps in the next section walk through the upgrade procedure (assuming you have a CM3+ chip handy).
CM3+ upgrade
There is no soldering needed, but you will have to disassemble your norns a bit. Please follow this tutorial video:
Note: please see data management help for up-to-date information about the filesystem expansion steps.
WiFi troubleshooting
standard norns
If you are not actively using the WiFi nub, it’s best not to keep it plugged in. It uses a lot of power, draining both battery and system resources.
If you are consistently unable to connect your norns to WiFi through the connection steps outlined here, please perform the following steps:
-
Boot norns first, then plug in the nub.
-
Confirm that your router is broadcasting a 2.4GHz band – the WiFi nub does not support 5GHz.
-
If your network name has any apostrophes, it might be interpretted as a prime, which would cause connection failure. Removing apostrophes from network names has helped resolve most issues with connectivity.
-
Try getting very close to your WiFi router. Bad signal can make it seem nonfunctional.
-
Plug the WiFi nub into a non-norns computer (laptop/desktop ; MacOS/Windows/Linux) and confirm that the nub functions as expected. If your nub is defective, please email help@monome.org for a replacement.
-
If you are prompted to update the nub’s drivers, please do so. Even if there are no updates available, sometimes the simple task of searching for an update resolves connectivity issues. When this process completes, plug the nub back into norns.
-
If norns is still unable to connect to WiFi, connect the power cable to your non-norns computer and follow the
serialsteps outlined here. Once you perform this serial login, try executingnmtuifor a graphical interface of the WiFi utilities, which may have better luck connecting to a network:
-
If you are still unable to connect, please email help@monome.org with the following information:
- Whether your nub was able to successfully connect with a non-norns computer
- Whether the nub seems active if plugged in after norns boots
- Screenshots of the terminal screens in step 5
- The name of your WiFi network
- The make/model of your WiFi router
- Your router config (WPA, WEP, etc)
- Whether your router is set up as a mesh
norns shield
For the best overall performance, for both CPU and RF interference, we highly recommend disabling WiFi when you don’t need it.
If you are consistently unable to connect your shield to WiFi through the connection steps outlined here and you are sure your password is being entered correctly, please perform the following steps:
-
If your network name has any apostrophes, it might be interpretted as a prime, which would cause connection failure. Removing apostrophes from network names has helped resolve most issues with connectivity.
-
Try connecting shield to your router via ethernet and connecting to it from another computer via SSH.
-
In Terminal, execute
nmtuifor a graphical interface of the WiFi utilities, which will provide more information about network connection issues: -
If you are still unable to connect, you might need to change your Pi’s country code. In Terminal, execute
sudo raspi-configand enter Localisation Options to set your country. -
Beyond these steps, we recommend checking the
journalctlfile to see additional information about why your Pi is failing to connect. Executejournalctl --no-pagerto see a full log.
If you’ve hit the end of this list without success, we recommend searching online for your specific router and confirming whether there’s any known configuration steps for your Pi model and your router. Network connectivity relies on the Pi itself, rather than the norns software stack.
boot-up troubleshooting
standard norns
If your norns does not seem to booting, it’s possible that either the Compute Module (CM3) is not seated correctly, or the screen ribbon is pressing against the CM3 when its fully assembled and shorting the chip.
Follow along with the dissassembly video here. Re-seating the CM3 will simply involve ejecting it (shown ~2:30 in the video), aligning it confidently, and placing it in again. As you reassemble the unit, before you screw the board back to the enclosure, check to see if it will power as expected – the board will be loosely tethered by the screen ribbon and the battery connector. If it boots, then you’ll need to ensure that the folds on the screen ribbon are tight – this should help reduce the pressure against the CM3. Just fold them a bit tighter and, as a final test, try screwing the board back to the enclosure to verify that the ribbon is no longer pushing the chip down.
norns shield
If your shield does not seem to be booting, the first thing to check is if the “startup tone” is occurring from your shield’s output. Connect headphones or a speaker to shield’s output (demarcated by the outward-facing arrow) and power it up – within 20 seconds or so, you should hear a sine-like tone which indicates the norns OS has been successfully loaded.
If you do not hear a startup tone, the norns OS is not booting. The best next step is re-flashing your SD card following these steps.
- If you do not hear a startup tone after a successful re-flash, we recommend confirming that your Raspberry Pi is operational. The easiest way to do this is to remove the Pi from the shield, attach it to an HDMI monitor/TV, and power the Pi separately. If the Pi is operational, you’ll see a rainbow square on your monitor/TV.
- If your Pi is operational, your shield might require repair/re-touching. See the
next stepssection below. - If your Pi is not operational, replacing the Pi should resolve the issue.
- If your Pi is operational, your shield might require repair/re-touching. See the
- If you do hear a startup tone after a successful re-flash, but do not see any activity on the screen, the screen or the header might be a point of failure. See the
next stepssection below.
next steps
- If you purchased a fully-built unit (no soldering) from monome, please email help@monome.org for service or replacement.
- If you soldered the unit yourself, please post images of the board to this thread. Note that this is a community resource, so please be respectful of time and energy limitations.
- If you purchased it from a third-party who soldered the components, please reach out to them for resolution.
grid connectivity troubleshooting
standard norns shuts off while running on battery
When grid is plugged into a standard norns running on its internal battery (rather than off its power supply), the power draw to boot grid can overwhelm norns and result in a shutdown. This does not always occur and can be dependent on the current battery level, so the best practice for working with a grid + norns on battery is to boot norns with the grid plugged in.
grid not connecting
If you’ve recently received a new grid, you may find that scripts do not seem to be connecting to it.
To troubleshoot:
- ensure your norns is up to date via
SYSTEM > UPDATE(see wifi + files for more info) - many scripts assume that an artist only has access to one grid (versus many MIDI controllers), and automatically connect to the first slot under
SYSTEM > DEVICES > GRID.- disconnect all grids
- press
K3on slot 1, selectnone, pressK3 - press
K3on slot 2, selectnone, pressK3 - ..repeat for any slot that doesn’t say
none - connect your new grid + it should populate slot 1!
audio input/output hardware specs
Codec
Standard norns has audio codec CS4270. In 2022, we revised the shield’s circuit to CS4271, due to global component shortage – more info here.
The codec is externally clocked with a crystal (for no jitter), and the sample rate is fixed at 48k.
Inputs
The standard norns input jacks are configured for balanced or unbalanced. Input impedance is 10k.
The shield has only one stereo input.
Outputs
The standard norns output jacks are configured for balanced or unbalanced. Output impedance is 590 ohm. Output from the codec is connected to the headphone driver as well.
The shield has only one stereo output. Revision 210330 outputs 1.75V peak-to-peak, which is roughly consumer line level.
Headphone driver
The standard norns headphone driver is a TPA6130A2. Volume is controlled via i2c with a simple protocol, so no driver is necessary. The i2c lines are connected to i2c0.
The shield does not have a separate headphone output.
norns shield noise troubleshooting
While the standard aluminum norns is a fully-isolated pro-audio device, norns shield has a necessarily different footprint and construction. As a consumer-level audio device, there are cases where the norns shield can experience interference from the underlying Pi unit, which creates noise in the audio lines.
Over the shield’s many iterations, we have worked to reduce these issues – revision 210330 improved audio isolation over the previous two releases (191106 and 200323), which 211028 (the latest model) retained.
If you experience noise on a 211028 unit, this is most likely the WiFi antenna on the Pi creating interference. To protect against this, each 211028 board was shipped with a white sticker covering the components in closest proximity to the Pi’s USB + Ethernet ports:
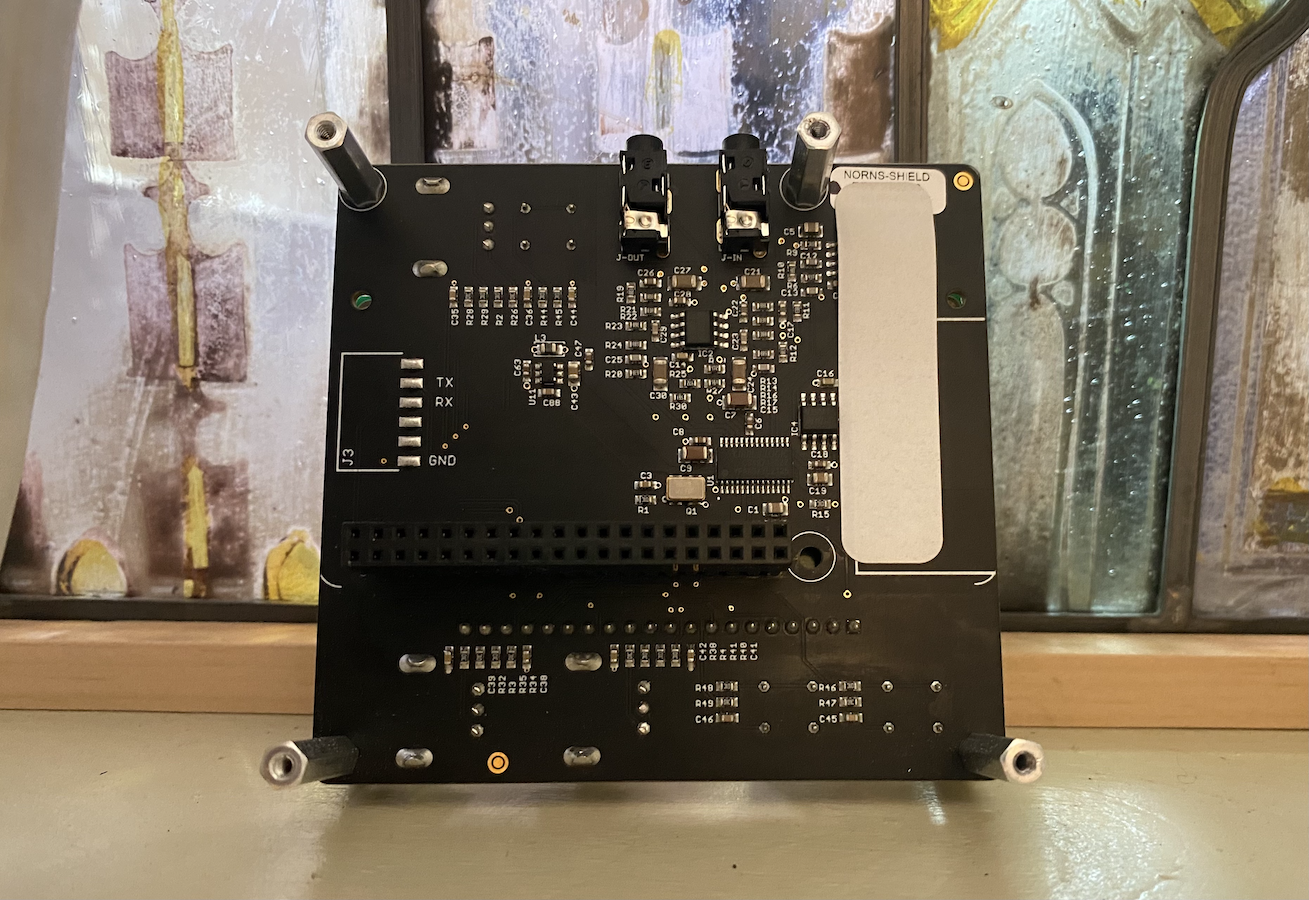
If you experience consistent noise, either visually represented on the in VU meter on the LEVELS screen or generally when listening to the shield’s output, disassemble the unit and check the state of this sticker.
If the sticker has been removed, or if it has worn down, or is just not effectively shielding against the strength of your Pi’s WiFi antenna, it can be replaced with a few layers of electrical tape.
Also, reassembling the unit with a little more looseness might also help – over-tightening the enclosure screws can contribute to unexpected noise + interference.
If there is still interference when WiFi is on and networking while monitoring is necessary, we recommend turning WiFi off (via SYSTEM > WIFI) and plugging directly into your router via the Pi’s Ethernet jack. This will completely bypass the Pi’s antenna and any related interference in the audio lines.
can I plug modular signals into norns directly?
NO!
norns (both standard and shield) has line-level inputs only – sending modular signals, which run very hot, through these inputs may result in damage. Please attenuate your modular signals before sending them into norns with an interface module like Intellijel’s Audio Interface.
how do I send MIDI to/from norns from/to another computer?
Since norns is a MIDI host and other computers are also MIDI hosts, norns is not able to send/receive MIDI to/from a DAW or computer directly over its USB charge port.
- connect a Roland UM-ONE mk2 to norns with USB, which will create a DIN-MIDI input and output for norns – then connect UM-ONE MIDI to your computer using another USB-MIDI interface
- build this DIY USBMIDI host-to-host adapter from
@okyeron - use a USB host MIDI router like Sevilla Soft’s MIDI USB-USB
norns shield: can I use the Pi’s HDMI output to mirror the shield’s screen?
No.
The norns OS is primarily developed for/on the standard norns hardware, which makes use of a compute module which has a smaller form factor than the traditional Pi board and does not have any of the additional I/O. This allows standard units to provide pro-audio I/O, a battery, and an overall roomier layout while maintaining a small footprint.
Avoiding the additional CPU headroom required to support external video output also allows us to optimize the capabilities of norns, to provide standard norns and shield users with the same foundational software experience.
battery readings
When you hit K2 on the SELECT / SYSTEM / SLEEP screen, you’ll be shown helpful system status information, including the current state of the battery at the bottom right corner:

- if the
mAreading is negative, this means power is being drawn- if you ever see a consistently negative reading while plugged into wall power, then the draw on the built-in USB hub is likely too high and you should use an externallty-powered hub
- if the
mAreading is positive, this means power is being supplied and the battery is charging up - on wall power, as the battery gets closer and closer to 100%, you may see the positive
mAbegin to reduce – this is normal / expected, as norns is ‘trickling’ charge in - at 100% battery, you’ll likely see
0mA, since norns does not need to draw any more power to charge the battery – this is a safety against overcharging and degrading your battery, so that if you leave your norns plugged into wall power for months, you’ll still have a working battery when you detach
‘Normal’ battery draw is difficult to define, as it depends on the script being used and the hardware connected to norns. Generally, without any additional hardware connected, a draining battery will display -400mA to -500mA and a charging battery will display 400mA to 600mA as it charges toward 100%.