sections
Making lists
There comes a point when you’ll want more numbers. Not just a few variables– you’ll need bags of numbers, heaps of numbers, rivers of numbers.
Teletype has patterns which normal programming languages call arrays. You can think of a pattern as a fixed-length list of numbers.
- Each pattern has 64 indexes (positions).
- There are four patterns.
- Patterns store the same data type as the rest of Teletype: -32384 to 32384.
- Patterns are stored with the scene.
OK, why do we need heaps of numbers? There is no specific reason, but you can do quite a lot with such a list. The most obvious (and fun) is to make a sequence of notes. Teletype makes sequencers interesting because you don’t need to follow a strict design– you can decide how the steps are recorded, played, looped, etc. But you can use patterns for various other purposes– times, custom scales, etc– they’re just numbers. It’s up to us as composer-performer-programmers to come up with a way to make numbers sound like music.
That last point of that earlier list is important. When you edit patterns and then save the scene, everything about the pattern will be stored alongside the scene scripts. So if you compose a melody using a pattern, it will be there when you next load the scene.
P 3
This reads index 3 of a pattern. Which pattern? We specify the “working” pattern with:
P.N 0
Here we set the working pattern to 0. There are four patterns, so this value can be 0-3. Let’s store the number 10 to index 0:
P 0 10
Notice that we’ve just passed two arguments to the P operator to do a write. We “read” with just one argument:
CV 1 N P 0
Here we read index 0 of the working pattern, look up the note value, and assign that to CV output 1. You can check the working pattern by simply reading P.N.
If you want full random-access to pattern information and don’t want to have to worry about the working pattern, use:
PN 2 4 100
PN 0 0
The first line writes 100 to pattern 2, index 4. The second line reads pattern 0, index 0.
Assistance for your list management
There are some operators that can do some smart tricks for you (well, “smart” for mid-last-century, but still cool). These operators do different things to the working pattern:
P.N 0
P.INS 0 5
Here we explicitly set our working pattern to 0, then insert the number 5 at index 0. This is different than simply writing the number 5 to index 0, as first all pattern data is shifted back. For example, if the pattern 0 is:
3, 4, 8, 0…
And then we P.INS 0 5 the pattern will become:
5, 3, 4, 8, 0…
We have a similar operator for removing a number, where the latter numbers are brought forward:
P.RM 1
This removes the number at index 1 (the number 3) which will result in:
5, 4, 8, 0…
Note that we do not need to constantly re-specify P.N 0 for the working pattern– we set it once and then it will be remembered.
P.INS and P.RM do another helpful function– keep track of the length of the pattern. A pattern can be up to 64 elements long, but often we’ll only want to use a fraction of this amount.
P.L reads and sets the length. Upon initialization each pattern has a length of zero. Changing numbers with P or PN does not affect the length. P.INS however increases the length by 1. P.RM subtracts 1 from the length.
Why do we care about the length? It’s a helpful way of keeping track of what data in the pattern is being used, and what is either blank or garbage. P.L gives you a way to keep track of what we’re doing, and gives us some other ways to add and remove numbers:
P.PUSH 11
This will put the number 11 at the end of the pattern, and increase length by 1. So if we were continuing on with the pattern above (assuming P.L is 4), we’d have:
5, 4, 8, 0, 11…
The compliment to push is pop:
P.POP
This returns last element of the pattern and shortens the length by 1. So in this case, we’d get the number 11.
Read head antics
Using the working pattern and its length attribute we have a series of operators to facilitate creative reading:
P.I
This is the read head for the working pattern. Each pattern stores its own read position independently. You can read and write this position:
P.I 2
This command moves the read head to index 2.
P.HERE
The number at the read head is returned. (In this case, index 2, which was the number 8 in our pattern above). We can also write the the read head position:
P.HERE 0
This would set the number at the read head to zero.
THIS → P.I is the index (position) of the read head, while P.HERE is the number at the index.
P.NEXT
This adds 1 to the play head and returns the number at that position. So if we had:
2, 5, 8, 1, 7…
P.L 5
P.I 3
CV 1 N P.NEXT
The length is 5 and play head set to 3. The last line advances the play head to 4 and returns the number there, which would be 7 (we then convert it to a note value and send it to CV output 1).
What happens if we call P.NEXT again, but we’re at the end of the list?
P.WRAP determines if we wrap to the start/end: 1 = yes, 0 = no. Each pattern has its own wrap attribute. So if wrap is on, P.NEXT will move the read head to zero and the first number of the pattern will be returned. If wrap is off, the play head will not advance, but you’ll still get the final number returned. To turn on wrap:
P.WRAP 1
We can also play backwards in the pattern with P.PREV. Like P.NEXT it will respect the length and wrap of a pattern.
P.PREV
There are two other attributes for pattern playback– start and end. These are useful for sub-looping inside the length of a pattern. They govern the behavior of P.NEXT and P.PREV. Say for example:
2, 5, 8, 1, 7…
P.L 5
P.WRAP 1
P.START 1
P.END 3
If we call P.PREV repetetively, we’ll get:
5 → 1 → 8 → 5 → 1 → 8 → 5 → 1 → 8 …
This is how we make weird sequencers. Complete, algorithmic control over all of the playback and data manipulation of big lists of numbers.
Show me something
There’s been a lot of imagining so far of what these lists look like. I have something to show you. Hit the NUM LOCK key, beside F10. (You can also switch between screens by pressing the TAB key, below 1.)
Why hello, you’re now in TRACKER mode.
We could’ve called this spreadsheet mode, but back in the day we all agreed that musical spreadsheets would be called trackers. They are a fascinating way to create music– I grew up with Scream Tracker on an old DOS machine, though the very-modern Renoise is alive and well.
Teletype’s tracker only slightly resembles these heavily-featured software packages, though. It excels (pun) at giving an interface for rapid viewing and editing of pattern data.
Navigation
The left column shows the index number. A scrollbar indicates your relative position in the editor. The highlighted number is your current edit position.
- ARROWS move the edit position.
- ALT-LEFT and ALT-RIGHT jump to the top and bottom.
- ALT-UP and ALT-DOWN jump up and down one page at a time.
Editing
- DIGITS typed in will modify the value.
- BACKSPACE remove rightmost digit.
- - flip sign.
- Brackets [ and ] nudge the value down or up by 1.
-
SPACE toggle non-zero to zero, or zero to one.
- ENTER (if editing position one past length) will increment length and edit position.
- SHIFT-ENTER duplicate value at current position and shift pattern forward.
-
SHIFT-BACKSPACE erases a value, sets it to 0.
- ALT-X, ALT-C, ALT-V all work as cut-copy-paste.
- SHIFT-ALT-V insert-pastes a number, shifting data and length forward.
Param knob live input:
- CTRL+ALT will overwrite the current position with the knob value scaled 0-31 (useful for scrolling in note data).
- CTRL+SHIFT will overwrite the current position with the knob value scaled 0-1023 (useful for scrolling in voltage data).
Attributes
- SHIFT-L set LENGTH of current pattern to position
- SHIFT-S set loop START of current pattern to position
-
SHIFT-E set loop END of current pattern to position
- ALT-L jump to LENGTH of current pattern
- ALT-S jump to loop START of current pattern
- ALT-E jump to loop END of current pattern
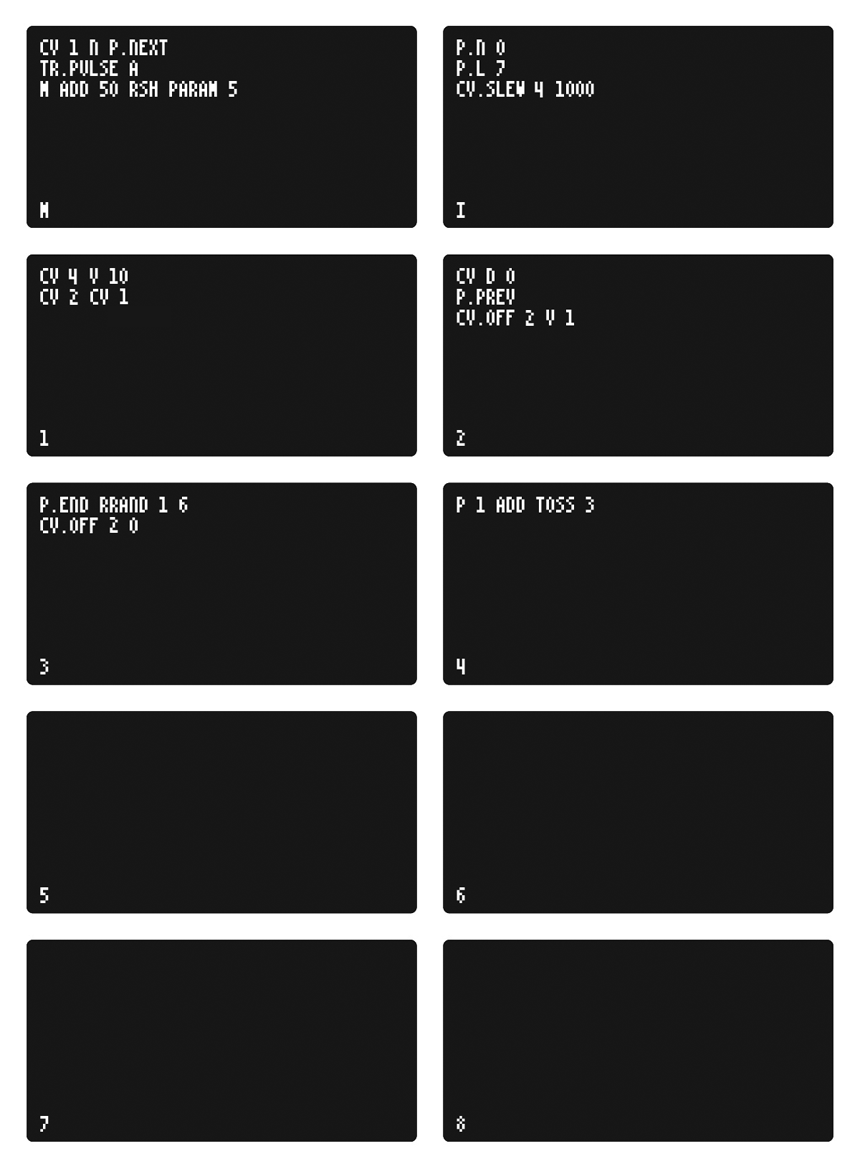
EXAMPLE: DOLPHIN AND SEAGULL
This scene is featured in the banner video above.
A single pattern is used as musical content. For the video we had this:
0, 4, 9, 10, 12, 15 19
The metronome speed is controlled by the param knob, recalculated each time the metro script is executed. On each metro tick, we advance the pattern play head and set CV output 1. Trigger output 1 is pulsed.
- CV out 1: frequency of oscillator 1
- CV out 2: frequency of oscillator 2
- CV out 4: output level of oscillator 2
- Trigger out 1: output level of oscillator 1
CV 4 is initialized with a long slew.
If let run freely, the pattern will simply loop. Trigger inputs 1-4 for the following actions:
- Ramp up CV 4 (level) and assign CV 2 to the current value of CV 1. This is basically a sample and hold.
- Ramp down CV 4 and flip the octave of CV 2 up. Also interrupt the pattern playback by interjecting a P.PREV. It has a musical stalling/repeat effect.
- Randomize the loop end of pattern playback. Set the octave of CV 2 back to normal.
- Directly edit the pattern data, toggling between major and minor (3 or 4) on the second step.
In the video Teletype is being driven by an unsynchronized White Whale. This way the script triggers phase with the playback speed of the pattern– the result being the sample and hold between the two voices constantly shifts which tone is being copied to the second voice. The steps of sequence on the White Whale are in “choose” mode: one of several choices is made per step, so the action Teletype takes is variable per looped WW bar, yet regular enough to stay musical.
Reference
Commands
P x             read working pattern index x
P x y           write y to working pattern index x
P.N             read working pattern
P.N x           set working pattern to x (0-3)
PN x y          read pattern x index y
PN x y z        write z to pattern x index y

P.INS x y       insert y at index x of working pattern, increase length
P.RM x          remove element at index x of working pattern, reduce length
P.L             read working pattern length
P.L x           set working pattern length to x
P.PUSH x        add x to end of working pattern, increase length
P.POP           remove and return last element of working pattern, decrease length

P.I             read working pattern index (read head)
P.I x           set index for working pattern
P.HERE          read value at current index of working pattern
P.HERE x        write x to current index of working pattern
P.NEXT          advance index of working pattern and return value
P.PREV          rewind index of working pattern and return value

P.WRAP x        specify wrapping behavior for working pattern (1 = wrap, 0 = do not wrap)
P.START x       set loop start to x for working pattern
P.END x         set loop end to x for working pattern
You can also browse help within Teletype by using ALT-H to toggle help mode.
Teletype Studies Continued
Part 6: Maybe later remembering →
Part 5: Pattern tracking
Part 4: Collect and transform ←
Part 3: Playing with numbers ←
Part 2: Curves and repetition ←
Part 1: Navigating and making edges ←