Grid Studies: Arduino
Arduino is an open-source electronics platform based on easy-to-use hardware and software. It is intended for anyone making interactive projects.
We’ll be using the Ardunio’s USB Host capabilities to run grid code without a computer, with easy access to physical hardware: sensors, motors, other actuators, wireless bits, everything.
Prerequisites
If you’re very new to Arduino, it will be very beneficial to work through the ‘Getting Started’ section at Arduino.cc: https://arduino.cc/en/Guide/HomePage
Be sure you have Arduino version 1.6.0 or later. It is required.
Download Arduino: arduino.cc
Download the monome installer: /docs/serialosc/setup
Download the code examples here: files/grid-studies-arduino.zip
Hardware
There are innumerable versions of the Arduino hardware.
Ardunio Due required. Other variants will not work. You can get them at the Arduino Store and at various distributors.
To gain access to the USB Host capabilities, you need a strange USB cable– micro OTG to Female A. See Digikey 839-1105-ND.
Grids also require a substantial amount of power to light so many LEDs– more power than an Arduino can supply. The solution to this is to power the grid externally. We’ve made a small adapter that does this, called ext5v. You can get one at market.monome.org.
The kit includes the needed OTG-A cable and a very short USB cable to make this entire setup very tidy, as seen below.
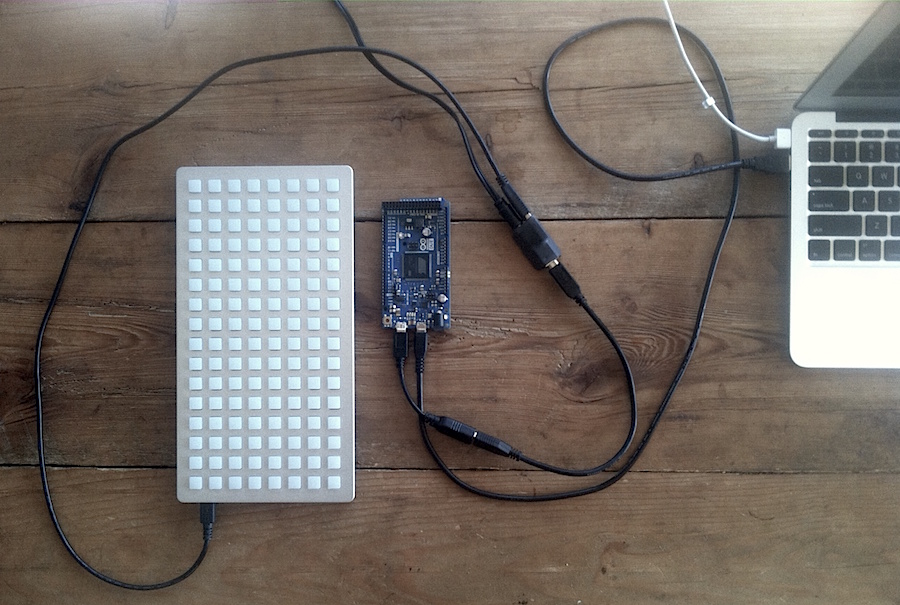
It is incredibly important to power the small adapter with 5V and nothing else. You can fry all sorts of things otherwise. The 5V DC supply is included in the kit (not shown in the photo).
Setup
Download the MonomeHost library:
github.com/monome/MonomeHost/releases/latest
Unzip the file. Launch the Arduino software.
Go to Sketch > Import Library > Add Library...
Navigate to the unzipped folder of the MonomeHost library. It will be installed.
Finally, you’ll need to select your Board and Port settings to specify the connected Arduino Due. See the screenshots below.
–
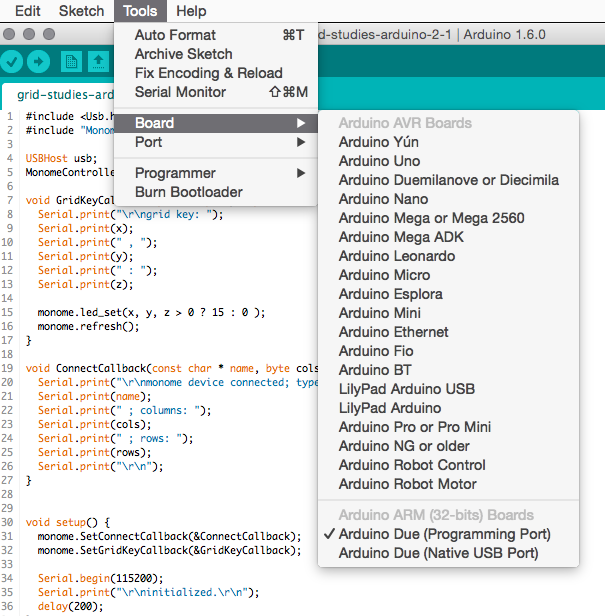
–
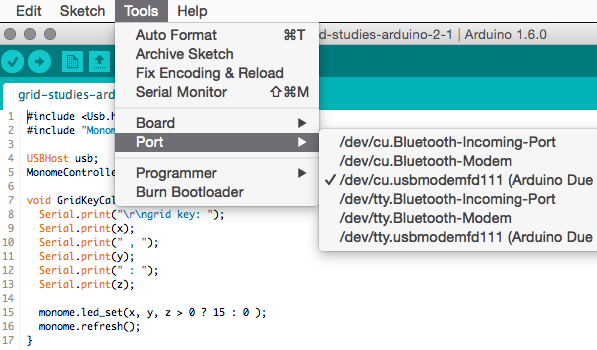
–
We’re ready to go.
1. Connect
See grid-studies-1.ino for this section.
The MonomeHost library facilitates easy connection and communication with grids. First, two headers must be included, and then we initialize our grid:
#include <Usb.h>
#include "MonomeController.h"

USBHost usb;
MonomeController monome(usb);
Next the setup() function is run, as is usual with Arduino:
void setup() {
  monome.SetConnectCallback(&ConnectCallback);

  Serial.begin(115200);
  Serial.print("\r\ninitialized.\r\n");
  delay(200);
}
Here SetConnectCallback() assigns a function which will be called upon successful connection to a grid device.
After this, we set up the serial debug port and print something (to let us know we’re getting started when the sketch runs.)
Here is the function we assigned to be called upon device connection:
void ConnectCallback(const char * name, byte cols, byte rows) {
  Serial.print("\r\nmonome device connected; type: ");
  Serial.print(name);
  Serial.print(" ; columns: ");
  Serial.print(cols);
  Serial.print(" ; rows: ");
  Serial.print(rows);
  Serial.print("\r\n");
}
It prints out a bunch of device parameters, so you know it’s connected.
And finally the main loop:
void loop() {
  usb.Task();
}
That’s it! Compile and upload the sketch. To actually see something happen, run the Serial Monitor which is in the Tools menu. Set the baud rate to 115200 as shown:
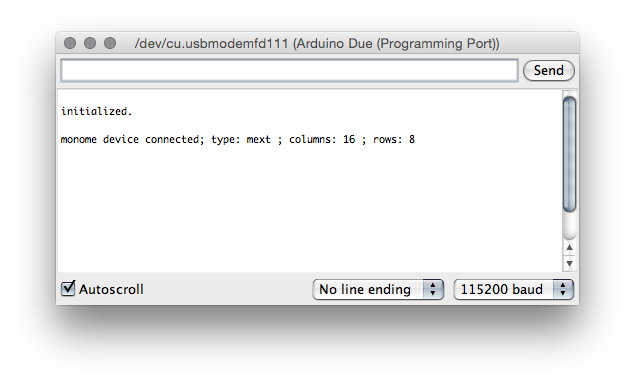
You should see something similar get printed. Try resetting the hardware with the button near the USB ports on the Arduino.
2. Basics
See grid-studies-2.ino for this section.
2.1 Key input
Within setup() we assign a function to handle key presses, similar to how we handle connection events:
monome.SetGridKeyCallback(&GridKeyCallback);
And then the function itself:
void GridKeyCallback(byte x, byte y, byte z) {
  Serial.print("\r\ngrid key: ");
  Serial.print(x);
  Serial.print(" , ");
  Serial.print(y);
  Serial.print(" : ");
  Serial.print(z);
Grid input has three parameters:
x : horizontal position (0-15)
y : vertical position (0-7)
z : state (1 = key down, 0 = key up)
Right now we’re just printing this data out to the serial monitor. We will, of course, do more interesting things with this function in the future.
2.2 LED output
We change the state of an LED by using the function:
monome.led_set(x, y, z);
This changes the LED at position (x,y) to state z, where z is 0 to 15. 0 is off 15 is full brightness, with 14 dimmed levels in between.
The grid is not physically refreshed until you explicitly call:
monome.refresh();
This way you can assemble a full grid update and refresh synchronously.
In our first example, we simply turn on LEDs according to key-downs, inside the GridKeyCallback() function:
monome.led_set(x, y, z * 15);
monome.refresh();
Since z from the key input is 0 or 1, we multiply by 15 to get off and full brightness in the same position.
3. Further
Now we’ll show how basic grid applications are developed by creating a step sequencer. We will add features incrementally:
- Use the top six rows as toggles.
- Generate a clock pulse to advance the playhead from left to right, one column at a time. Wrap back to 0 at the end.
- Display the play head on “position” (last) row.
- Indicate the “activity” row (second to last) with a low brightness.
- Trigger an event when the playhead reads an “on” toggle. Our “event” will be to turn on the corresponding LED in the “activity” row.
- Jump to playback position when key pressed in the position row.
- Adjust playback loop with two-key gesture in position row.
3.1 Toggles
See grid-studies-3-1.ino for this step.
First we’ll create a new array called step that can hold 6 rows worth of step data. On key input we’ll look for key-down events in the top six rows:
// toggle steps
if(z == 1 && y < 6) {
	step[y][x] ^= 1;
	dirty = true;
}
If this condition is true, we toggle the corresponding position in the step data. Notice the addition of the dirty flag.
Inside loop() we check this flag. If true, it means we need to refresh the grid display.
if(dirty) {
	redraw();
	monome.refresh();
	dirty = false;
}
We will “build” the LED display from scratch each time, inside of redraw(). Below we simply copy the step data to the led array, doing the proper multiplication by 11 in order to get almost-full brightness:
void redraw() {
	monome.led_clear();
	for(int y=0;y<6;y++)
		for(int x=0;x<16;x++)
			monome.led_set(x,y,step[y][x] * 11);
}
First led_clear() completely clears the grid, and then we iterate through the array, copying step data to the grid.
After leaving redraw() we do monome.refresh() and then unset dirty.
That’ll get us started.
3.2 Play
See grid-studies-3-2.ino for this step.
Now we need a clock. We’ll make a quick (read: slightly sloppy) clock using millis(). First a few variables:
unsigned long t = millis();
unsigned long interval = 200;
And then inside loop():
if(millis() - t > interval) {
	t = millis();
	next();
}
Each time this is called, the current time is compared to the last recorded t to see if it has reached interval. If so, we reset t to the current time and call next(), which will process the next sequence step.
You can change the speed by altering the value of interval. The value is roughly the number of milliseconds in between steps– so smaller values will make the sequencer go faster.
Inside next() we update play_position:
void next() {
  if(play_position == 15)
      play_position = 0;
  else
      play_position++;

  dirty = true;
}
This simply increments the position and wraps back to 0 once it hits the end. We set the dirty flag, as we want to redraw a play head on the grid. Shown is the updated redraw():
byte highlight;
for(byte x=0;x<16;x++) {
	if(x == play_position)
		highlight = 4;
	else
		highlight = 0;

	for(byte y=0;y<6;y++)
 		monome.led_set(x,y,step[y][x] * 11 + highlight);
}
During this loop which copies steps to the grid, we check if we’re updating a column that is the play position. If so, we increase the highlight value. By adding this value during the copy we’ll get a nice effect of an overlaid translucent bar.
3.3 Triggers
See grid-studies-3-3.ino for this step.
When the playhead advances to a new row we want something to happen which corresponds to the toggled-on rows. We’ll do two things: we’ll show separate visual feedback on the grid in the second-to-last (trigger) row, and we’ll call a trigger() function that will send serial.
Drawing the trigger row happens entirely in the redraw():
// draw trigger row and on-triggers
for(byte x=0;x<16;x++)
	monome.led_set(x,6,4);
for(byte y=0;y<6;y++)
	if(step[y][play_position] == 1)
		monome.led_set(y,6,15);
First we create a dim row (level 4 is fairly dim). Then we search through the step array at the current play position, showing a bright indicator for each on state. This displays a sort of horizontal correlation of rows (or “channels”) 1-6 current state.
For sending serial, we create a function trigger() which gets passed values of activated steps. This is what we do, inside next() right after we change `play_position’:
// TRIGGER SOMETHING
for(int y=0;y<6;y++)
	if(step[y][play_position] == 1)
		trigger(y);
And then trigger() itself:
void trigger(byte i) {
	Serial.print(i);
}
You’ll need to open Serial Monitor to see this. Compelling, yes! But this code is easily replaced with digital IO, sending MIDI, revving a motor, shooting a canon, etc.
3.4 Cutting
See grid-studies-3-4.ino for this step.
We will now use the bottom row to dynamically cut the playback position. First let’s add a position display to the last row, which will be inside redraw():
// draw playback position
monome.led_set(play_position,7,15);
Now we look for key presses in the last row, in the GridKeyCallback() function:
// toggle steps
if(z == 1 && y < 6) {
	step[y][x] ^= 1;
	dirty = true;
}
// cut
else if(y == 7) {
	if(z == 1)
		cutting = true;
		next_position = x;
	}
}
We’ve added two variables, cutting and next_position. Check out the changed code inside next() where we advance the play head:
if(cutting)
	play_position = next_position;
else if(play_position == 15)
	play_position = 0;
else
	play_position++;

cutting = false;
Now, when pressing keys on the bottom row it will cue the next position to be played. Note that we set cutting = false after each cycle so that each press only affects the timer once.
3.5 Loop
Lastly, we’ll implement setting the loop start and end points with a two-press gesture: pressing and holding the start point, and pressing an end point while still holding the first key. We’ll need to add a variable to count keys held, one to track the last key pressed, and variables to store the loop positions.
byte keys_held, key_last;
byte loop_start, loop_end = 15;
We set loop_end by default to the maximum length (15).
We count keys held on the bottom row thusly:
keys_held = keys_held + (z*2) - 1;
By multiplying z by 2 and then subtracting one, we add one on a key down and subtract one on a key up.
We’ll then use the keys_held counter to do different actions:
// cut and loop
else if(y == 7) {
	// track number of keys held
	keys_held = keys_held + (z*2) - 1;

	// cut
	if(z == 1 && keys_held == 1) {
		cutting = true;
		next_position = x;
		key_last = x;
	}
	// set loop points
	else if(z == 1 && keys_held == 2) {
		loop_start = key_last;
		loop_end = x;
	}
}
We then modify the position change code in next():
if(cutting)
	play_position = next_position;
else if(play_position == 15)
	play_position = 0;
else if(play_position == loop_end)
	play_position = loop_start;
else
	play_position++;
Done!
Closing
Suggested Exercises
- “Record” keypresses in the “trigger” row to the toggle matrix.
- Display the loop range on the bottom row of the grid.
- Use the rightmost key in the “trigger” row as an “alt” key.
- If “alt” is held while pressing a toggle, clear the entire row.
- If “alt” is held while pressing the play row, reverse the direction of play.
Credits
Arduino was founded by Massimo Banzi, David Cuartielles, Tom Igoe, Gianluca Martino, and David Mellis. Arduino.
MonomeHost was written by and is maintained by Ezra Buchla.
This tutorial was created by Brian Crabtree for monome.org.
Contributions welcome. Submit a pull request to github.com/monome/docs or e-mail help@monome.org.