Terms
Terms: Sum pulled apart. A collection of essential monome applications, synchronized and integrated within Ableton Live Suite (works with Live 11 / Live 10 / Live 9).
Terms is a collection of Max for Live Devices working together to create a complete performance system within Ableton Live. Each device implements a monome application, incorporating a unified interface within Ableton Live. These apps are simplified for easy exploration with enhanced visual feedback for vari-bright grids.
Expanded versions, and other Max for Live adaptations of grid-focused apps are available from community member elquinto’s github.
Installation
Terms is delivered as an Ableton Live Pack, hosted on the monome Github page:
- Download the Latest Release of Terms from github.
- Open the TermsbyMonome_vx.x.x.alp to install.
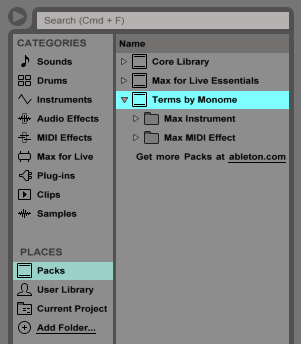
This will add the Devices into your User Library under the Places category inside of Packs. You’ll find the Terms by Monome here where you can instantiate all of the different devices.
Getting Started
Now that the Devices have been added to your User Library they can be easily instantiated in Ableton via the Device Browser as pictured below. Drag your desired Device onto a track and the application will automatically grab control of a connected monome grid.
If the grid isn’t instantly focussed on the Device, select your grid from the dropdown at the top of the Device.
Devices
There are eight included Devices in the Terms bundle. Five of these are designed exclusively for interacting with a monome grid, whereas the remainder add a few very useful musical utilities, plus a rich yet simple synthesizer.
Flin
A cyclic poly-rhythm music box, where each column represents a voice. Notes are arranged left (lowest), to right (highest). The vertical dimension represents time, where top is fastest and bottom slowest.

Make sure the Transport is running in Live, otherwise no response will be seen on the grid
- Press a key to start cycling a note.
- Push the bottom row to mute that note.
- Cycle rate is set by the vertical location of the key press. Faster notes toward the top.
- Duration can be changed by holding a press and pressing elsewhere in the column. The second press sets duration, longer toward the bottom.
Set the overall speed range of Flin with the rhythm dropdown. 1/16 will provide standard speed, while 1/32 will double the rate, and 1/8 will half it.
Pitch & Scaling

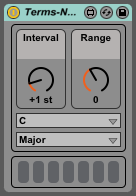
All of the note generating Devices in Terms have a unified Pitch & Scaling section allowing for rapid tuning and automation of note choices per device.
- Two drop downs at bottom select the musical key and scale.
- Interval sets the musical interval between adjacent notes. Larger values spread notes out, while smaller values approach chromatic separation.
- Range sets the harmonic range of output notes from baritone to soprano.
To the right of the Scaling options a narrow display shows the currently output notes as horizontal lines. This display is calibrated to match Ableton’s Drum Rack note display in order to visualize the range of notes currently being output.
The Pitch & Scaling section is broken out into the Notes Device. See below for details.
nb: When attempting to trigger a Drum Rack use the Chromatic scale in C, with Interval set to 1 and Range set to 0.
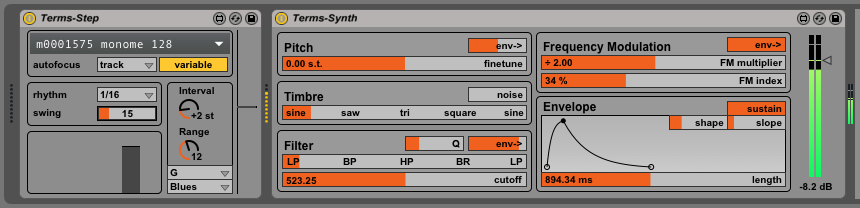
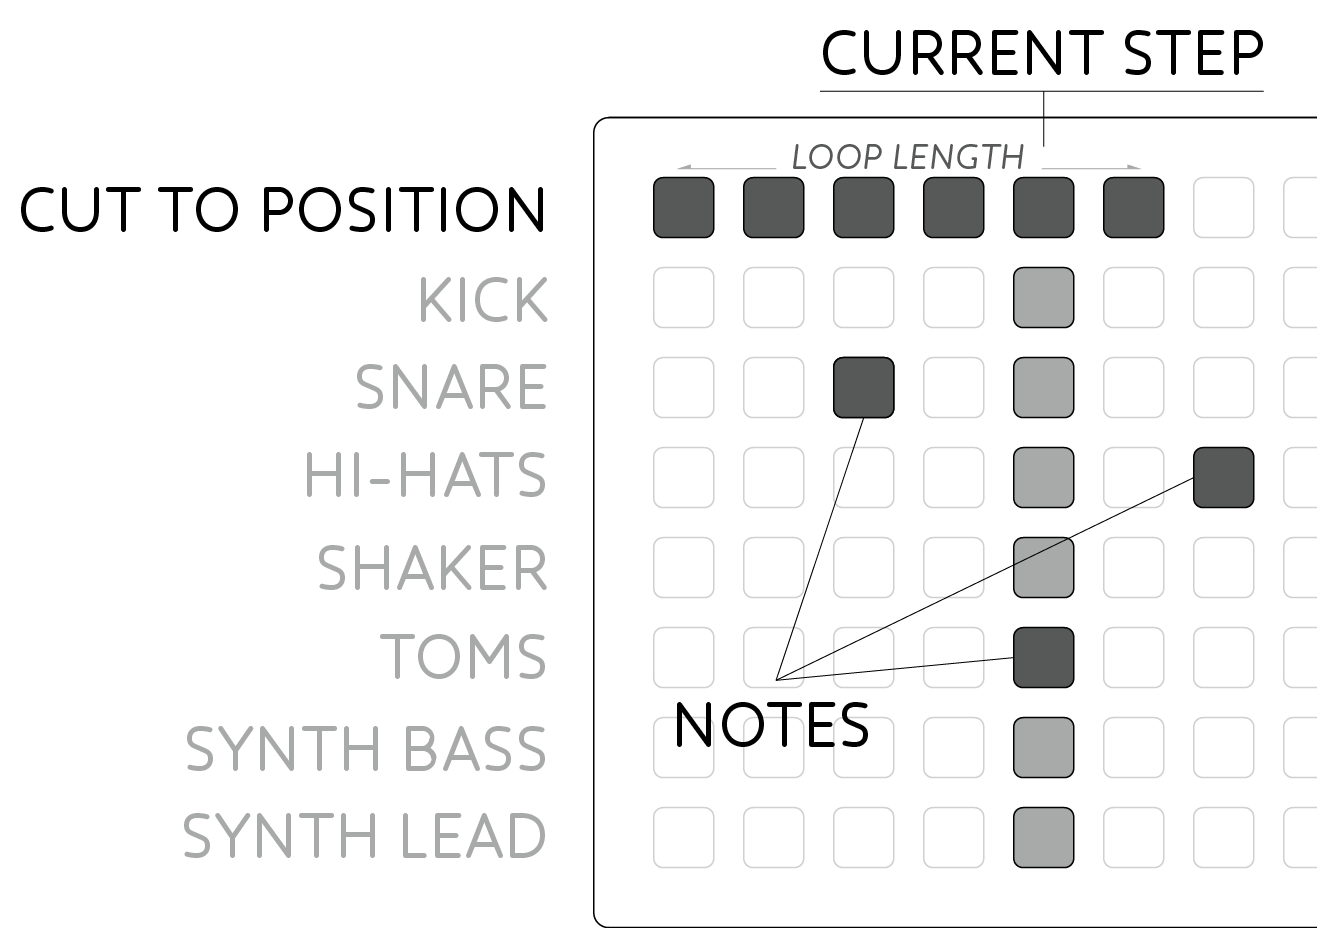
Step
A simple step sequencer for triggering drum sounds or melodies.
Make sure the Transport is running in Live, otherwise no response will be seen on the grid
- Enter triggers with key presses. Notes will light when active.
- Top row shows the current playhead.
- Press keys in the top row to jump to a new playback position.
- Set a playback loop by holding the new playback position, and pressing another top-row key to set the end position.
Step includes the same Rhythm setting as Flin which can be used to change the rate of the step sequencer. The sequencer will restart whenever Live’s transport is reset to the start.
Step includes the same Pitch & Scaling options as Flin. Use the Chromatic scale mode to trigger sounds in a drum rack, or automate the Pitch and Interval controls for shifting melodic patterns.
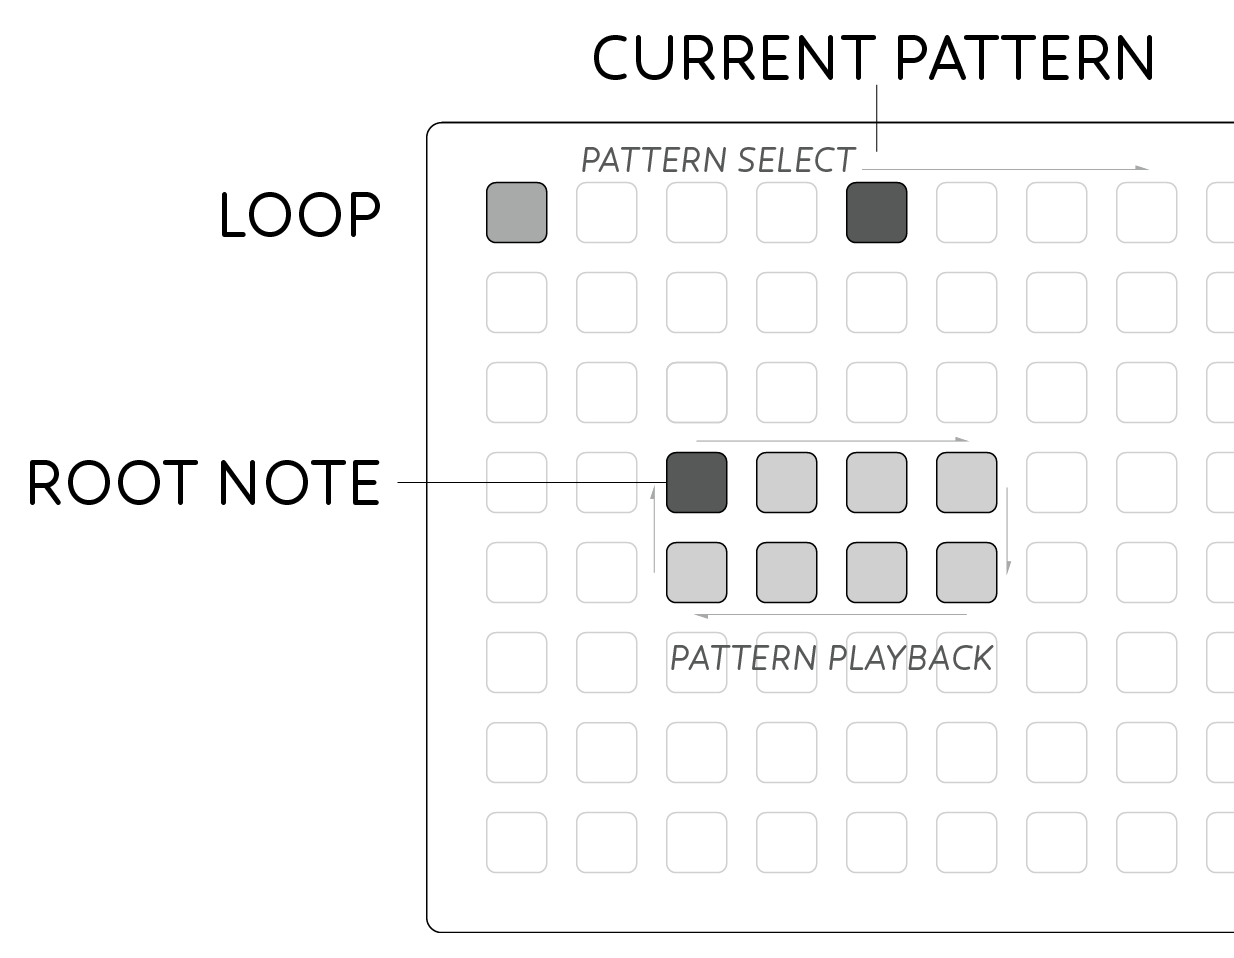
Polygomé
A dynamic pattern instrument, creating automatic melodies & arpeggiations. The grid maps pitches increasing from top-left to bottom-right.
Make sure the Transport is running in Live, otherwise no response will be seen on the grid
- Hold keys to play the current pattern starting from the given root note.
- Pitches are arranged with diatonic scales horizontally and fourths vertically.
- Multiple notes can be played simultaneously by holding multiple keys.
- The current playback pattern is selected in the top-row.
- ‘Loop’ mode is toggled with the top-left key for sustained arpeggios.
The Rhythm settings are carried over from Flin in addition to the goméizer which allows the arpeggiation sequences to be modified. Select from the preset options that appear, and hit GO! to hear how the pattern is changed. The individual sliders and toggles can be set by hand if you want more specific control over how the patterns are created.
Polygomé includes the same Pitch & Scaling options as Flin above. Changing the Interval setting will radically reconfigure the layout of notes on the grid.
Goméizer
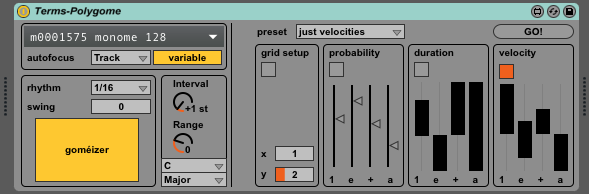
While Polygomé comes with a bank of patterns immediately accessible on load, it’s also possible to create modified patterns of your own using the Goméizer. This is a randomization engine which is applied in a rhythmic context.
There are four sections that can be randomized either separately or in any combination. The toggle boxes in each section select whether or not to apply the transform to the respective element of the pattern. Turn on the desired sections and then press GO! to apply the randomization.
Grid Setup controls how many steps the pattern will take in any direction on the grid. Generally the lowest values of 1 and 2 are recommended for melodic patterns, while higher numbers will make more abstract arpeggiations of notes. The chosen numbers select the maximum value for the randomization to take on.
The remaining three sections are applied in a rhythmic manner. Separate values for the four sub-divisions of each beat can be entered. Each pattern is 8 steps long, so the input values are repeated for the second half of the pattern.
Probability controls the likelihood that a note will be heard. Setting the values to maximum mean there will always be a note on that subdivision, while minimum means there will never be a note. In between values set the chance which is executed each time the user hits GO!.
Duration sets the length of each note. The sliders can be given a specific value, or a range of values to randomly choose from each time the Goméizer is executed. Maximum length is one whole beat, while minimum time is a very short staccato note.
Velocity sets the velocity of the resulting MIDI notes. Again, these values can be set with a range for variable velocity each time. Generally these values will set the volume of the resulting output, though make certain your synthesizer will respond to changing velocity settings.
Press Cafe
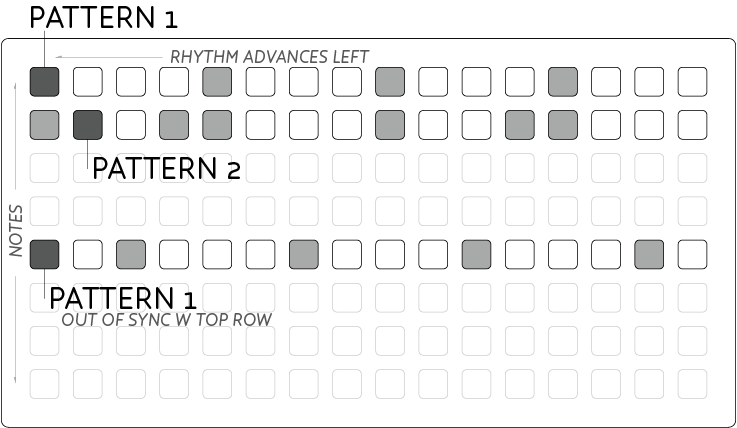
A pattern performance instrument for polyrhythmic sequences. Notes are arranged vertically, while rhythms are arranged horizontally. Press different keys in the same row to play the same note with different patterns.
Make sure the Transport is running in Live, otherwise no response will be seen on the grid
- Press and hold a key in a given row to start the rhythm. Release to stop.
- Hold multiple rows for interlocking patterns.
Rhythm and Swing settings are provided to fine tune the rhythmic patterns.
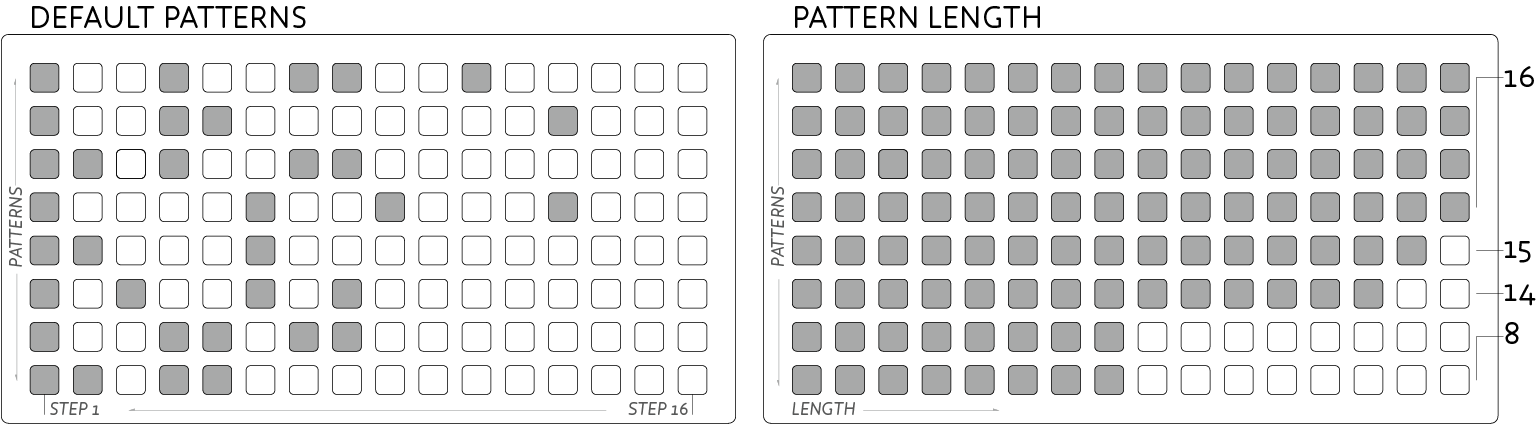
The default mode is Play mode, while Edit and Length modes allow you to change the rhythmic patterns, and loop lengths of the first 8 patterns. In these modes the patterns of the first 8 keys in a row are represented vertically descending. Length settings other than 16 will allow for polyrhythms to occur when holding more than one row.
The Pitch & Scaling settings from Flin are again repeated here.
Launchd
A simple clip launcher for navigating Live sets and having hands-on control of your sounds. This is a MIDI Effect device designed to be placed on a dedicated audio track for global control of your Live Set.
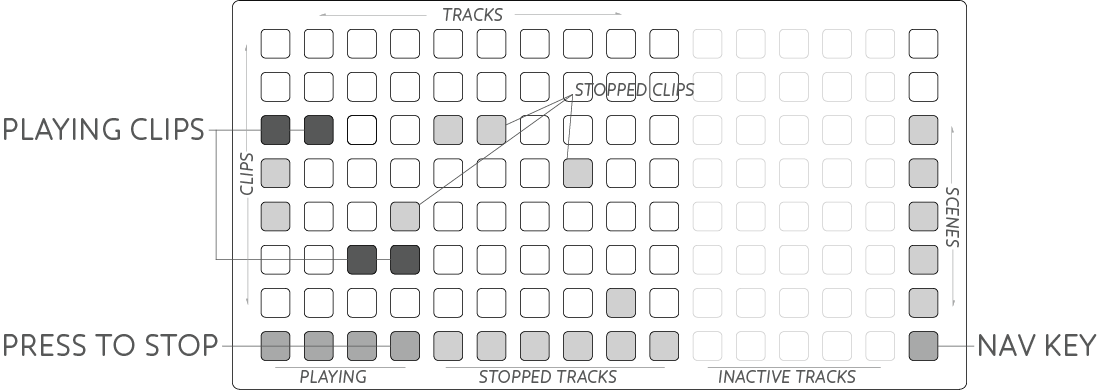
The bottom row and far right column are reserved for special functions. The remainder of the grid is a physical Session View for launching clips:
- Loaded clips are displayed with mid-brightness leds.
- Play a clip by pressing an available clip.
- When launching a clip it will flash until it begins playing when it will brighten.
- Retrigger clips by pressing them again as you would in Session view.
- If a track is armed for recording, pressing an empty slot will begin recording.
The bottom row provides a track stop key for each track in the order they’re displayed in your Live set:
- All existing tracks will dimly light their bottom key.
- Any track with a currently playing clip will have a brightly lit key.
- Press this lit key to stop the currently playing clip.
The far right row gives access to Scenes:
- Keys will light when there are clips in the respective Scene.
- Pressing this key will cue all the clips in the Scene.
The bottom-right key is a special nav (read: navigation) key for moving through the Live Set:
- Press and hold the nav key
- The two keys immediately above will dimly light.
- While still holding, press the lower of the two buttons to move down through the Scenes.
- Alternatively press the higher of the two lit keys to move back upward through the set.
Terms Synth
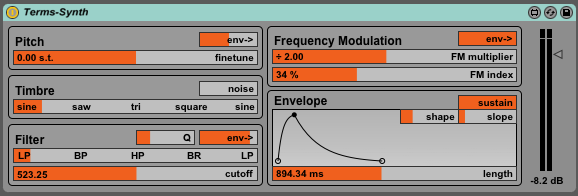
Terms includes a simple, yet flexible synthesis engine for rapid sound design. To create such a broad palette of sounds the synth uses both FM & subtractive synthesis approaches, plus an Attack-Decay envelope to control volume, with additional modulation routing options.
Pitch allows the tuning of the synth to be finetuned to match with samples or live instruments. The small env slider modulates the pitch with the envelope in either positive or negative direction, according to the slider.
Timbre fades smoothly between different oscillator waveforms allowing for smooth control over harmonic content. Noise can be mixed in with the oscillator, which is particularly useful for percussion sounds.
The oscillator is processed by the Filter for sculpting the sonic response. Cutoff shifts the point at which the filter begins to take action. Q adds resonance, or emphasis, around the cutoff frequency. Env allows the Cutoff control to be modulated by the envelope.
The last Filter slider allows the response of the filter to be faded between many different responses. At either end is the classic Lowpass response, with the less common Bandpass, Highpass, and Band Reject (Notch) responses in between. Mixing smoothly between these responses allows subtle shifts between the standard responses.
Frequency Modulation controls a second, slave oscillator, for frequency modulating the main oscillator. FM multiplier sets the harmonic relationship between the oscillators, where higher multiples add upper harmonics to the sound, where lower settings add low frequencies and sub-octave tones. FM Index controls how much modulation should be applied to the main oscillator. Env allows the FM Index to be modulated according to the envelope.
Envelope is a slow changing modulation triggered each time a note is received. The output volume of the synth is always controlled by envelope. Length controls the duration of the modulation. The envelope contains attack and decay sections where Shape alters the linearity of these slopes - lower settings for softer attacks, higher settings for smoother tails. Slope shifts the amount of time spent in attack versus decay - lower settings for quick percussive attacks, higher settings for swelling synth tones.
With the Sustain switch turned off, any received note will play through the entire Envelope. Alternately switching Sustain on, creates an ‘Attack-Decay-Release’ envelope shape, where a held note will stop at the top of the envelope until the note is released when it will return to zero. Similarly, very short notes will shift directly into the Release stage when a note is released even if the Attack phase isn’t finished.
Note: With Sustain switched off, the Synth will not respond to changing note lengths.
Finally a Volume fader is provided for setting the gain of the synth as it has a very wide dynamic range.
Notes
Notes breaks out the Pitch & Scaling section of the grid-oriented Devices above. It can be used with sequencers, arpeggiators, or live MIDI performances, locking your performance to the selected key. In particular the Interval and Range controls can be modulated via MIDI CC or automation all while staying in your selected key.
The display at the bottom of the Device shows which scale tone is currently being played, allowing one to orient themselves for playing in modes of the given key.
With the Interval setting at +1st or lower, some adjacent notes may play the same tone. This is to allow wider ranging note sequences to be compressed to a very narrow set of possible tones. General use cases will likely work best with values of +1 and higher.
Note: If using with Ableton Push or other device with integrated ‘scale’ settings, make sure to set it to Chromatic mode in order to be able to play all notes in the scale.
Time
Make sure the Transport is running in Live, otherwise no notes will be passed through the Device.
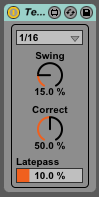
Time is a live rhythmic quantizer with continuously variable Swing and Correction amount. When performing live MIDI performances alongside the grid-based Devices in Terms it became apparent that some method to synchronize a performance would greatly aid in rhythmic clarity.
Set the time Division with the top dropdown selector. This control sets the rhythmic sub-divisions to be quantized toward. Additionally this value sets the kind of swing that will be applied.
Swing determines the amount of tempo swing to apply to the rhythmic quantization. A setting of 0% applies zero swing giving a very straight rhythmic output. Values between 5 and 15% are great to add a little movement to the groove without feeling like swing. 33% provides a soft swing, great for fast tempos, while 50% provides traditional triplet swing. Pushing this value to the maximum 75% gives semi-quaver swing for extreme situations.
Correct defines how much quantization should occur to the rhythms performed into Time. 0% causes almost no change to your performance, while 100% causes notes to be clamped right to the beat. The in-between settings are particularly useful, anywhere from 30 to 75%, where a natural performance can still be felt but massaged to align closer to the groove. Higher values are great to give a drum-machine style feel, even when performing live.
Latepass is the final piece of the puzzle, allowing the performer to play on-the-beat rather than having to anticipate to keep everything in place. 5 - 10% is a good starting place, where notes that are played slightly late will sound immediately, rather than being delayed to the next beat. Pushing this value too high may result in the groove dragging so try and keep it as low as feels comfortable missing beats.
Auto-Focus
All Terms Devices, except Synth, require the use of a monome grid. To streamline the workflow, the Devices will automatically focus on the first available grid device when added to your Live Set. Manually selecting a different grid will overwrite the default behaviour and your choice will be saved in the Live Set.
As there can be many grid-capable devices available in a single Live Set, the auto-focus technique is used to dynamically switch which application is currently displayed on the grid. The default behaviour is that focus will be grabbed whenever selecting the respective Track in the Live Set.
Auto-focus can be disabled from the dropdown, or can be set to Device mode where focus will only change when explicitly selecting the Terms Device inside a Track’s Device strip.
Credits
Terms was created by monome.org using Max 7 & Ableton Live 9.
This manual was created by Trent Gill for monome.org.
Contributions welcome. Submit a pull request to github.com/monome/terms or e-mail help@monome.org.